Creating Your First Project
- 1. Project Setup
- 2. Hello, World!
- 3. Data Structures & PostgreSQL
- 4. Apps, Controllers, Views
- 5. Extending the Blog
- 6. Adding Comments
- Have Fun!
1. Project Setup
This guide will lead you through creating a small blog application. To set up the project, open a terminal and type:
ihp-new blog
Note for Windows: Make sure that you are located in the Linux part of the filesystem and not on the Linux-mounted Windows filesystem, i.e. not on a path starting with /mnt/. Otherwise PostgreSQL will complain about the accessibility of the project’s PostgreSQL database.
The Very First Time
The first time you set up IHP, this command might take 10 - 15 minutes to install. Any further projects after that will be a lot faster because all the packages are already cached on your computer.
If you don’t already use cachix, you will be prompted to install it. You don’t need it, but it is highly recommended, as it reduces build time dramatically. Learn more about cachix here.
While the build is running, take a look at “What Is Nix” by Shopify to get a general understanding of how Nix works.
In case some errors appear now or in later steps:
- Check out the troubleshooting section to get a quick solution
- You can also join our very active Slack community and ask a question there. We’re happy to help!
Directory Structure
The new blog directory now contains a couple of auto-generated files and directories that make up your app.
Here is a short overview of the whole structure:
| File or Directory | Purpose |
|---|---|
| Config/ | |
| Config/Config.hs | Configuration for the framework and your application |
| Config/nix/nixpkgs-config.nix | Configuration for the Nix package manager |
| Application/ | Your domain logic lives here |
| Application/Schema.sql | Models and database tables are defined here |
| Web/Controller | Web application controllers |
| Web/View/ | Web application HTML template files |
| Web/Types.hs | Central place for all web application types |
| static/ | Images, CSS and JavaScript files |
| .ghci | Default config file for the Haskell interpreter |
| .gitignore | List of files to be ignored by git |
| App.cabal, Setup.hs | Config for the cabal package manager |
| flake.nix | Declares your app dependencies (like package.json for NPM or composer.json for PHP) |
| default.nix | Backward compatibility for developers who don’t use Nix Flakes |
| Makefile | Default config file for the make build system |
2. Hello, World!
Starting Your App
You now already have a working Haskell app ready to be started.
Switch to the blog directory before doing the next steps:
cd blog
Start the development server by running the following in the blog directory:
devenv up
Your application is starting now. The development server will automatically launch the built-in IDE. The server can be stopped by pressing CTRL+C.
By default, your app is available at http://localhost:8000 and your development tooling is at http://localhost:8001.
The development server automatically picks other ports when they are already in use by some other server. For example, it would pick http://localhost:8001 and http://localhost:8002 if port 8000 is used.
In the background, the built-in development server starts a PostgreSQL database connected to your application. Don’t worry about manually setting up the database. It also runs a WebSocket server to power live reloads on file saves inside your app.
The very first time you start this might take a while, and in rare cases may even require a restart (press CTRL+C and run devenv up again).
Hello Haskell World
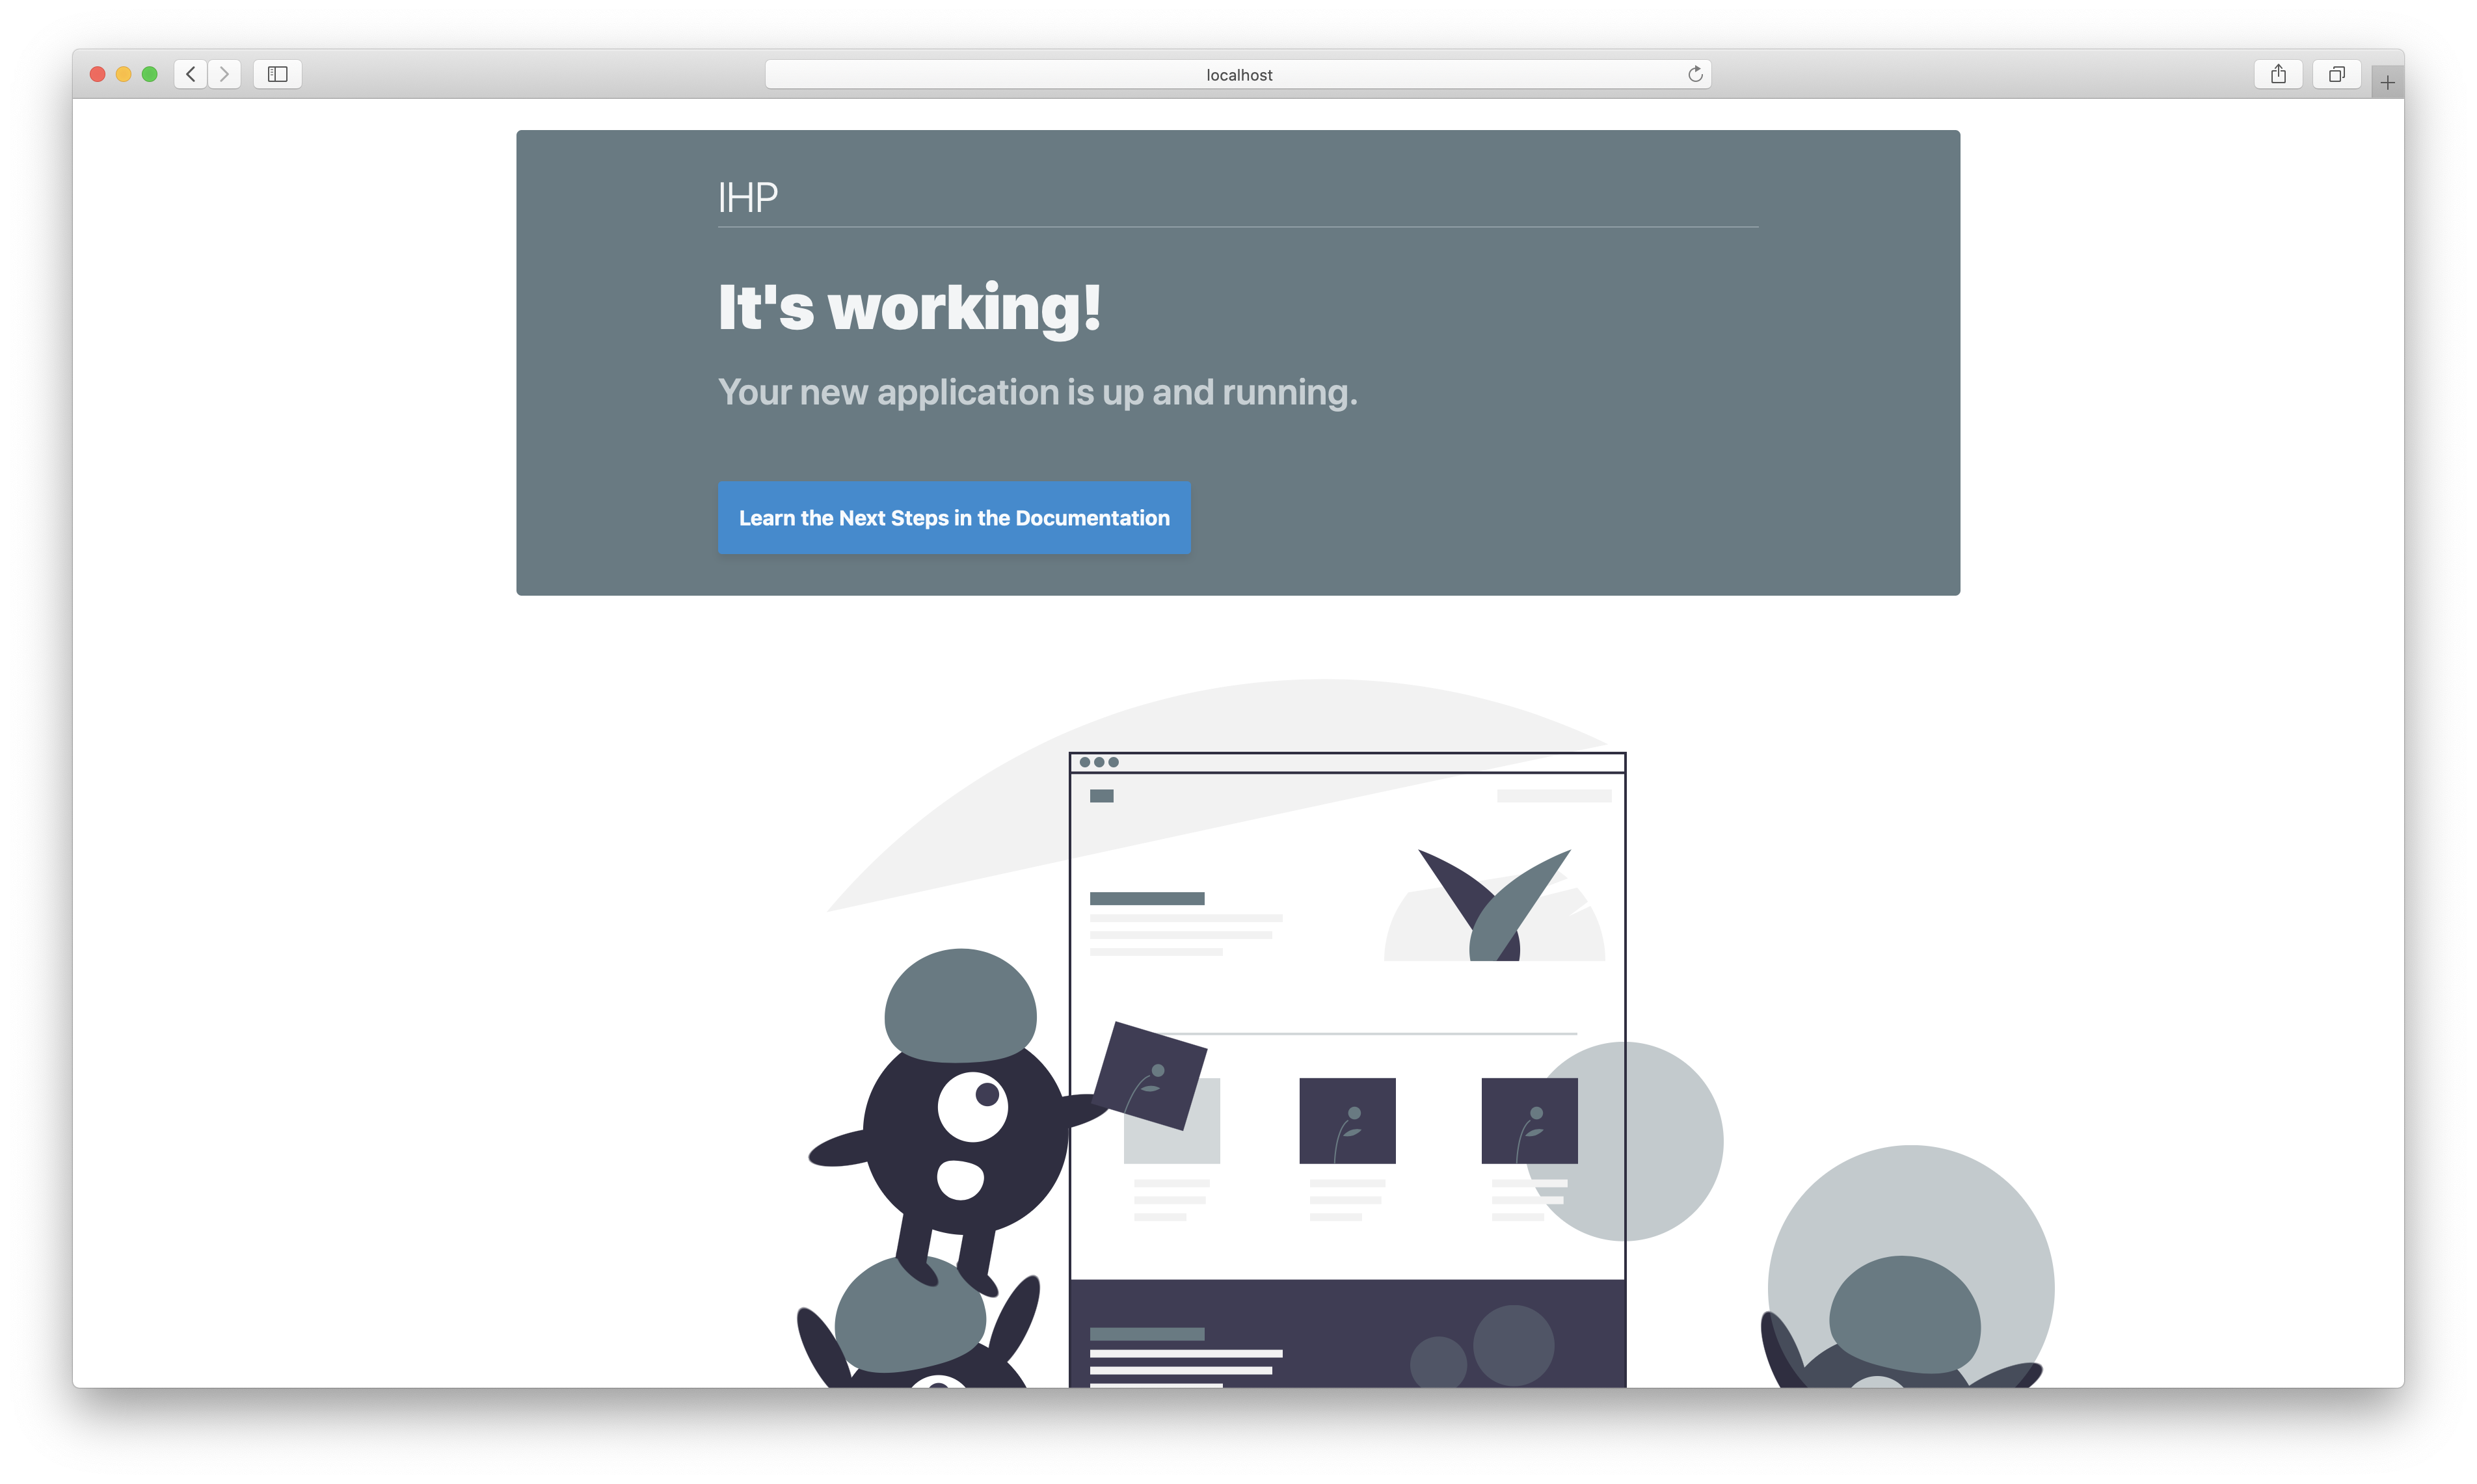
Open http://localhost:8000 and you will see this:
Let’s change this to a friendly hello world:
Open Web/View/Static/Welcome.hs in your text editor. Place your text editor and your web browser next to each other, to see the magic of live reloading:
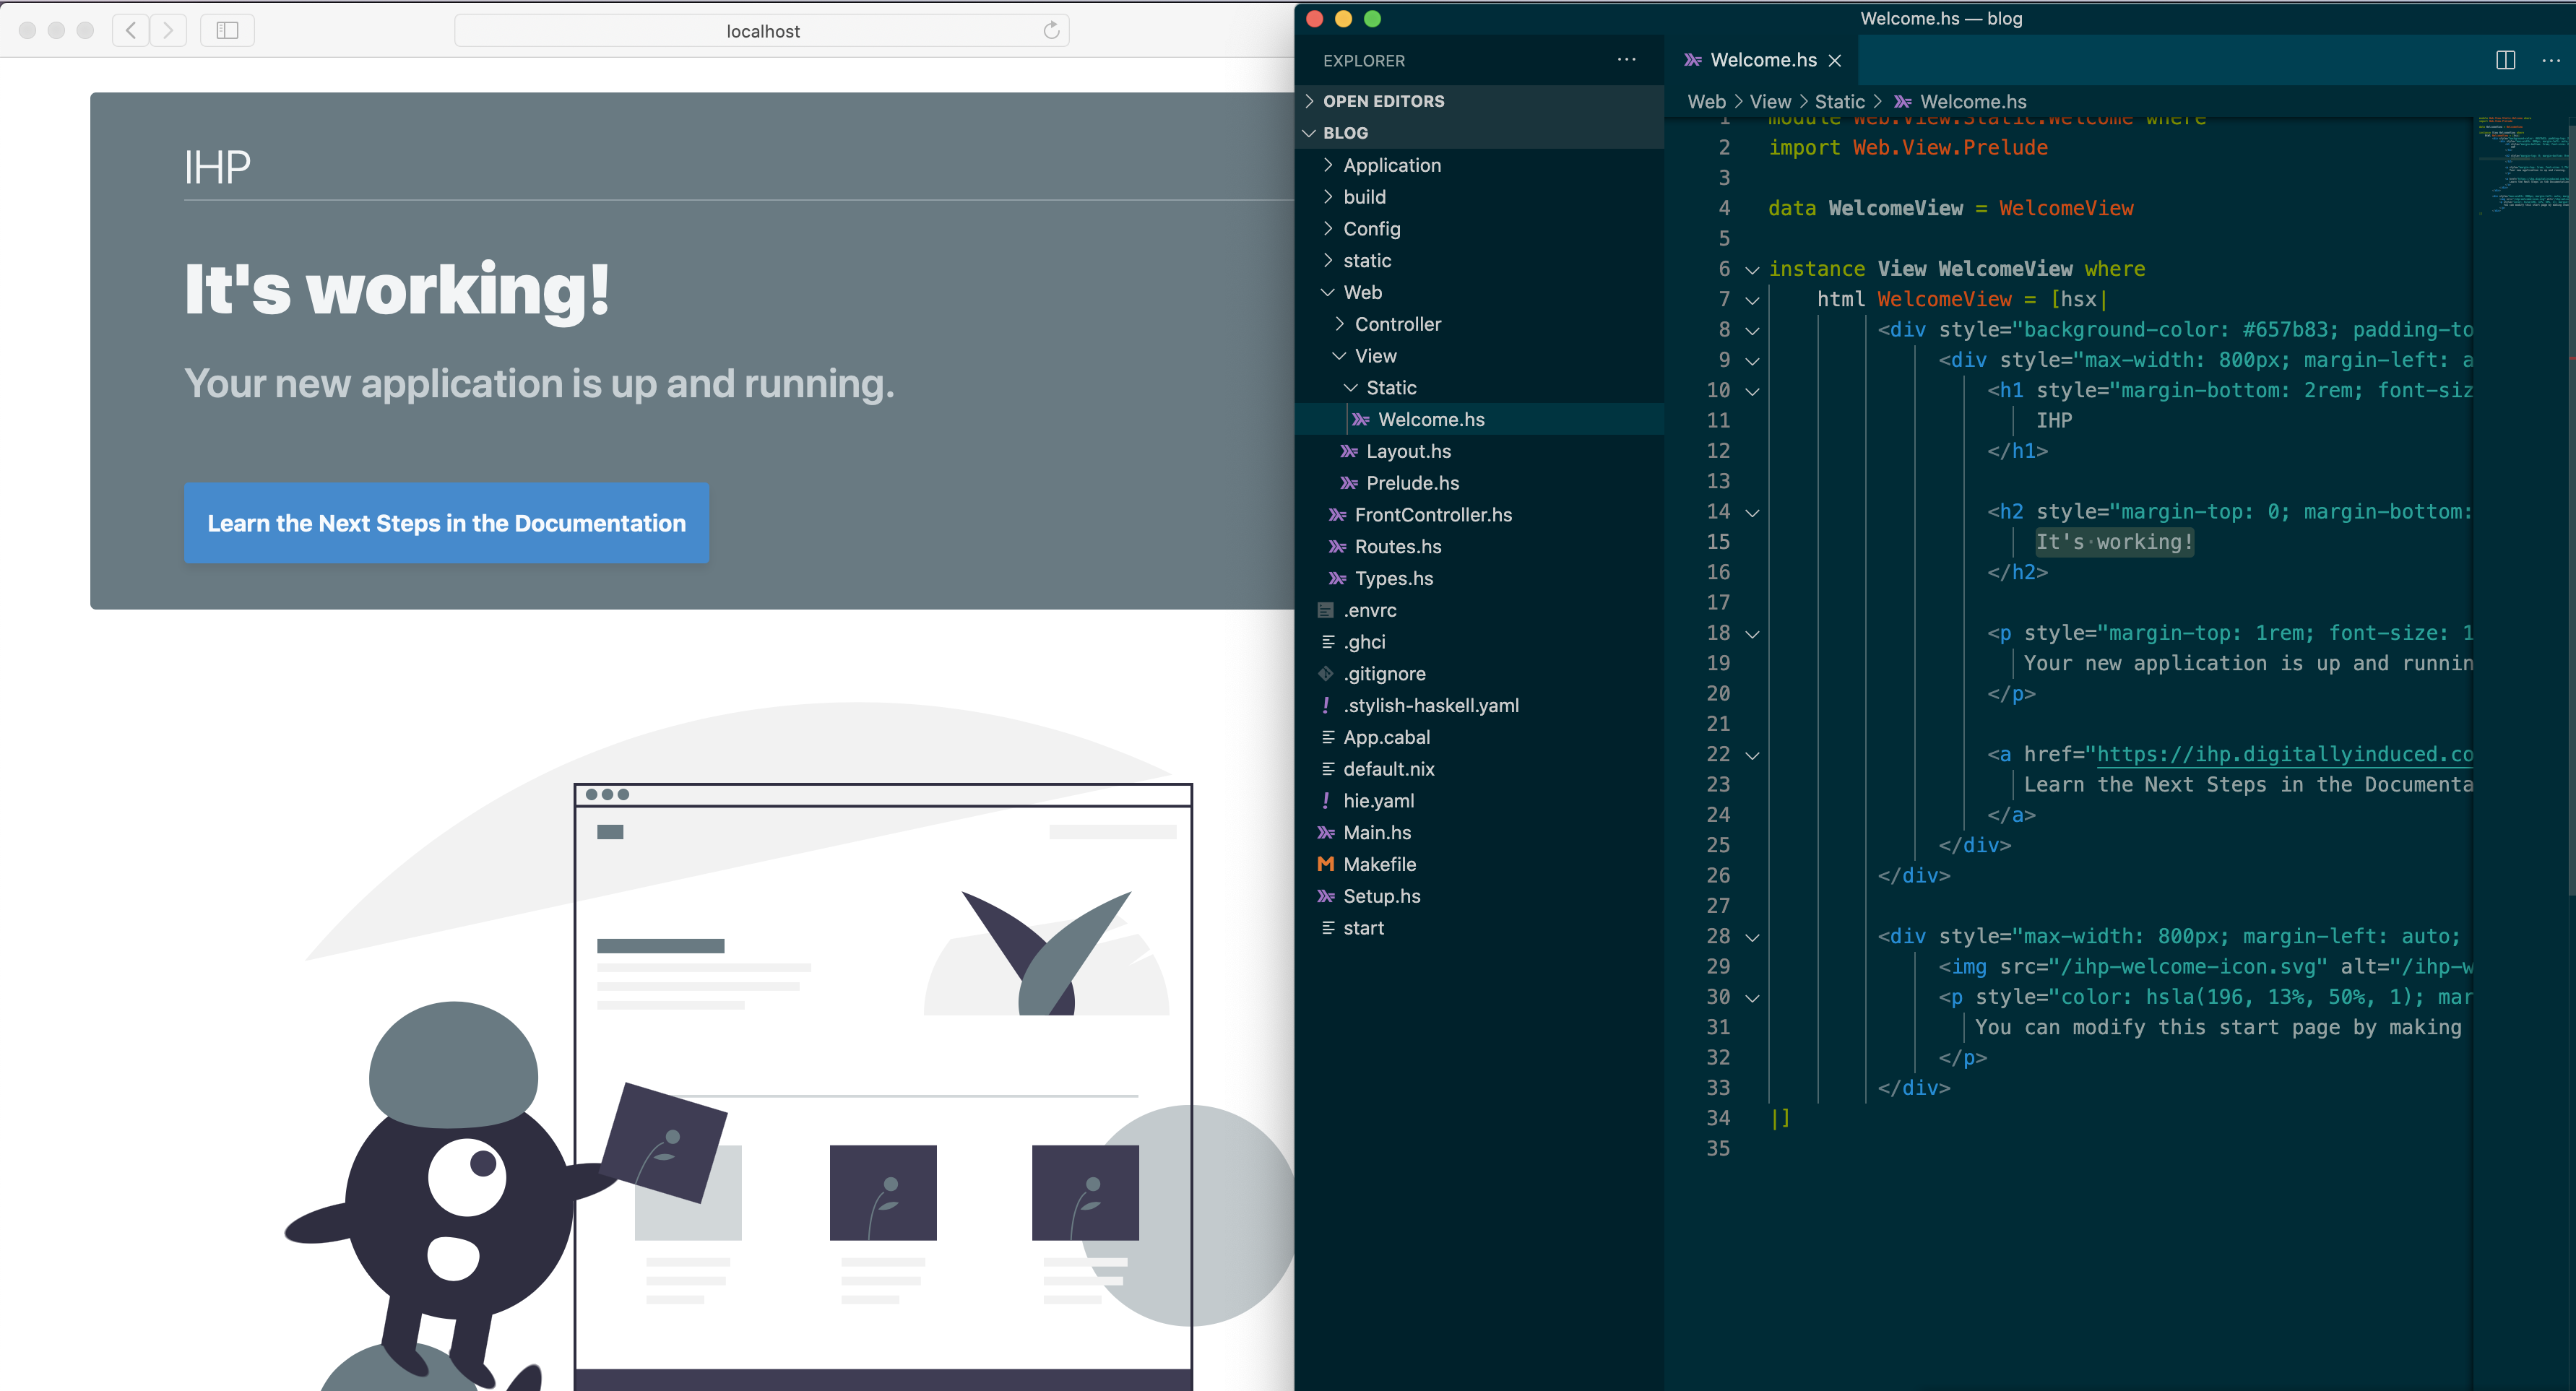
Inside the HTML code replace It's working! with Hello World from Haskell!, like this:
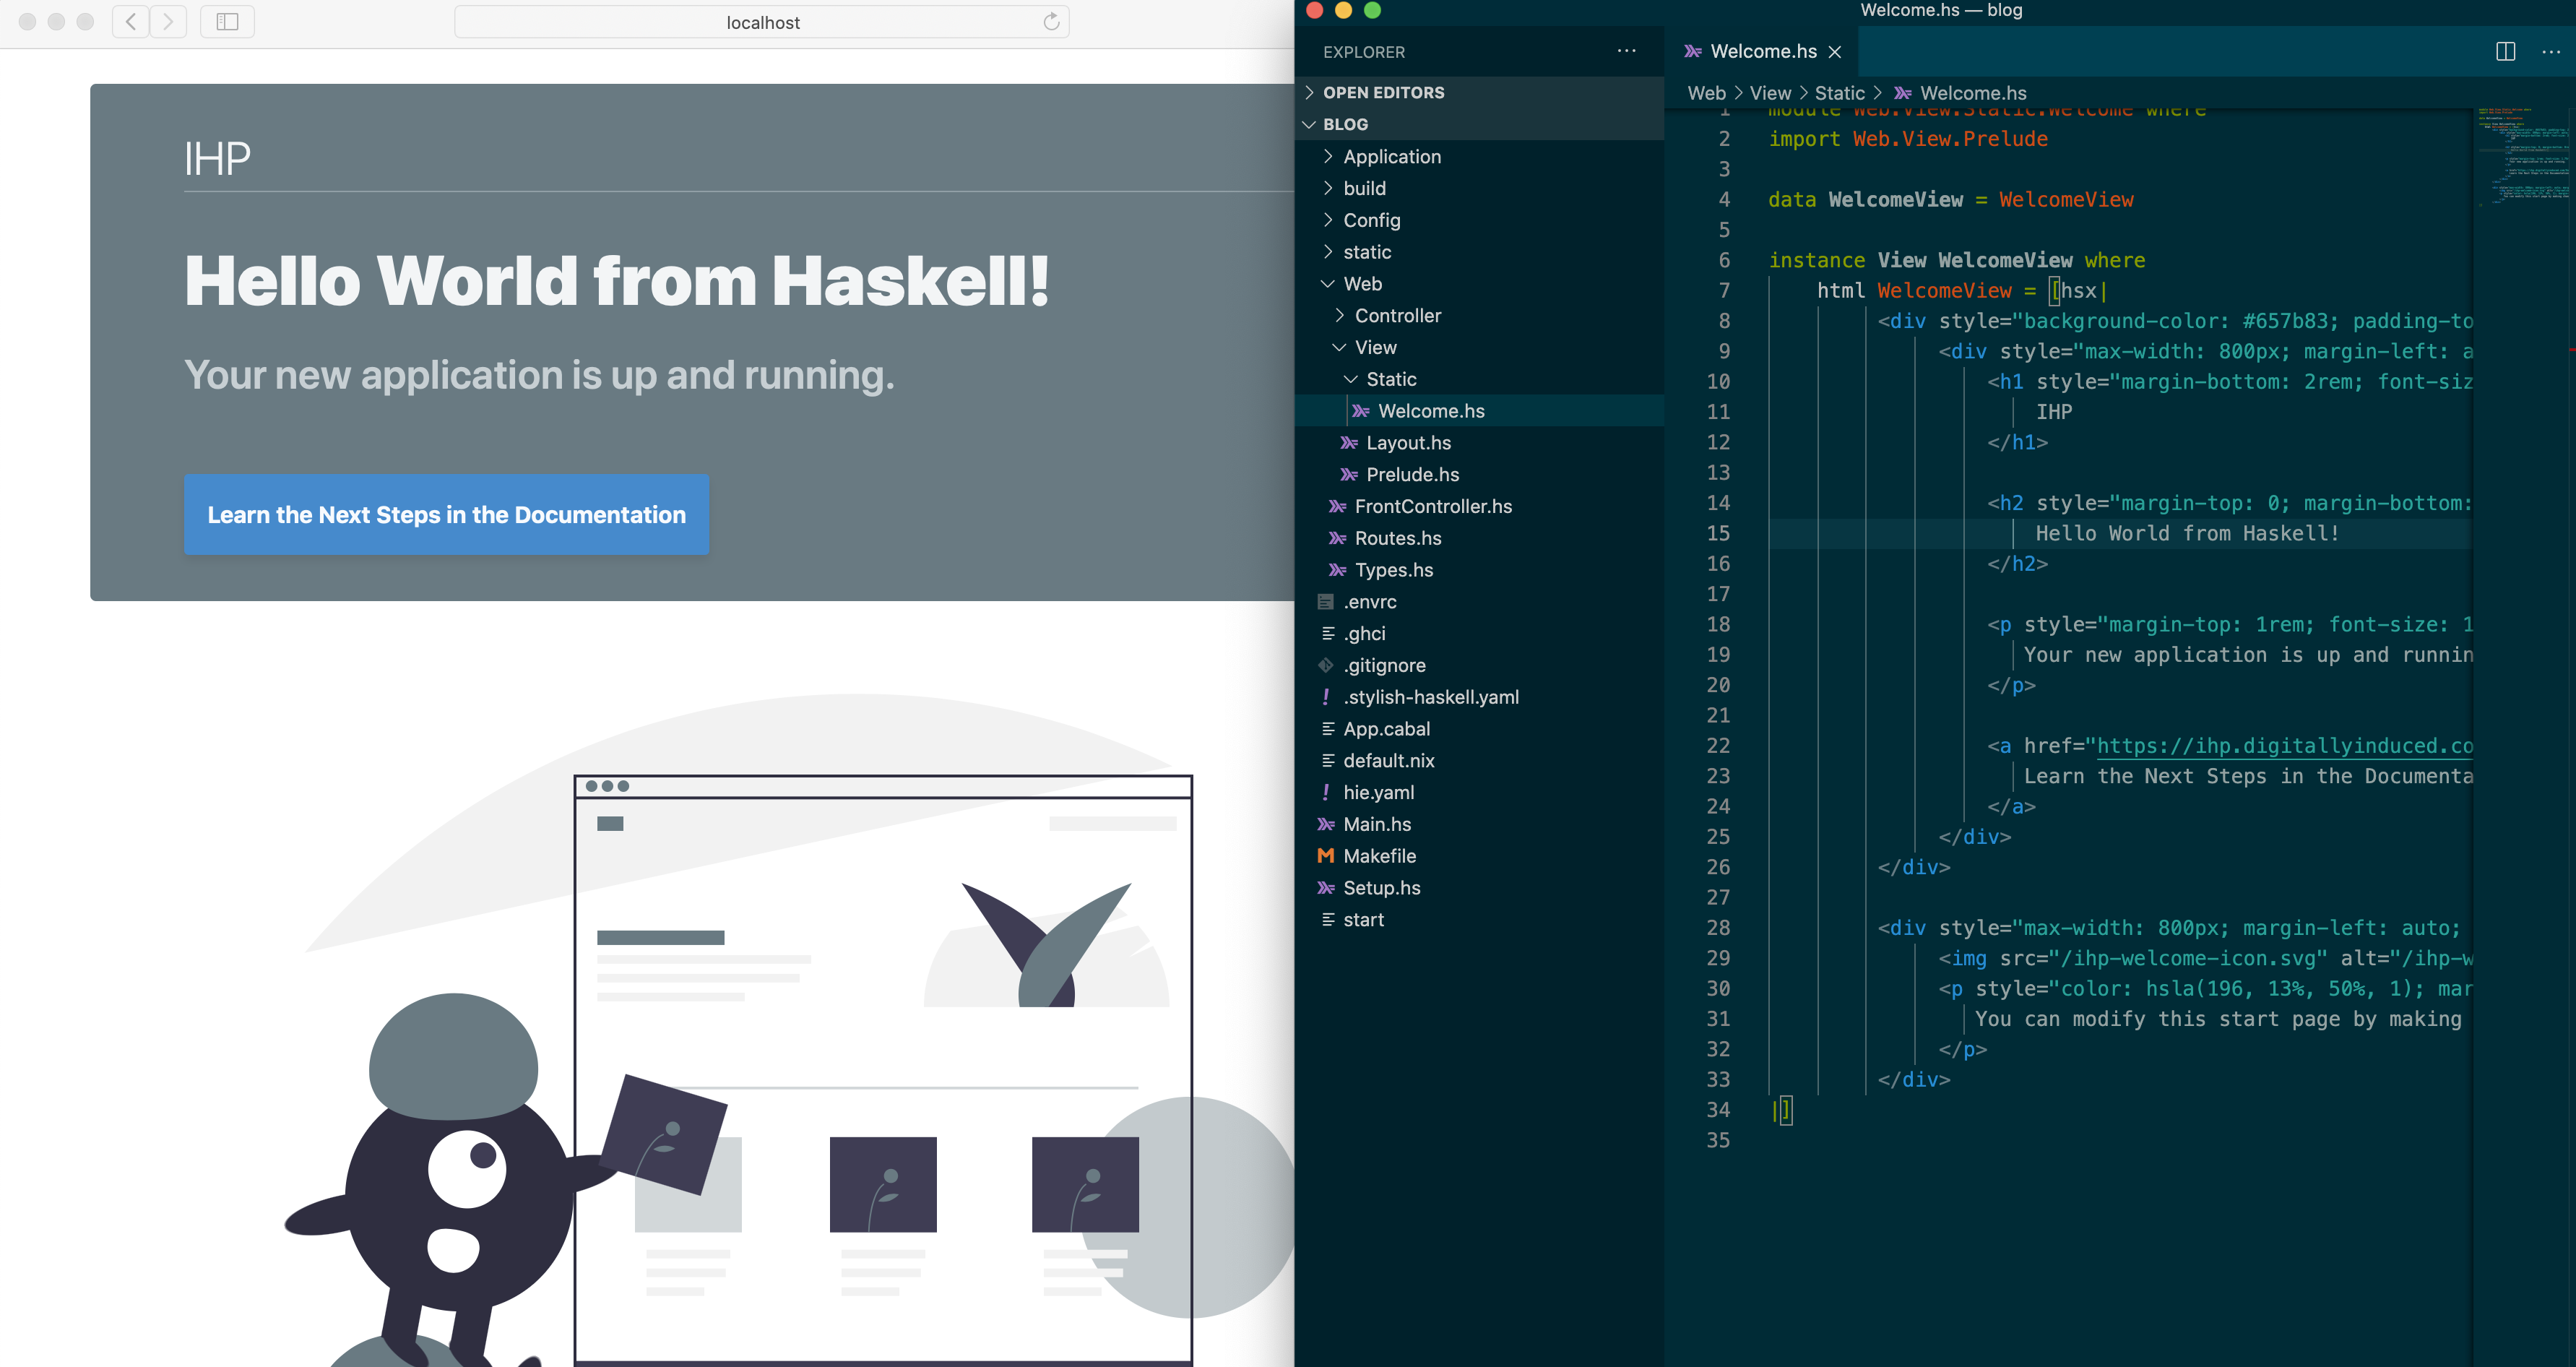
You’ll see that the web browser magically refreshes once you save the file changes.
Did it work? Congratulations 🎉 You’ve officially built your first haskell web application :) That makes you a haskell programmer. Welcome to the Haskell community! :)
If you liked the live reloading, have some fun and play around with the welcome view before you continue with the next steps.
3. Data Structures & PostgreSQL
Schema Modeling
For our blog project, let’s first build a way to manage posts.
For working with posts, we first need to create a posts table inside our database. A single post has a title, a body and of course an id. IHP is using UUIDs instead of the typical numerical ids.
This is how our posts table might look like for our blog:
| id :: UUID | title :: Text | body :: Text |
|---|---|---|
| 8d040c2d-0199-4695-ac13-c301970cff1d | My Experience With Nix On OS X | Some time ago, I’ve moved this jekyll-based blog … |
| b739bc7c-5ed1-43f4-944c-385aea80f182 | Deploying Private GitHub Repositories To NixOS Servers | In a previous post I’ve already shared a way to deploy private git repositories to a NixOS based server. While … |
To work with posts in our application, we now have to define this data schema.
For the curious: IHP has a built-in GUI-based schema designer. The schema designer will be used in the following sections of this tutorial. The schema designer helps to quickly build the DDL statements for your database schema without remembering all the PostgreSQL syntax and data types. But keep in mind: The schema designer is just a GUI tool to edit the Application/Schema.sql file. This file consists of DDL statements to build your database schema. The schema designer parses the Application/Schema.sql, applies changes to the syntax tree, and then writes it back into the Application/Schema.sql. If you love your VIM, you can always skip the GUI and go straight to the code at Application/Schema.sql. If you need to do something advanced which is not supported by the GUI, just manually do it with your code editor of choice. IHP is built by terminal hackers, so don’t worry, all operations can always be done from the terminal :-)
Open the IHP Schema Designer and add a new table with title and body as text columns. To do this right-click > Add Table to open the New Table dialog.
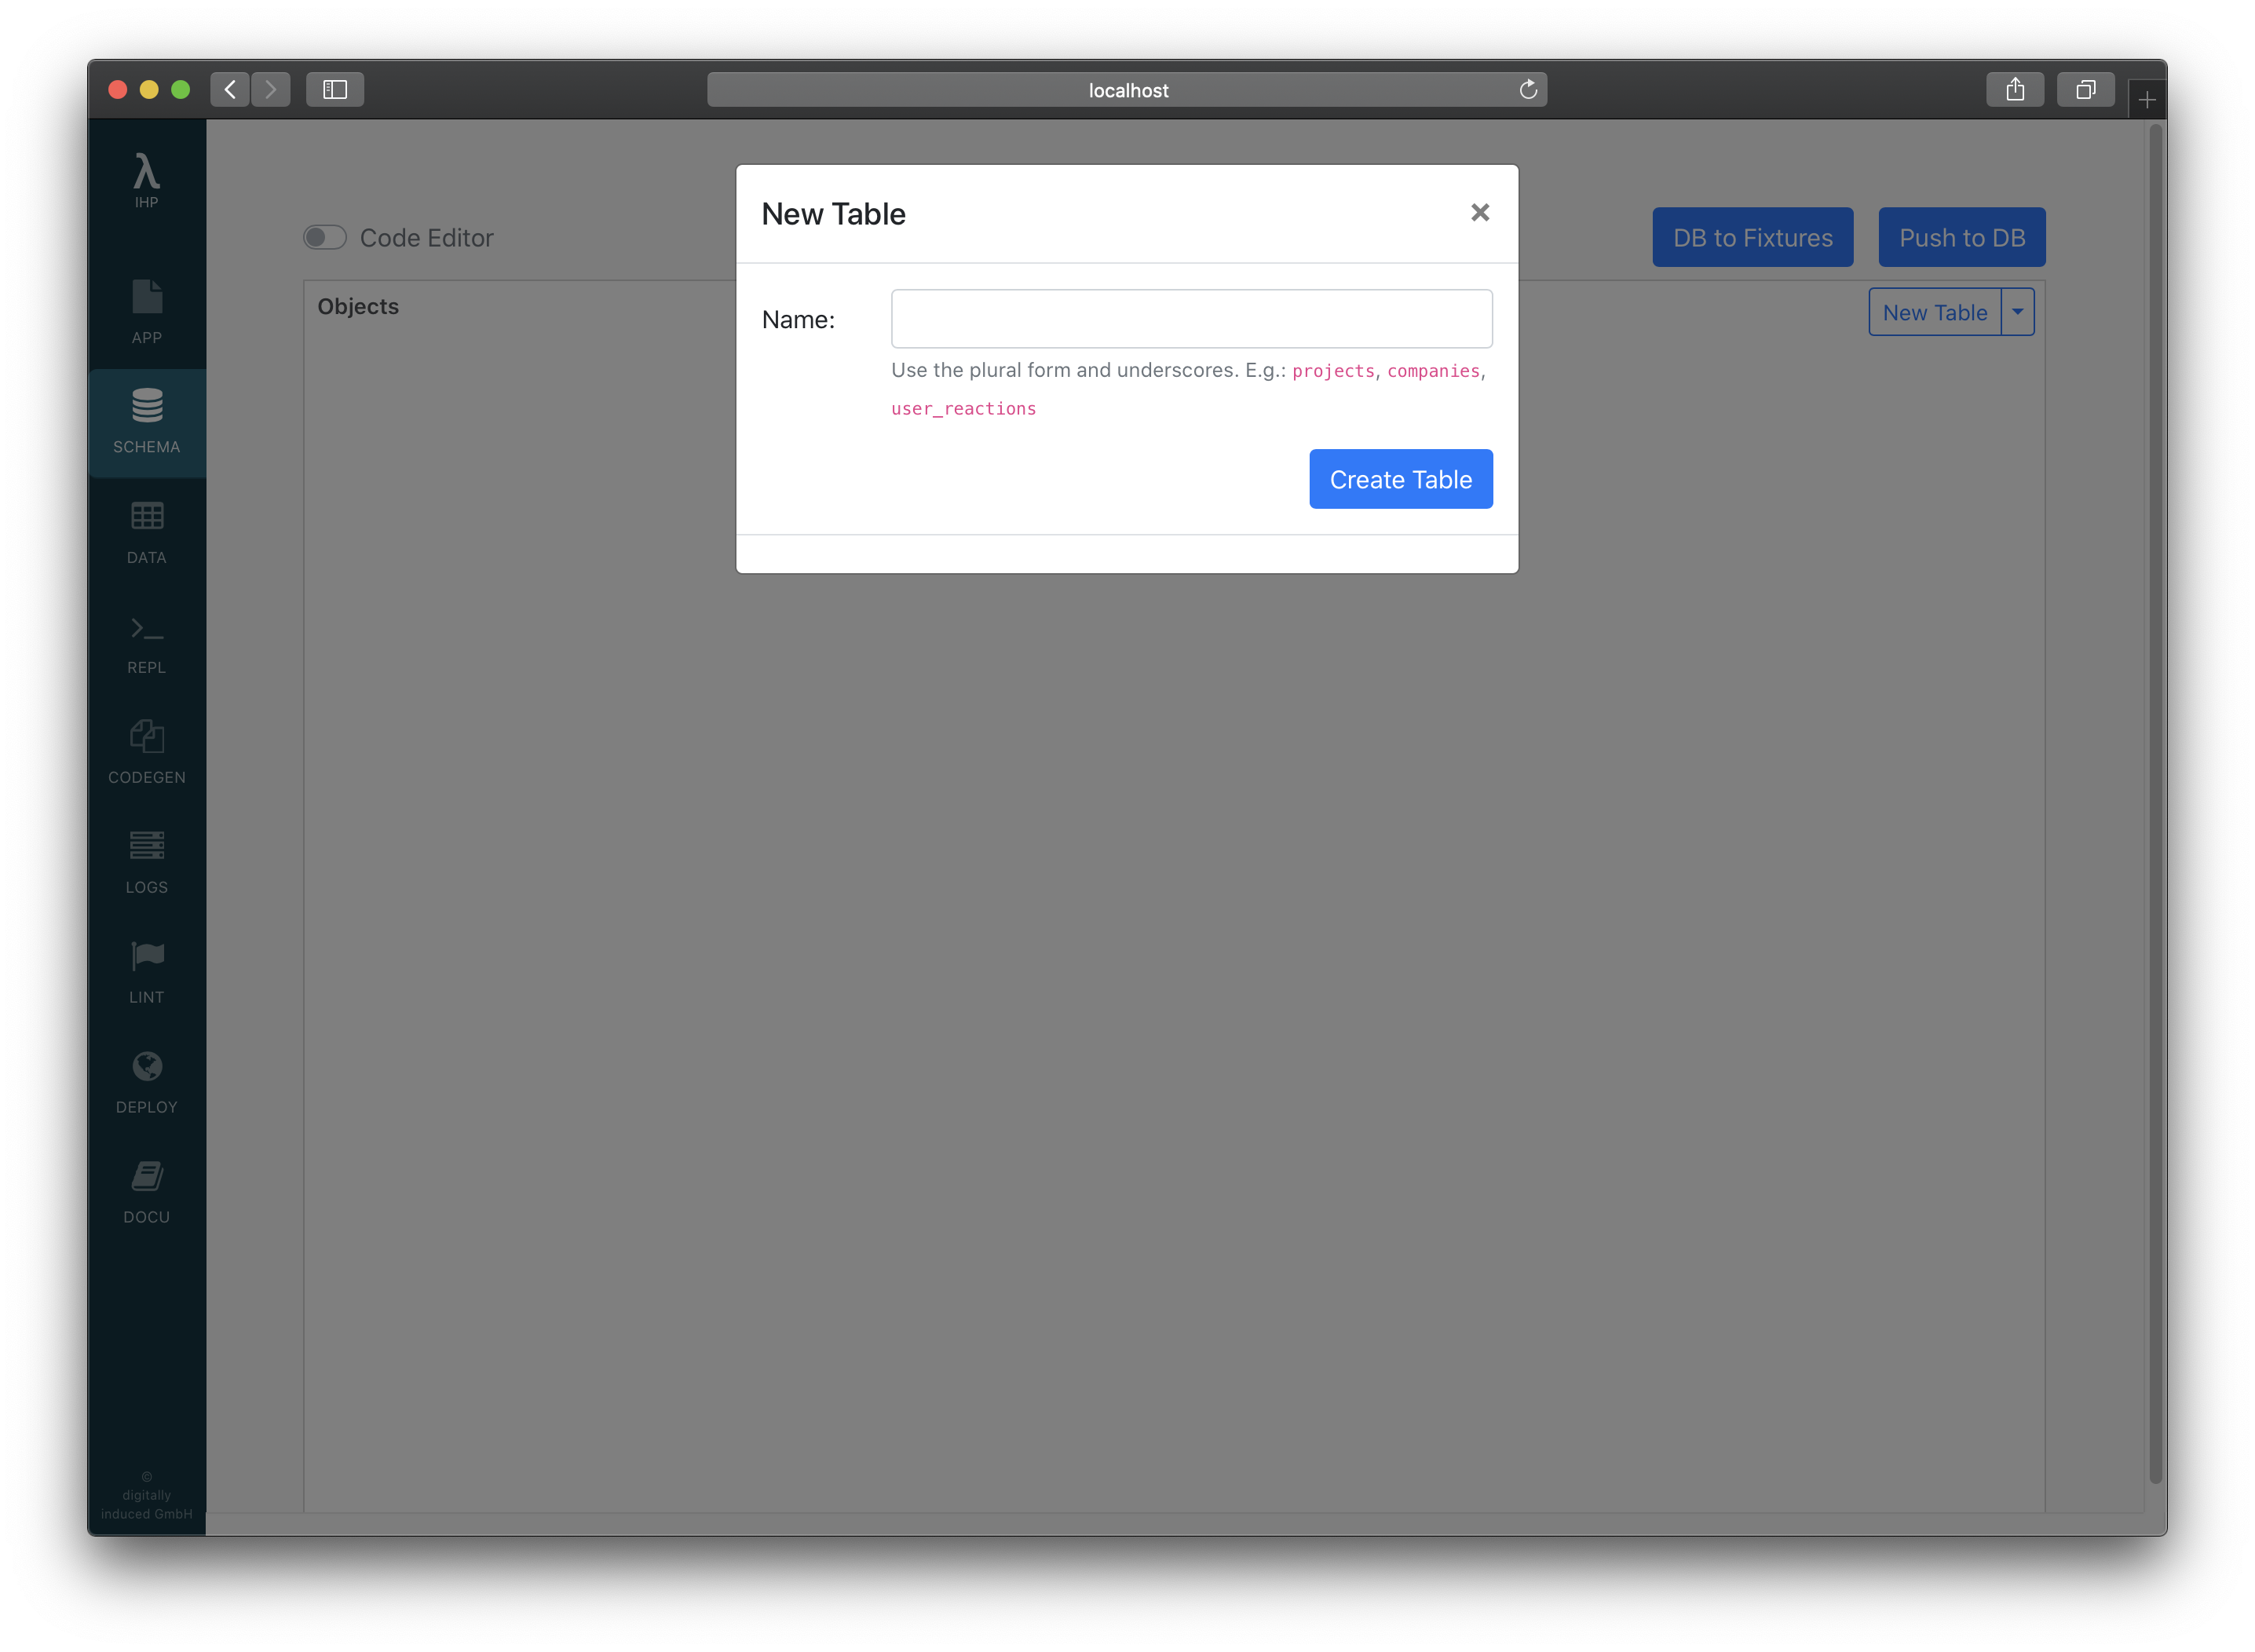
Enter the table name posts and click on Create Table.
In the right pane, you can see the columns of the newly created table. The id column has been automatically created for us.
Right-click into the Columns pane and select Add Column:
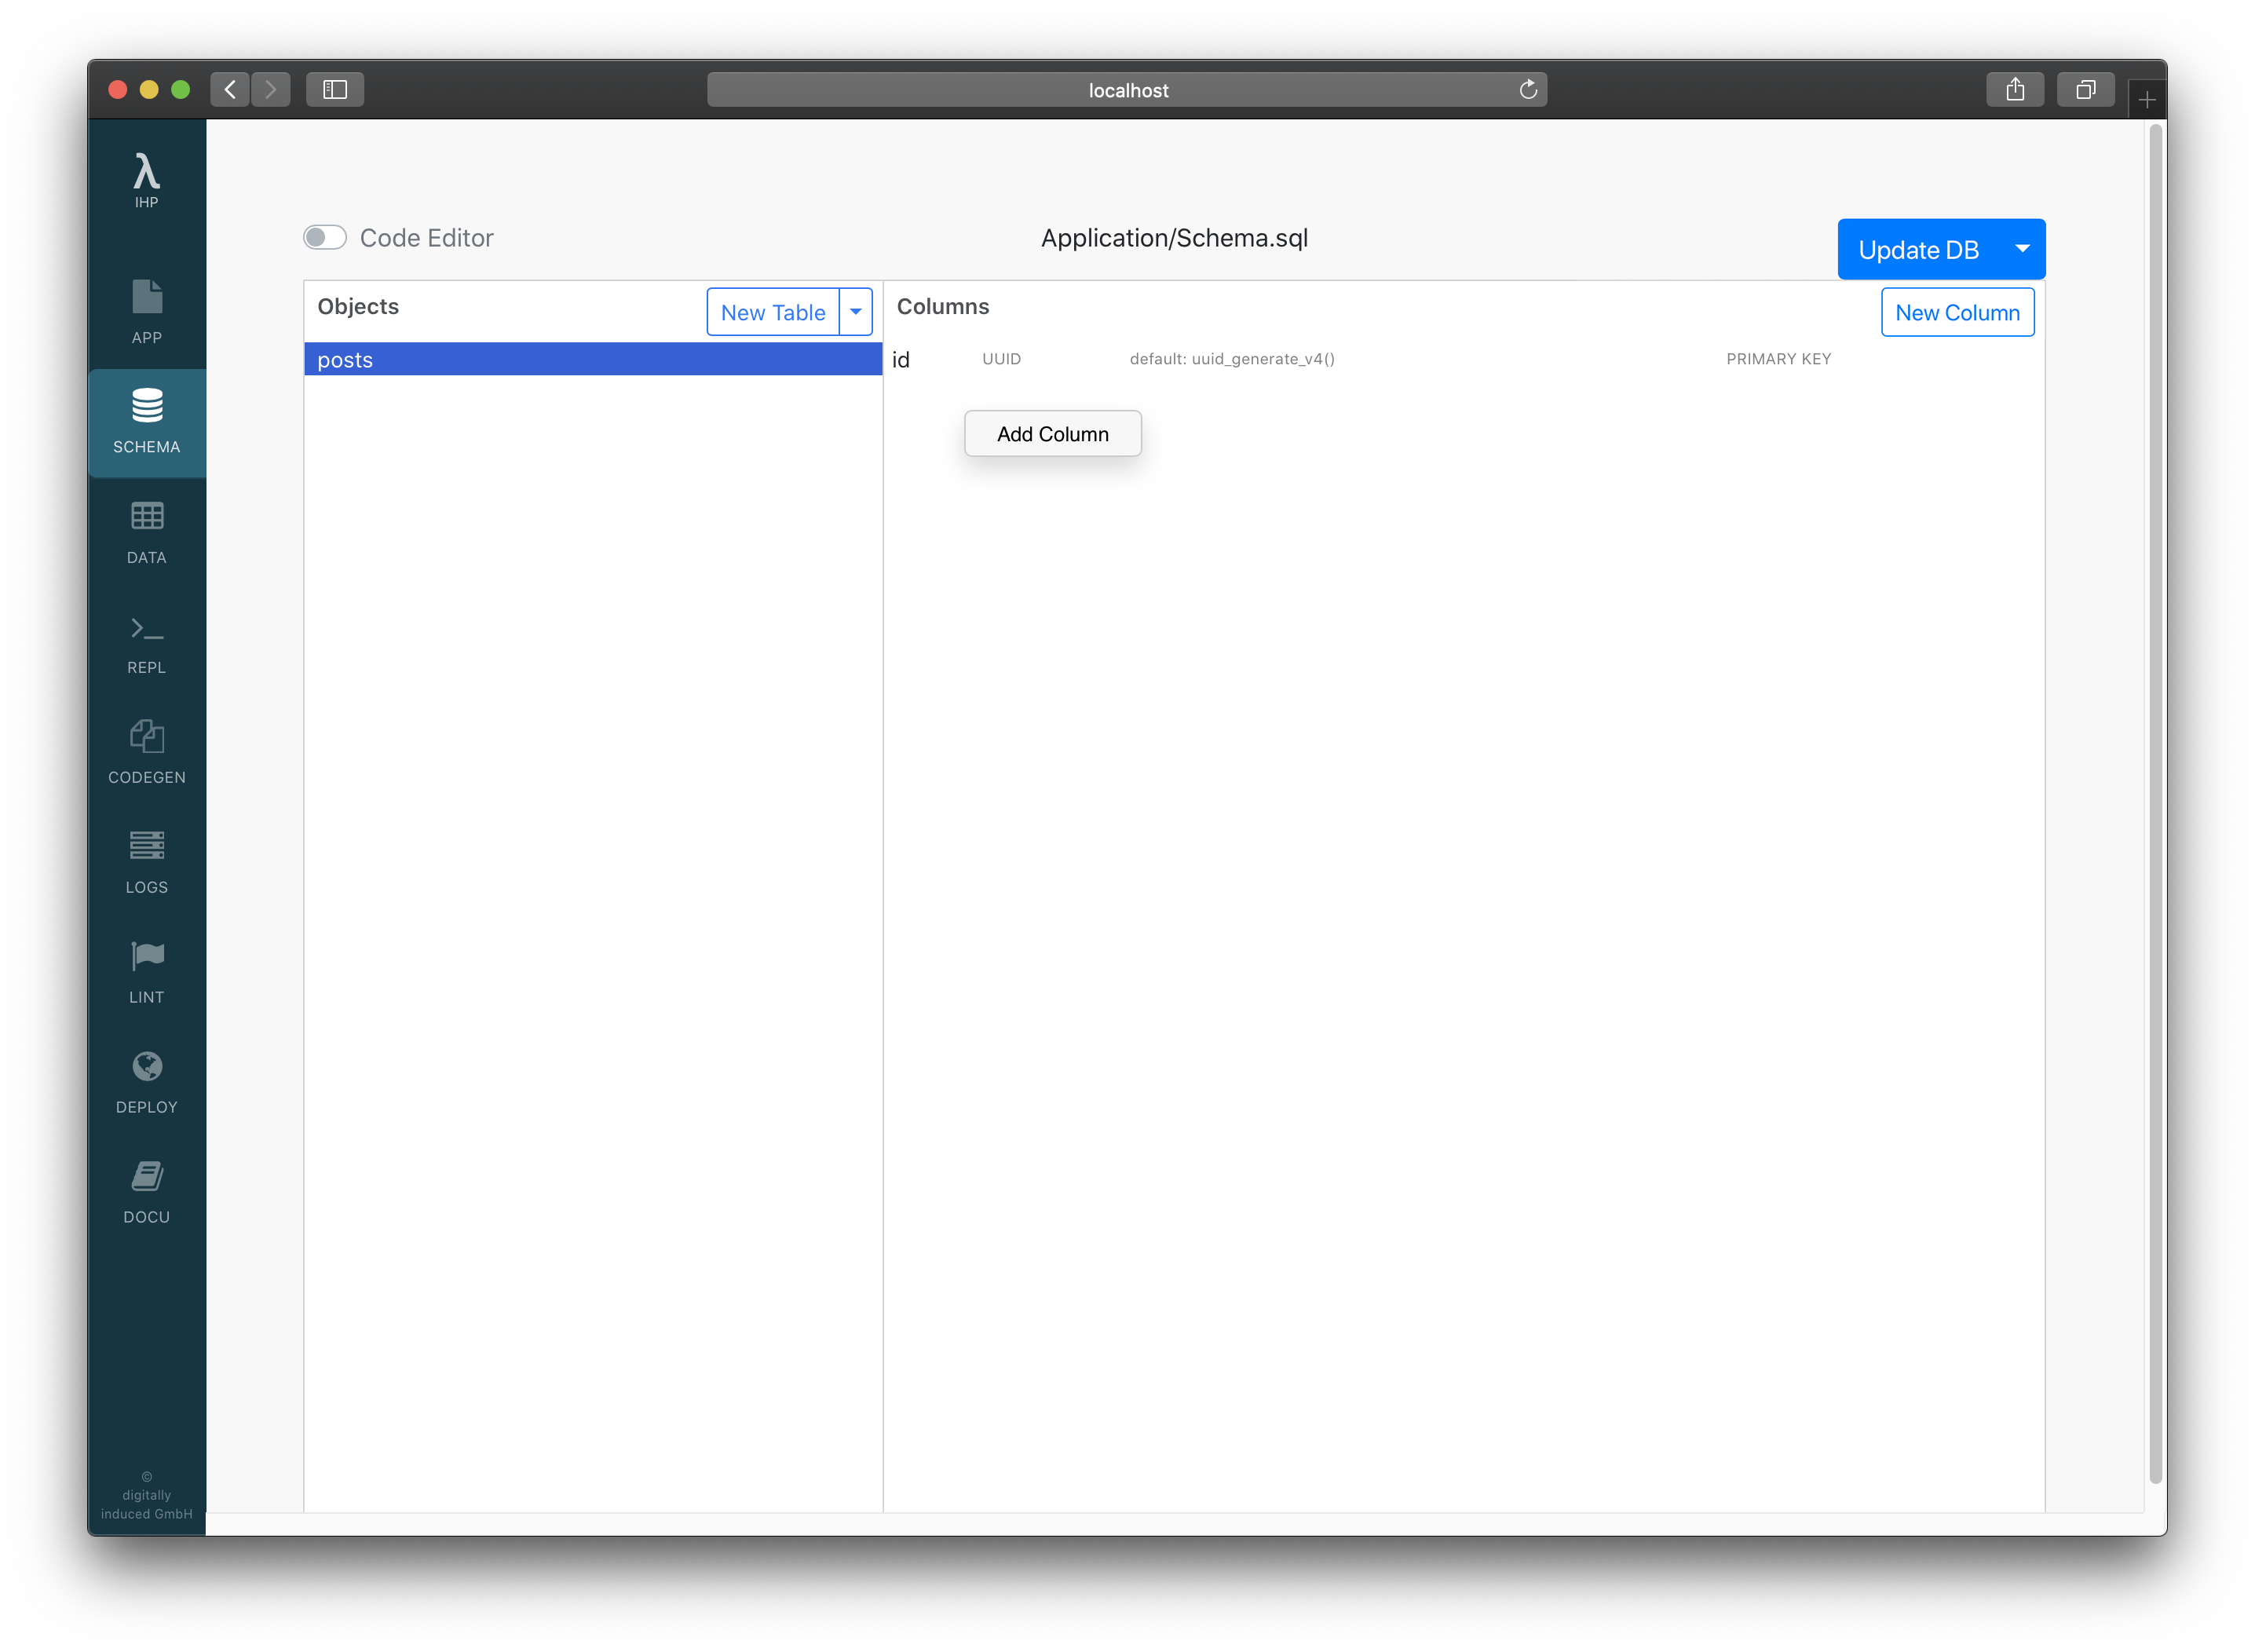
Use this dialog to create the title and body columns.
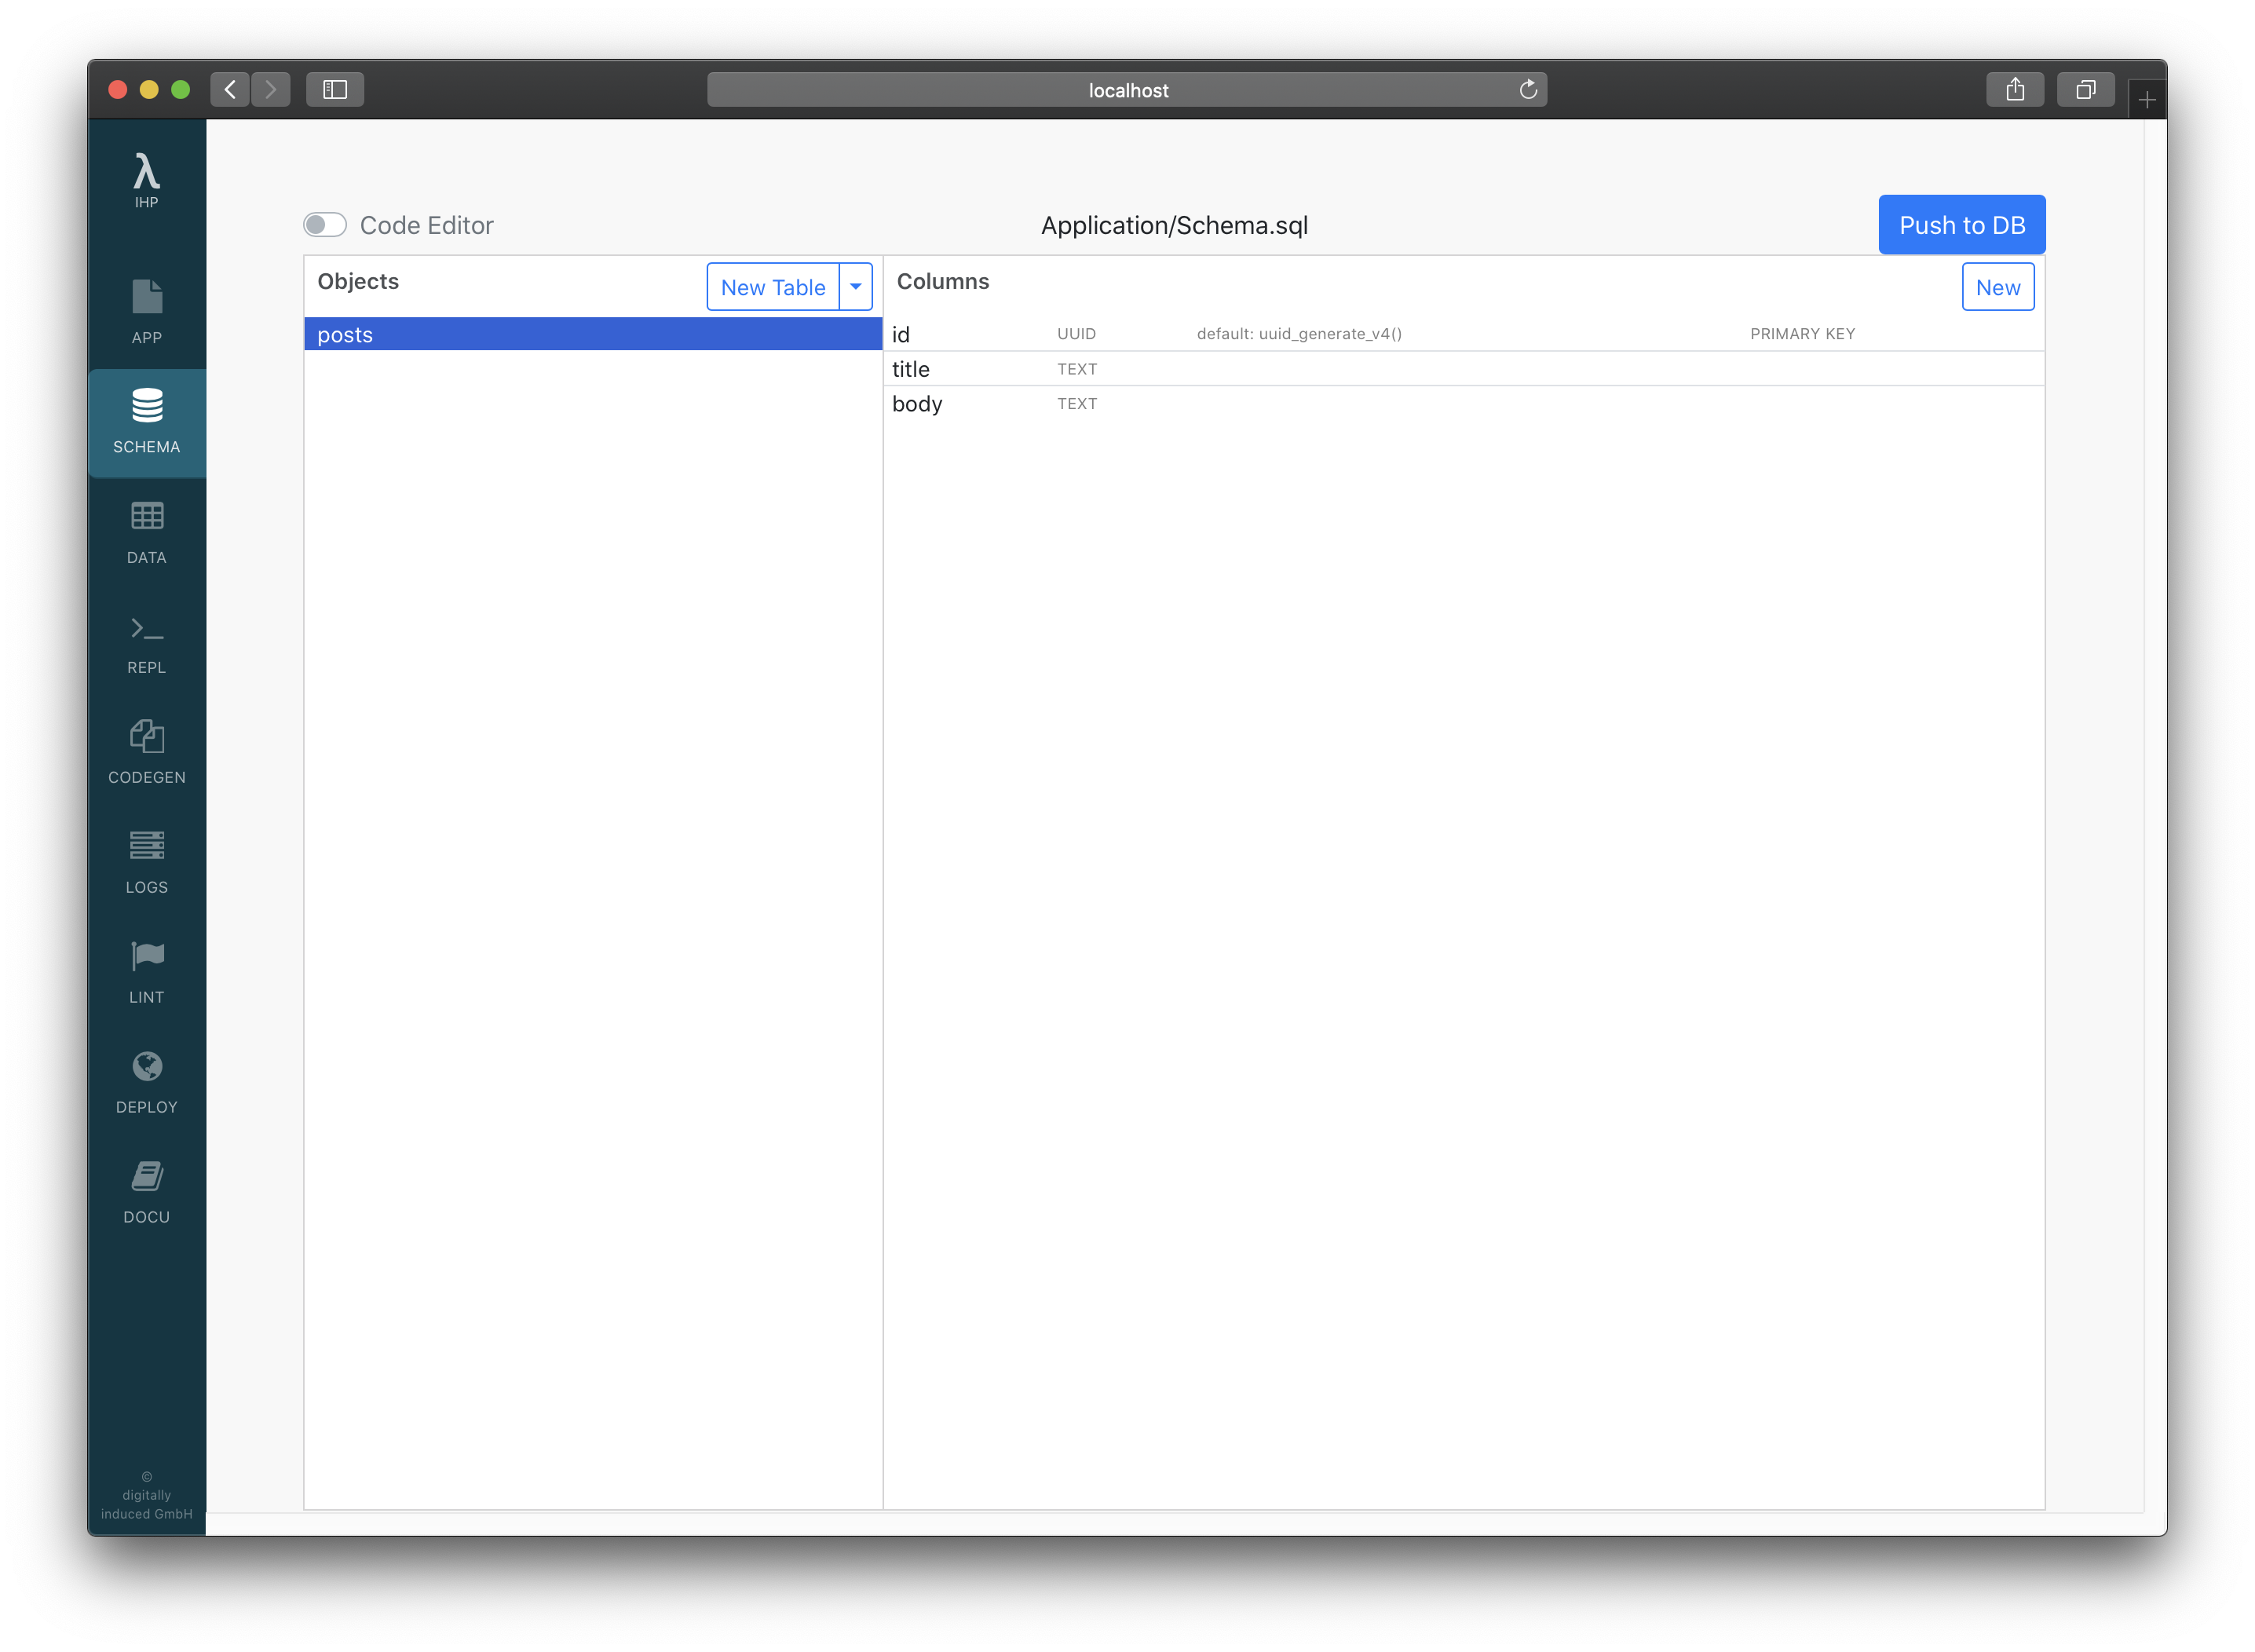
After that, your schema should look like this:
Loading the Schema
Next, we need to make sure that our database schema with our posts table is imported into the local PostgreSQL database. Don’t worry, the local development PostgreSQL server is already running. The development server has conveniently already started it.
Open the Application/Schema.sql in your code editor to see the SQL queries which make up the database schema:
CREATE TABLE posts (
    id UUID DEFAULT uuid_generate_v4() PRIMARY KEY NOT NULL,
    title TEXT NOT NULL,
    body TEXT NOT NULL
);
To load the table into our local Postgres server, we need to click Migrate DB in the Schema Designer. Then click Run Migration.
The posts table has been created now. Let’s quickly connect to our database and see that everything is correct:
$ make psql

psql (9.6.12)
Type "help" for help.

-- Let's do a query to check that the table is there

app=# SELECT * FROM posts;

 id | title | body
----+-------+------
(0 rows)

-- Looks alright! :)


-- We can quit the PostgreSQL console by typing \q

app=# \q
Now our database is ready to be consumed by our app.
Record Types
By specifying the above schema, the framework automatically provides several types for us. Here is a short overview:
| Type | Post |
|---|---|
| Definition | data Post = Post { id :: Id Post, title :: Text, body :: Text } |
| Description | A single record from the posts table |
| Example | Post { id = cfefdc6c-c097-414c-91c0-cbc9a79fbe4f, title = "Hello World", body = "Some body text" } :: Post |
| Type | Id Post |
|---|---|
| Definition | newtype Id Post = Id UUID |
| Description | Type for the id field |
| Example | "5a8d1be2-33e3-4d3f-9812-b16576fe6a38" :: Id Post |
For the curious: To dig deeper into the generated code, open the Schema Designer, right-click a table, and click Show Generated Haskell Code or look into build/Generated/Types.hs.
4. Apps, Controllers, Views
IHP follows the well-known MVC (Model-View-Controller) structure. Controllers and actions are used to deal with incoming requests.
A controller belongs to an application. The default application is called Web (that’s why all the controller and views are located there). Your whole project can consist of multiple sub-applications. Typically your production app will need e.g. an admin back-end application next to the default web application.
We can use the built-in code generators to generate a controller for our posts. A handy way to do it, is by right clicking on the table, and selecting Generate Controller.

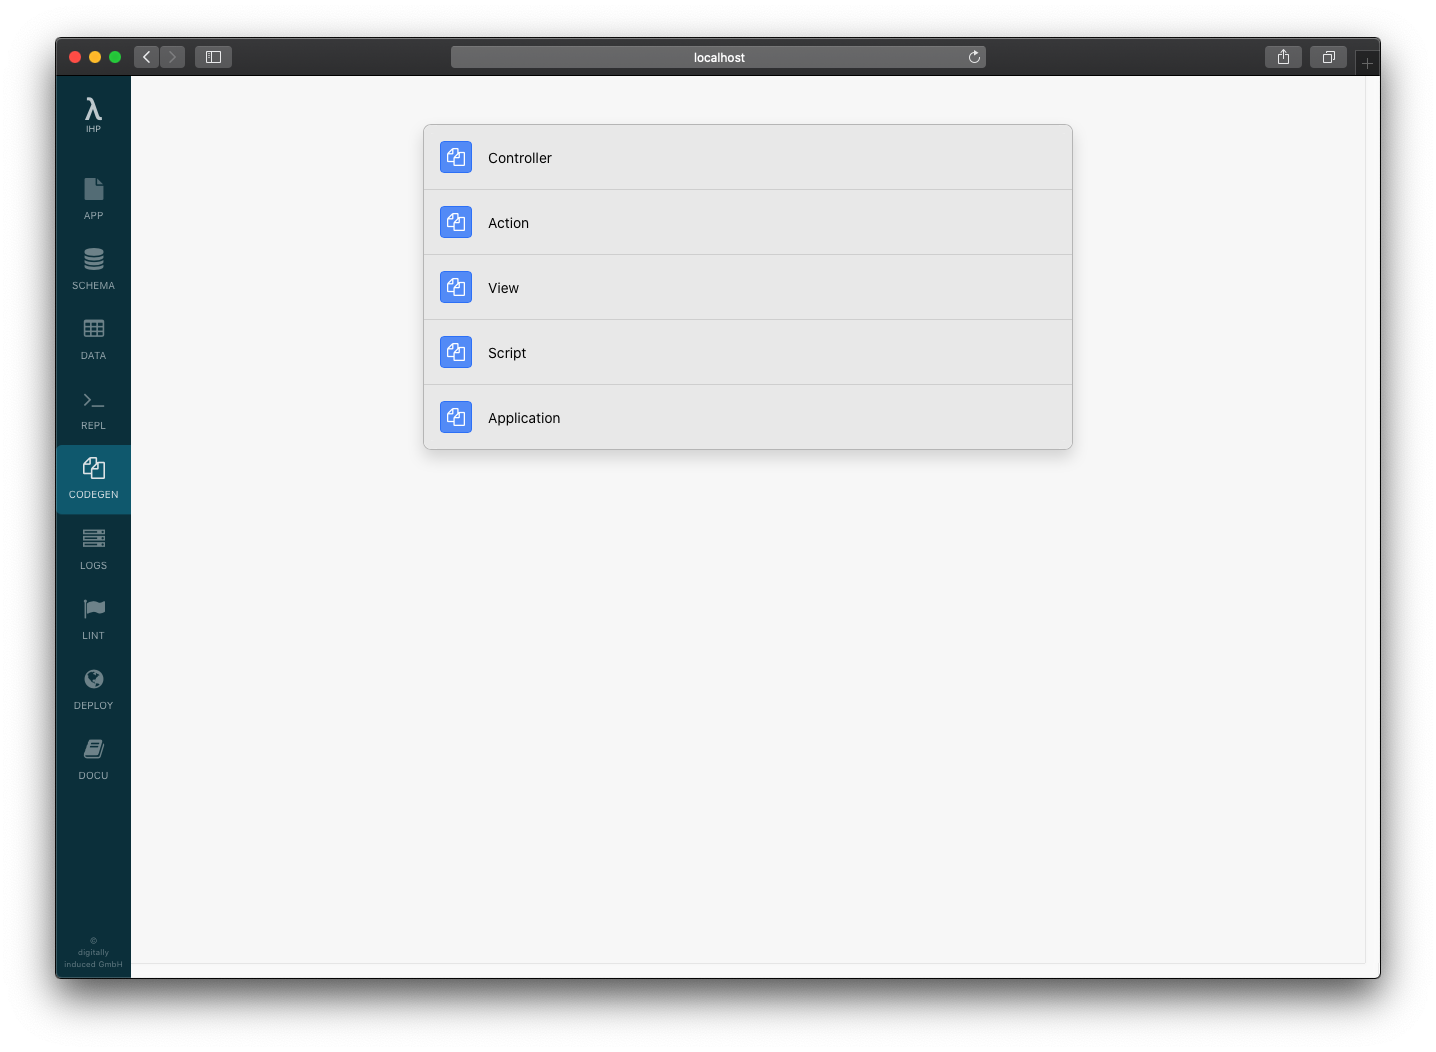
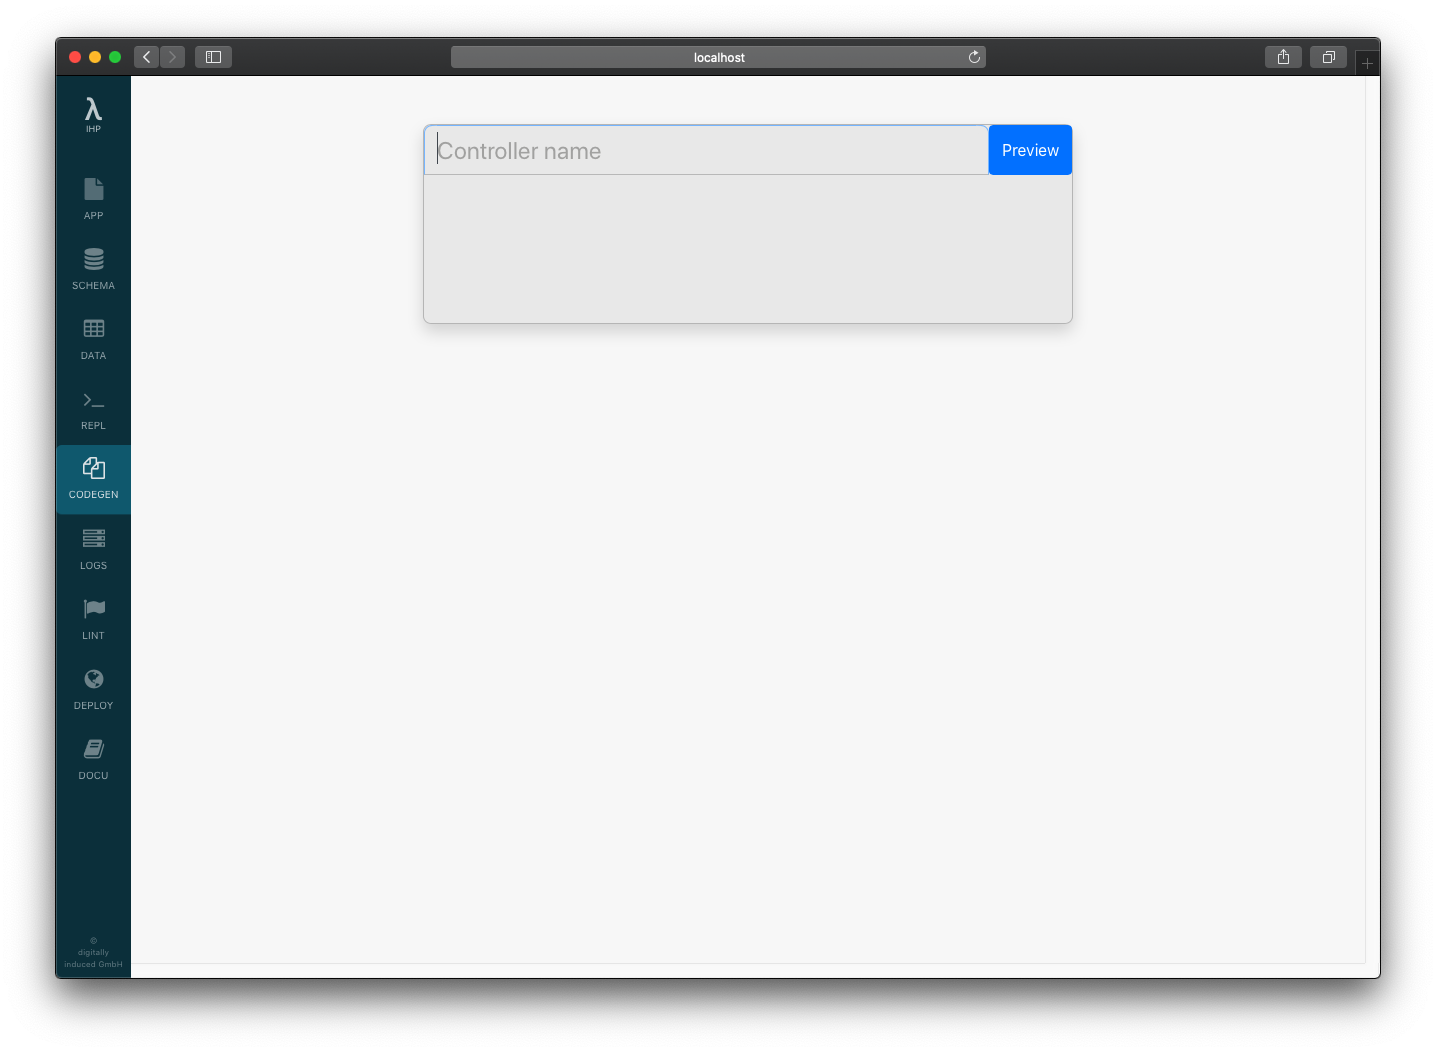
Or, we can do it manually. Inside the development server, click on CODEGEN to open the Code Generator. There you can see everything that can be generated. Clicking on Controller:
You need to enter the controller name. Enter Posts and click Preview:
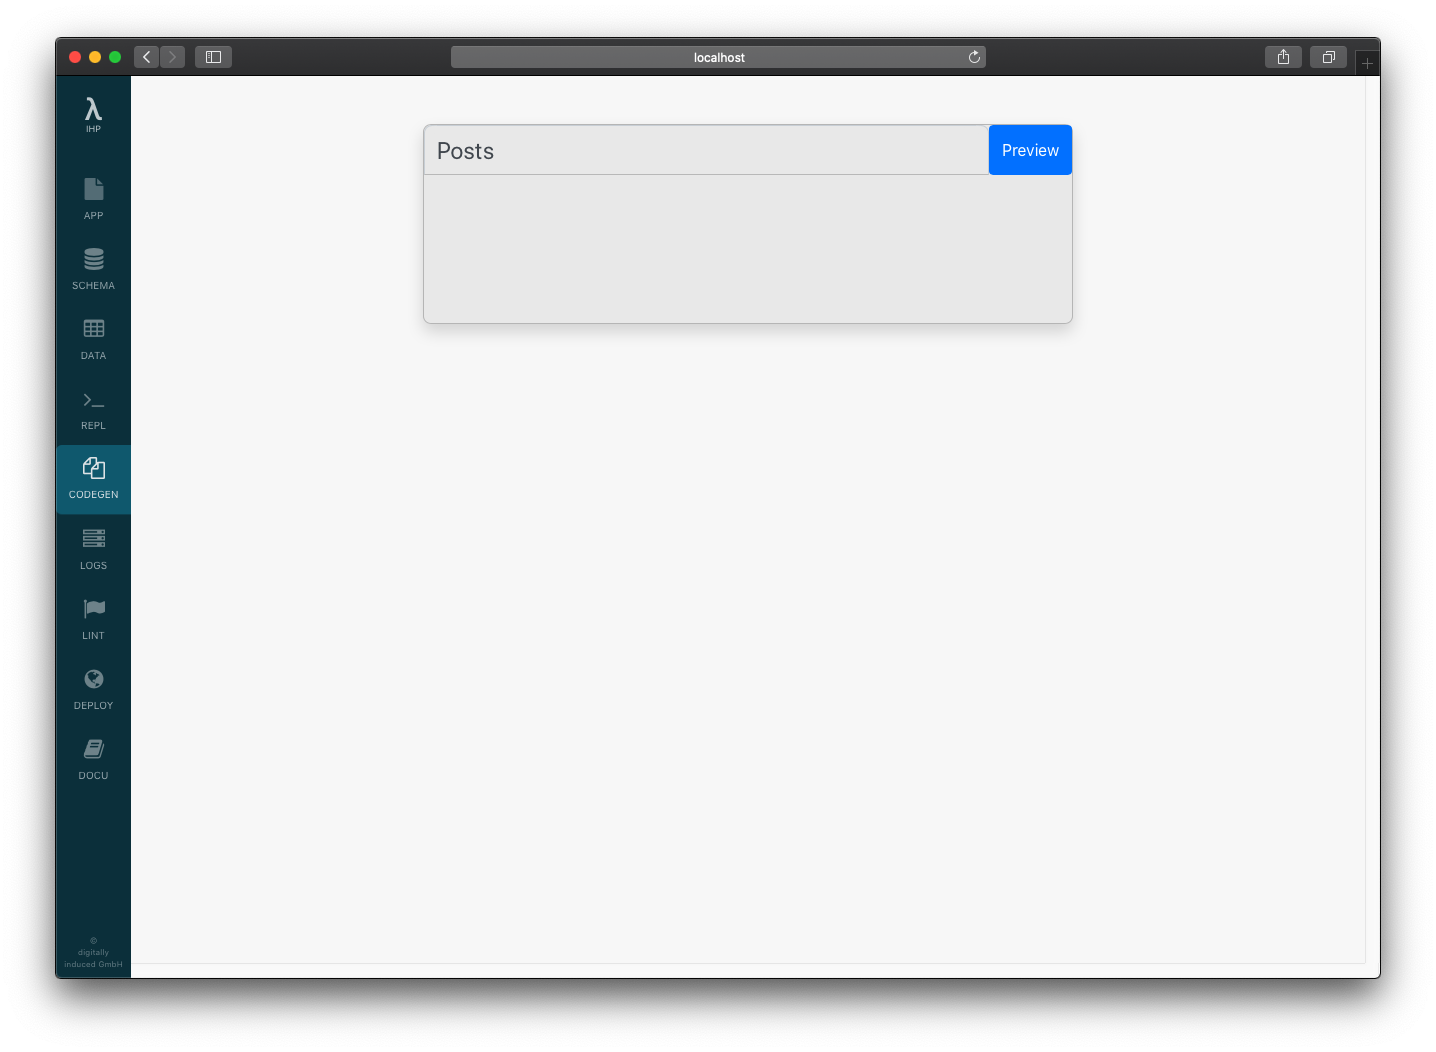
The preview will show you all the files which are going to be created or modified. Take a look and when you are ready, click on Generate.
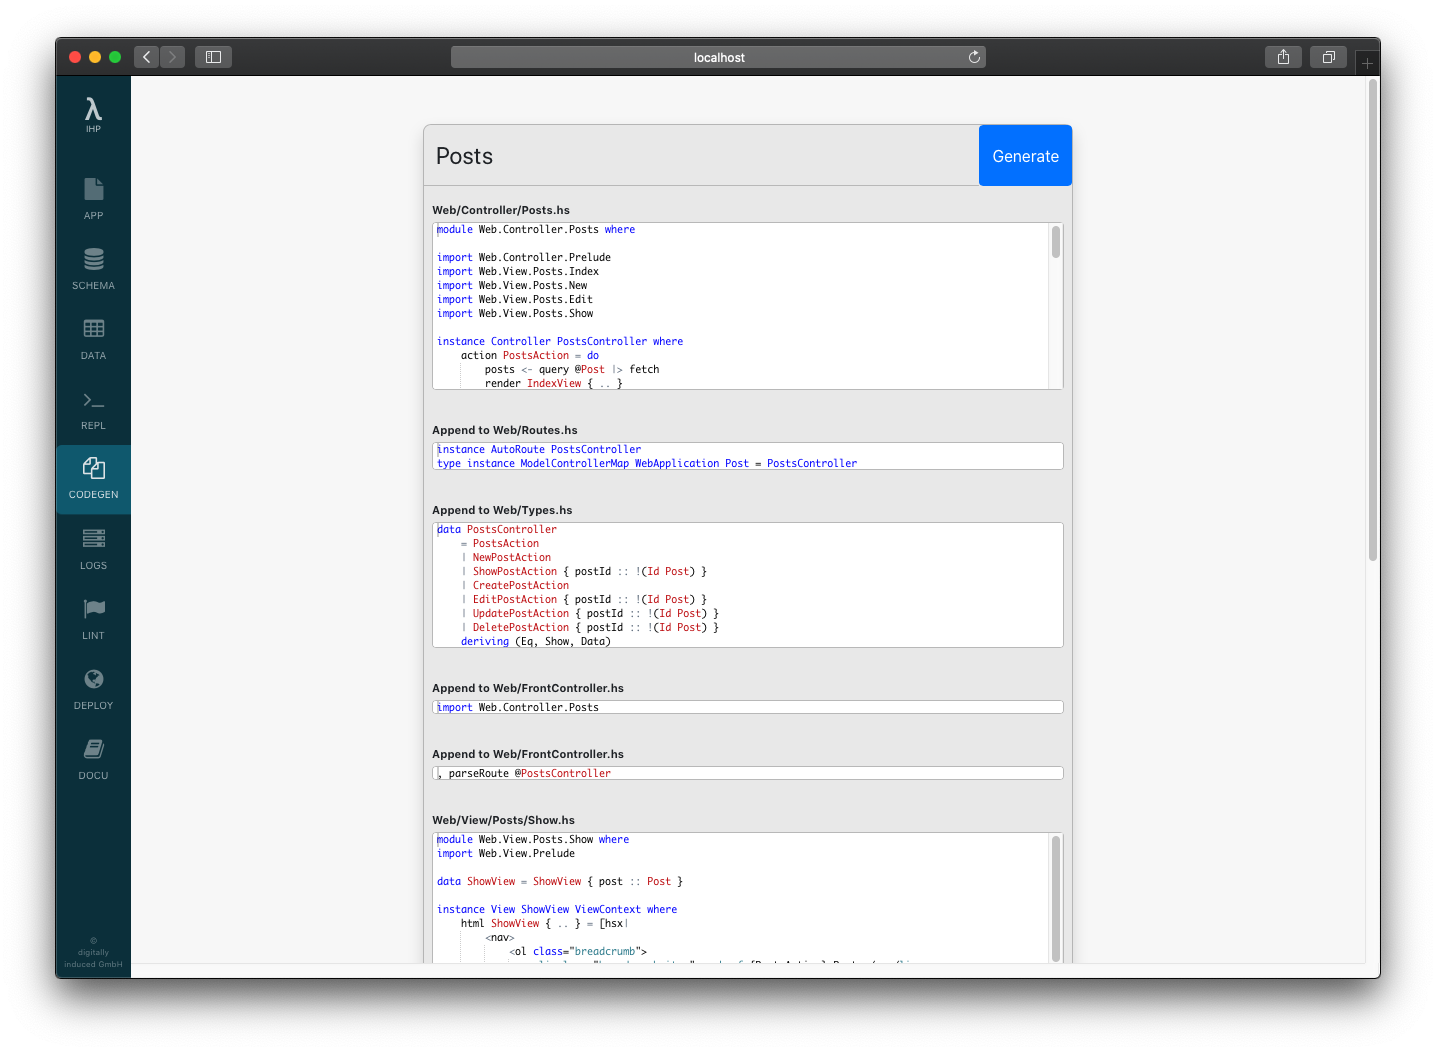
After the files have been created as in the preview, your controller is ready to be used. Open your browser at http://localhost:8000/Posts to try out the new controller. The generator did all the initial work we need to get our usual CRUD (Create, Read, Update, Delete) actions going.
Here’s how the new /Posts page looks like:
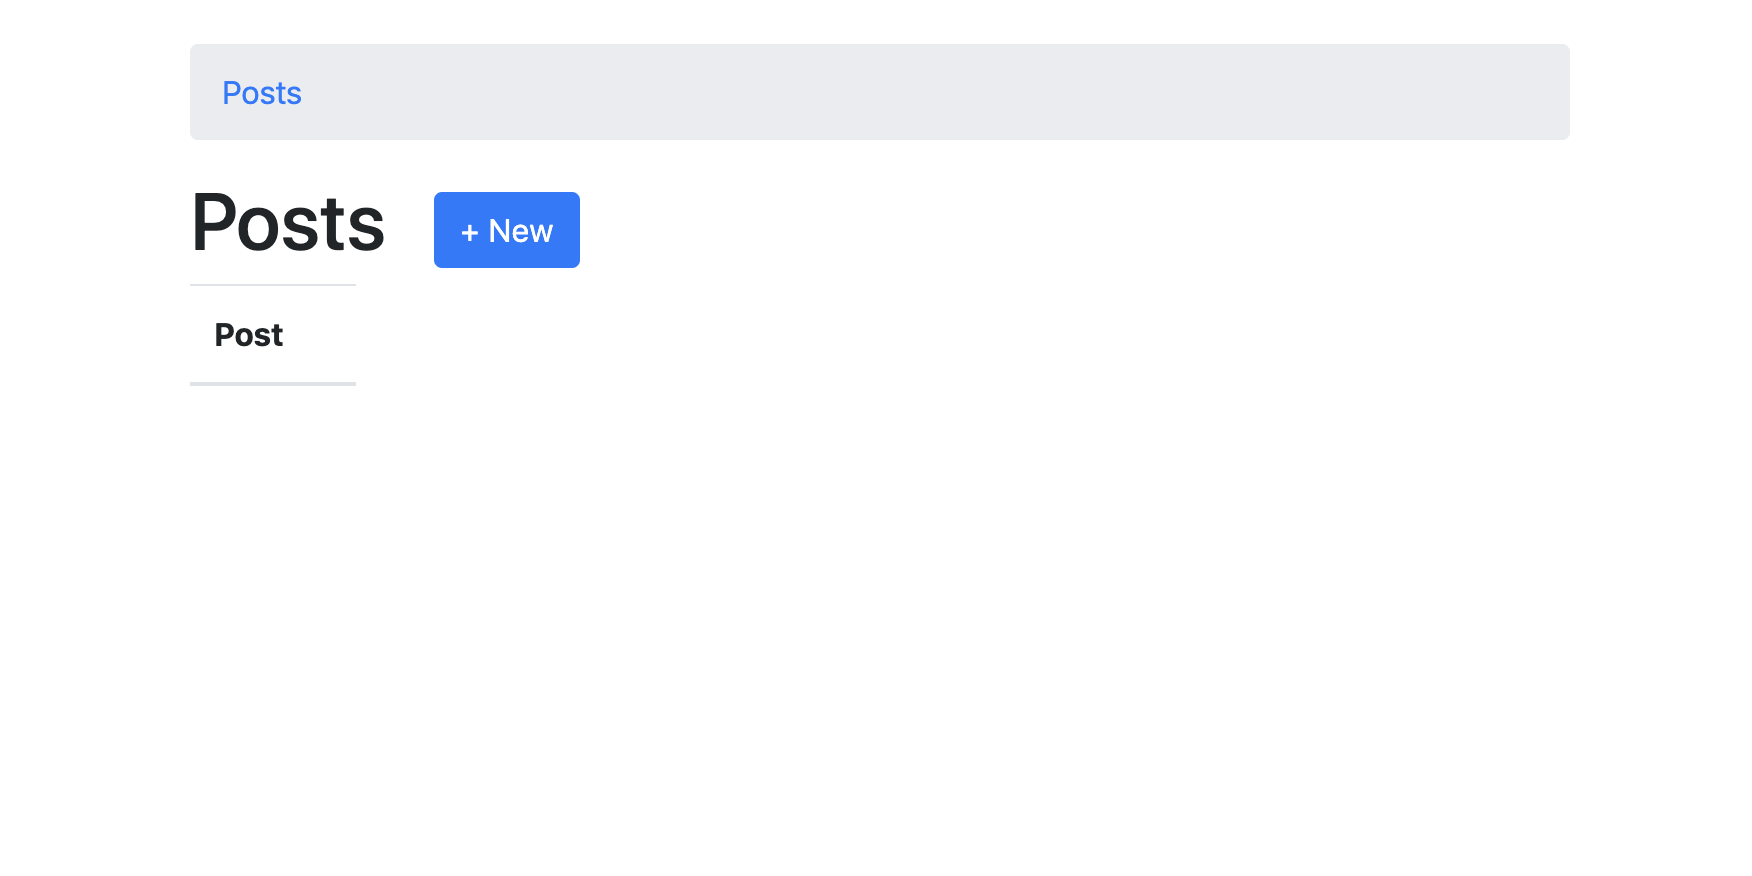
Next, we’re going to dig a bit deeper into all the changes made by the controller generator.
New Types
Let’s first take a closer look at the changes in Web/Types.hs. Here a new data structure was created:
data PostsController
    = PostsAction
    | NewPostAction
    | ShowPostAction { postId :: !(Id Post) }
    | CreatePostAction
    | EditPostAction { postId :: !(Id Post) }
    | UpdatePostAction { postId :: !(Id Post) }
    | DeletePostAction { postId :: !(Id Post) }
    deriving (Eq, Show, Data)
We have one constructor for each possible action. Here you can see a short description of all the constructors:
| Action | Request | Description |
|---|---|---|
PostsAction | GET /Posts | Lists all posts |
NewPostAction | GET /NewPost | Displays the form to create a post |
ShowPostAction { postId = someId } | GET /ShowPost?postId={someId} | Shows the posts with id $someId |
CreatePostAction | POST /CreatePost | Endpoint to create a Post |
EditPostAction { postId = someId } | GET /EditPost?postId={someId} | Displays the form to edit a post |
UpdatePostAction { postId = someId } | POST /UpdatePost?postId={someId} | Endpoint to submit a post update |
DeletePostAction { postId = someId } | DELETE /DeletePost?postId={someId} | Deletes the post |
A request like “Show me the post with id e57cfb85-ad55-4d5c-b3b6-3affed9c662c“ can be represented like ShowPostAction { postId = e57cfb85-ad55-4d5c-b3b6-3affed9c662c }. Basically, the IHP router always maps an HTTP request to such an action data type. (By the way: The type Id Post is just a UUID, but wrapped within a newtype, newtype Id model = Id UUID).
Controller Implementation: Web/Controller/Posts.hs
The actual code that is run, when an action is executed, is defined in Web/Controller/Posts.hs. Let’s take a look, step by step.
Imports
module Web.Controller.Posts where

import Web.Controller.Prelude
import Web.View.Posts.Index
import Web.View.Posts.New
import Web.View.Posts.Edit
import Web.View.Posts.Show
In the header we just see some imports. Controllers always import a special Web.Controller.Prelude module. It provides e.g. controller helpers and also the framework-specific functions we will see below. The controller also imports all its views. Views are also just “normal” Haskell modules.
Controller Instance
instance Controller PostsController where
The controller logic is specified by implementing an instance of the Controller type-class.
Index Action
This is where the interesting part begins. As we will see below, the controller implementation is just an action function, pattern matching over our data PostsController structure we defined in Web/Types.hs.
    action PostsAction = do
        posts <- query @Post |> fetch
        render IndexView { .. }
This is the index action. It’s called when opening /Posts. First, it fetches all the posts from the database and then passes them along to the view. The IndexView { .. } is just shorthand for IndexView { posts = posts }.
New Action
    action NewPostAction = do
        let post = newRecord
        render NewView { .. }
This is our endpoint for /NewPost. It just creates an empty new post and then passes it to the NewView. The newRecord is giving us an empty Post model. It’s equivalent to manually writing Post { id = Default, title = "", body = "" }.
Show Action
    action ShowPostAction { postId } = do
        post <- fetch postId
        render ShowView { .. }
This is our show action at /ShowPost?postId=postId. Here we pattern match on the postId field of ShowPostAction to get the post id of the given request. Then we just call fetch on that postId which gives us the specific Post record. Finally, we just pass that post to the view.
Edit Action
    action EditPostAction { postId } = do
        post <- fetch postId
        render EditView { .. }
Our /EditPost?postId=postId action. It’s pretty much the same as in the action ShowPostAction, just with a different view.
Update Action
    action UpdatePostAction { postId } = do
        post <- fetch postId
        post
            |> buildPost
            |> ifValid \case
                Left post -> render EditView { .. }
                Right post -> do
                    post <- post |> updateRecord
                    setSuccessMessage "Post updated"
                    redirectTo EditPostAction { .. }
This action deals with update requests for a specific post. As usual, we pattern match on the postId and fetch it.
The interesting part is buildPost. It is a helper function defined later in the controller: buildPost = fill @["title", "body"]. The fill call inside buildPost reads the title and body attributes from the browser request and fills them into the post record. The buildPost is also the place for validation logic.
ifValid returns Either Post Post. Left post means that e.g. the title or body did not pass validation. Right post means that all parameters could be set on post without any errors.
In the error case (Left post ->) we just re-render the EditView. The EditView then tells the user about validation errors.
In the success case (Right post ->) we save the updated post to the database (with updateRecord). Then we set a success message and redirect the user back to the edit view.
Create Action
    action CreatePostAction = do
        let post = newRecord @Post
        post
            |> buildPost
            |> ifValid \case
                Left post -> render NewView { .. }
                Right post -> do
                    post <- post |> createRecord
                    setSuccessMessage "Post created"
                    redirectTo PostsAction
Our create action, dealing with POST /CreatePost requests.
It’s pretty much like the update action. When the validation succeeded, it saves the record to the database using createRecord.
Delete Action
    action DeletePostAction { postId } = do
        post <- fetch postId
        deleteRecord post
        setSuccessMessage "Post deleted"
        redirectTo PostsAction
The last action is dealing with DELETE /DeletePost?postId=postId requests. It’s pretty much like the other actions, we just call deleteRecord here.
Routes
The router is configured in Web/Routes.hs. The generator just places a single line there:
instance AutoRoute PostsController
This empty instance magically sets up the routing for all the actions. Later you will learn how you can customize the URLs according to your needs (e.g. “beautiful URLs” for SEO).
Note that the word ‘Post’ here still refers to a post on our blog and is unrelated to the HTTP-POST request method.
Views
We should also quickly take a look at our views.
Let’s first look at the show view in Web/View/Posts/Show.hs:
module Web.View.Posts.Show where
import Web.View.Prelude

data ShowView = ShowView { post :: Post }

instance View ShowView where
    html ShowView { .. } = [hsx|
        {breadcrumb}
        <h1>Show Post</h1>
        <p>{post}</p>

    |]
        where
            breadcrumb = renderBreadcrumb
                            [ breadcrumbLink "Posts" PostsAction
                            , breadcrumbText "Show Post"
                            ]
We can see that ShowView is just a data definition. There is also a View ShowView instance. The HTML-like syntax inside the html function is hsx code. It’s similar to React’s JSX. You can write HTML code as usual there. Everything inside the [hsx|...|] block is also type-checked and converted to Haskell code at compile-time.
Now that we have a rough overview of all the parts belonging to our Post, it’s time to do some coding ourselves.
5. Extending the Blog
The generated controller already feels close to a super simple blog. Now it’s time to make it more beautiful.
Creating a Post
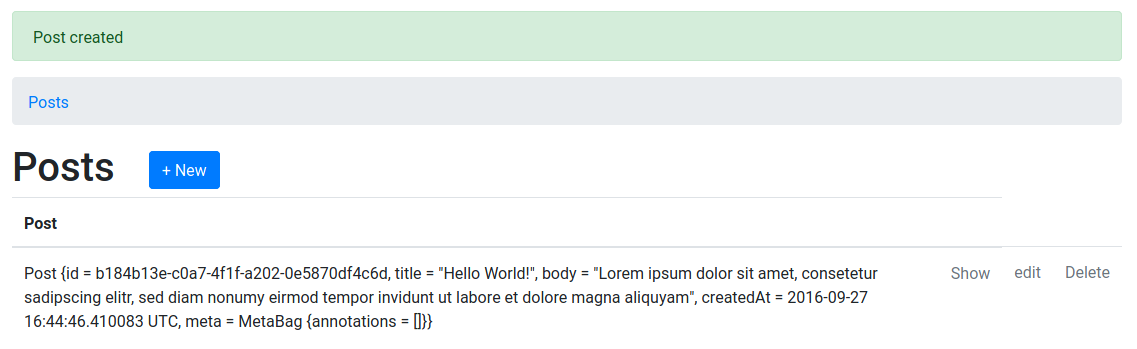
First, we quickly need to create a new blog post. Open http://localhost:8000/Posts and click on + New. Then enter Hello World! into the “Title” field and Lorem ipsum dolor sit amet, consetetur sadipscing elitr, sed diam nonumy eirmod tempor invidunt ut labore et dolore magna aliquyam into the “Body”.
Click Create Post. You should now see the new post listed on the index view.
Displaying a Post
Let’s first improve the show view. Right now the headline is “Show Post”, and the actual post body is just a dump of the Post Data definition.
Open the Web/View/Posts/Show.hs and replace <h1>Show Post</h1> with <h1>{post.title}</h1>. Also add a <div>{post.body}</div> below the <h1>.
The Web/View/Posts/Show.hs file should look like this:
module Web.View.Posts.Show where
import Web.View.Prelude

data ShowView = ShowView { post :: Post }

instance View ShowView where
    html ShowView { .. } = [hsx|
        {breadcrumb}
        <h1>{post.title}</h1>
        <p>{post.body}</p>

    |]
        where
            breadcrumb = renderBreadcrumb
                            [ breadcrumbLink "Posts" PostsAction
                            , breadcrumbText "Show Post"
                            ]
After you saved the changes, you should see that the changes have been reflected in the browser already. In the background, the page has been refreshed automatically. This refresh is using a diff based approach by using morphdom.
Display all posts
After creating your post, you should have already seen that the posts list is now displaying all the post fields. Let’s change it to only display the post’s title.
Open the Web/View/Posts/Index.hs and replace <td>{post}</td> with <td>{post.title}</td>.
Let’s also make it clickable by wrapping it in a link. We can just put a <a href={ShowPostAction post.id}> around it. The line should now look like:
<td><a href={ShowPostAction post.id}>{post.title}</a></td>
Now we can also remove the “Show” link. We can do that by removing the next line <td><a href={ShowPostAction post.id}>Show</a></td>.
Also remove the corresponding <th></th> from thead so that there are only three th tags:
<thead>
    <tr>
        <th>Post</th>
        <th></th>
        <th></th>
    </tr>
</thead>
Adding Validation
Let’s make sure that every post has at least a title. Validations can be defined inside our controller Web/Controller/Posts.hs.
Right now at the bottom of the file, we have this:
buildPost post = post
    |> fill @["title","body"]
Replace the implementation with this:
buildPost post = post
    |> fill @["title","body"]
    |> validateField #title nonEmpty
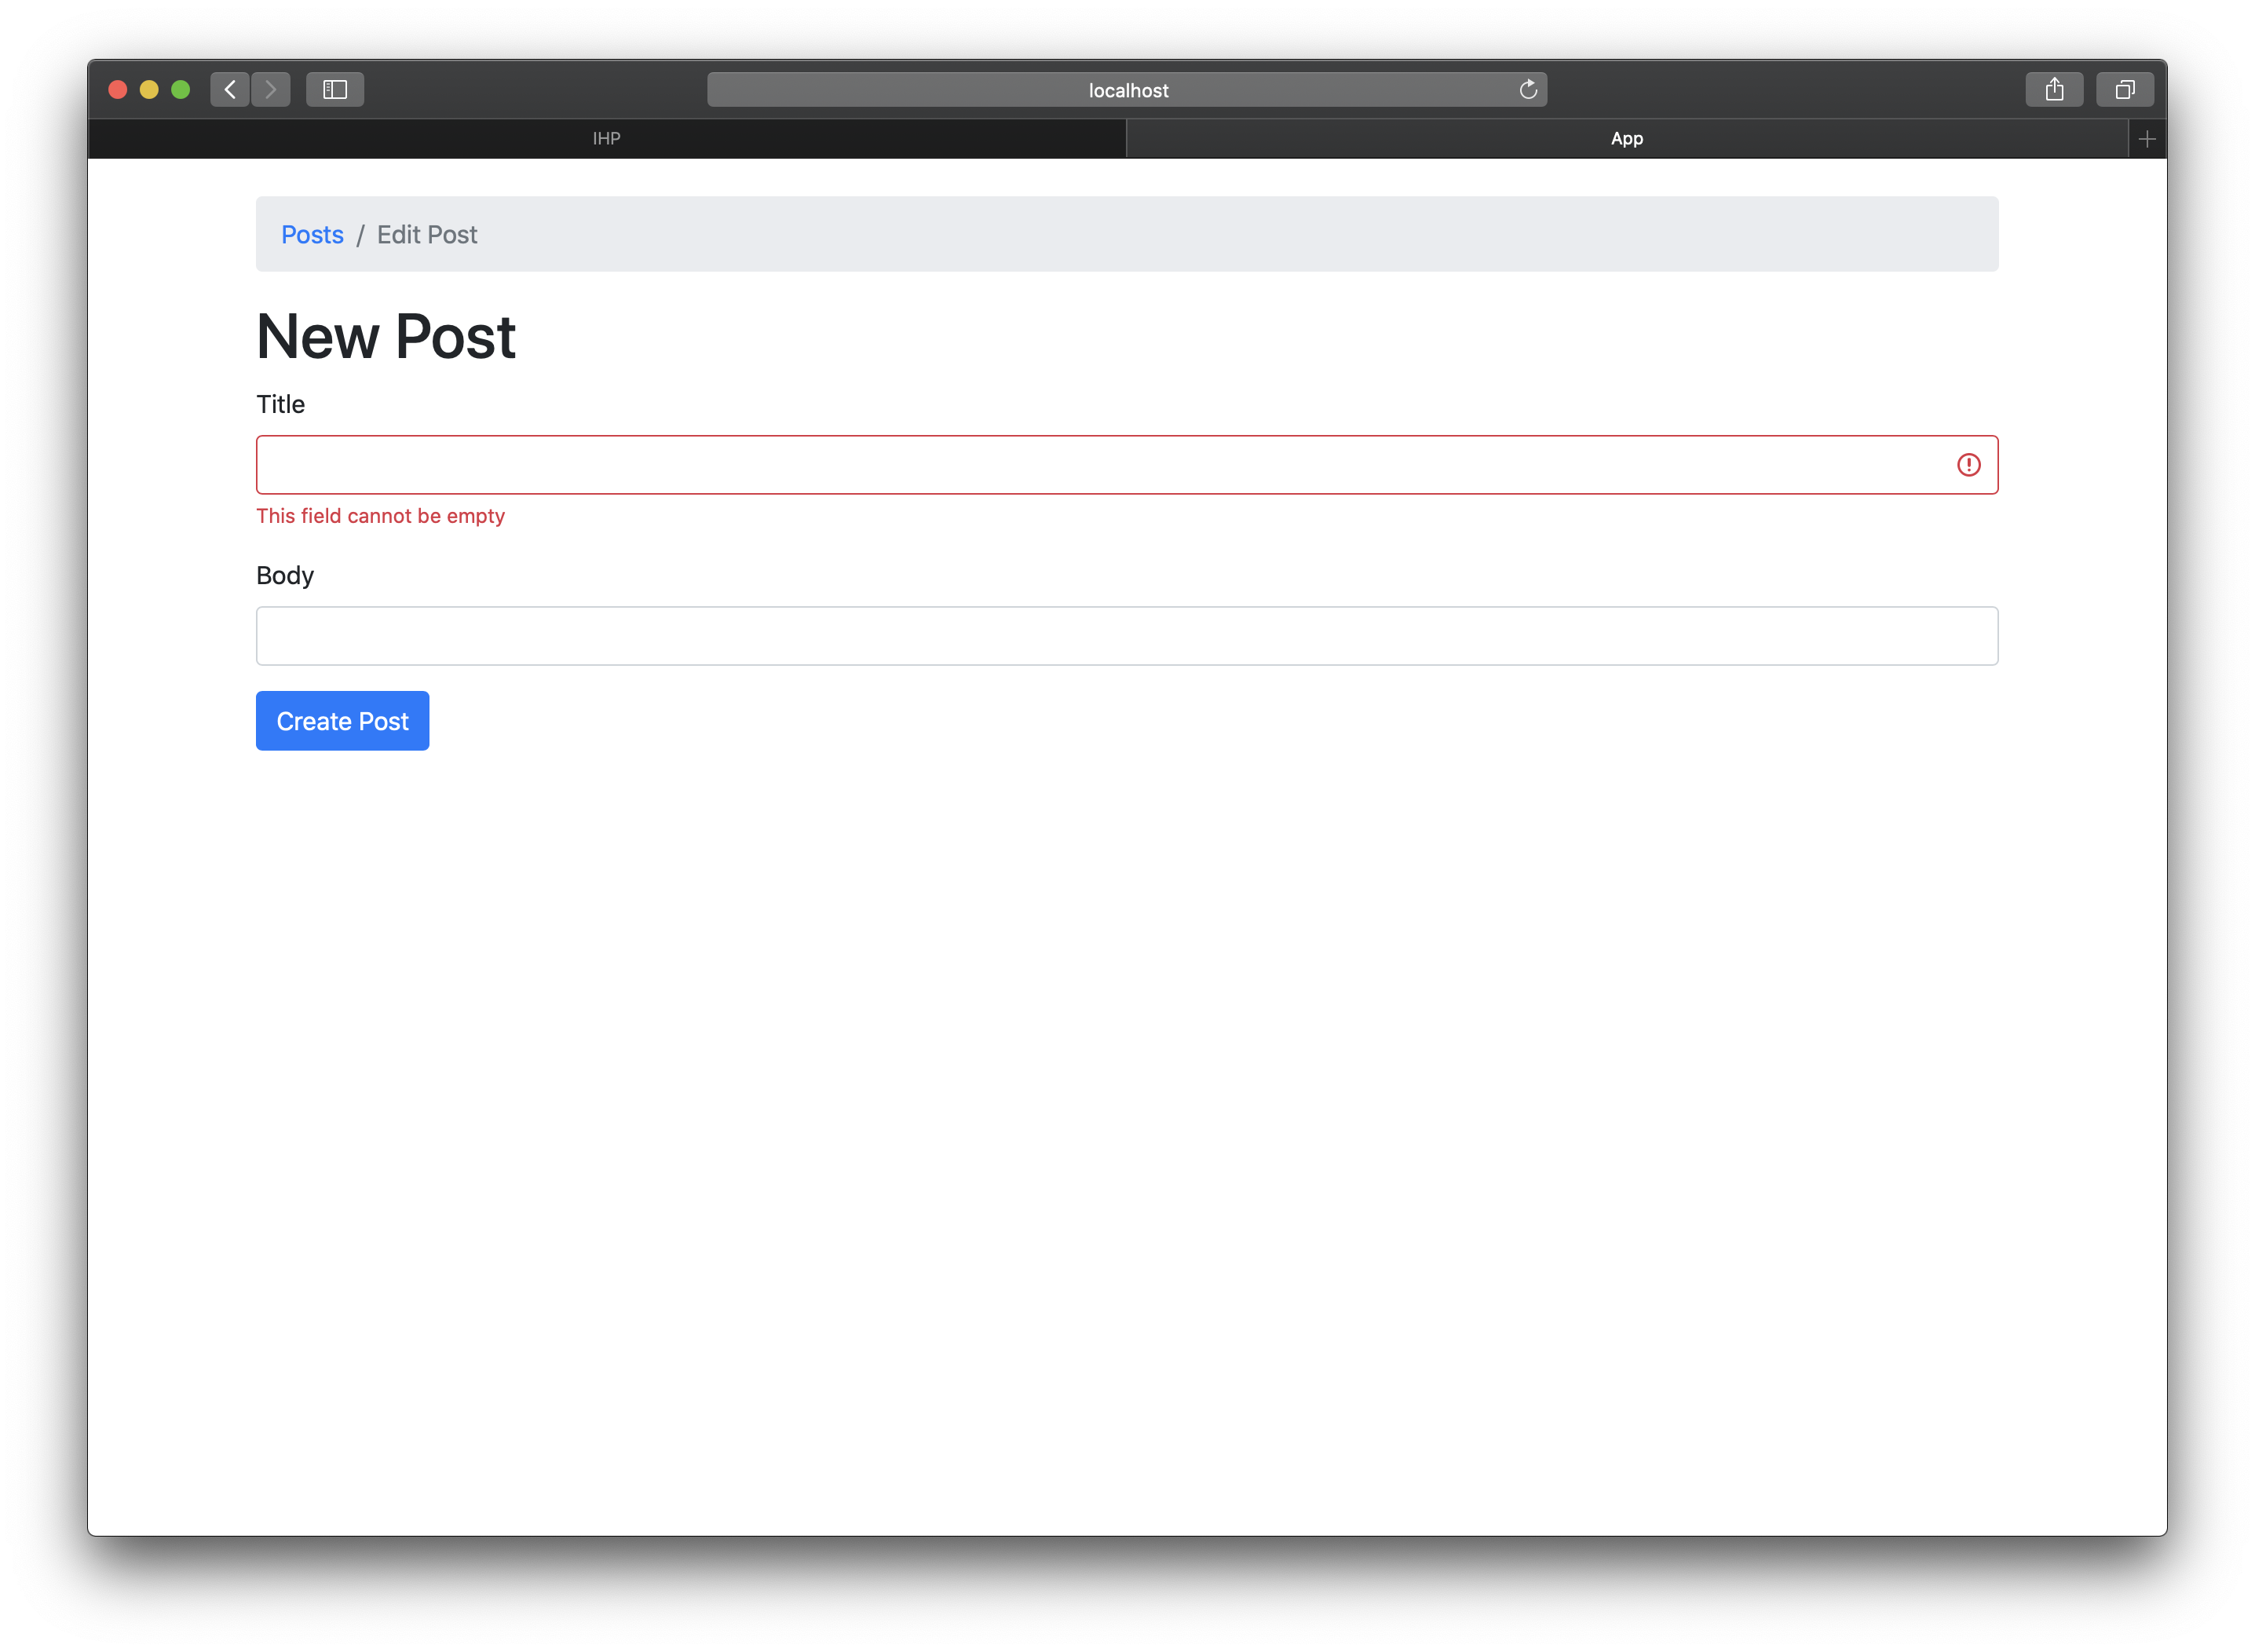
Now open http://localhost:8000/NewPost and click Create Post without filling the text fields. You will get a “This field cannot be empty” error message next to the empty title field.
You can find a list of all available validator functions in the API Documentation.
Timestamps
It would be nice to always show the latest post on the index view. Let’s add a timestamp to do exactly that.
Take a look at Application/Fixtures.sql. The file should look like this:
-- .......
-- .......

INSERT INTO public.posts VALUES ('fcbd2232-cdc2-4d0c-9312-1fd94448d90a', 'Hello World!', 'Lorem ipsum dolor sit amet, consetetur sadipscing elitr, sed diam nonumy eirmod tempor invidunt ut labore et dolore magna aliquyam');
(If you don’t see an entry for your test post in Application/Fixtures.sql, then click Migrate DB -> Update DB in the Schema Designer (or use make dumpdb from the command line).)
All our existing posts are saved here. You should also commit this file to git to share your fixtures with your teammates. We will need these saved fixtures in a moment when we want to update the database schema.
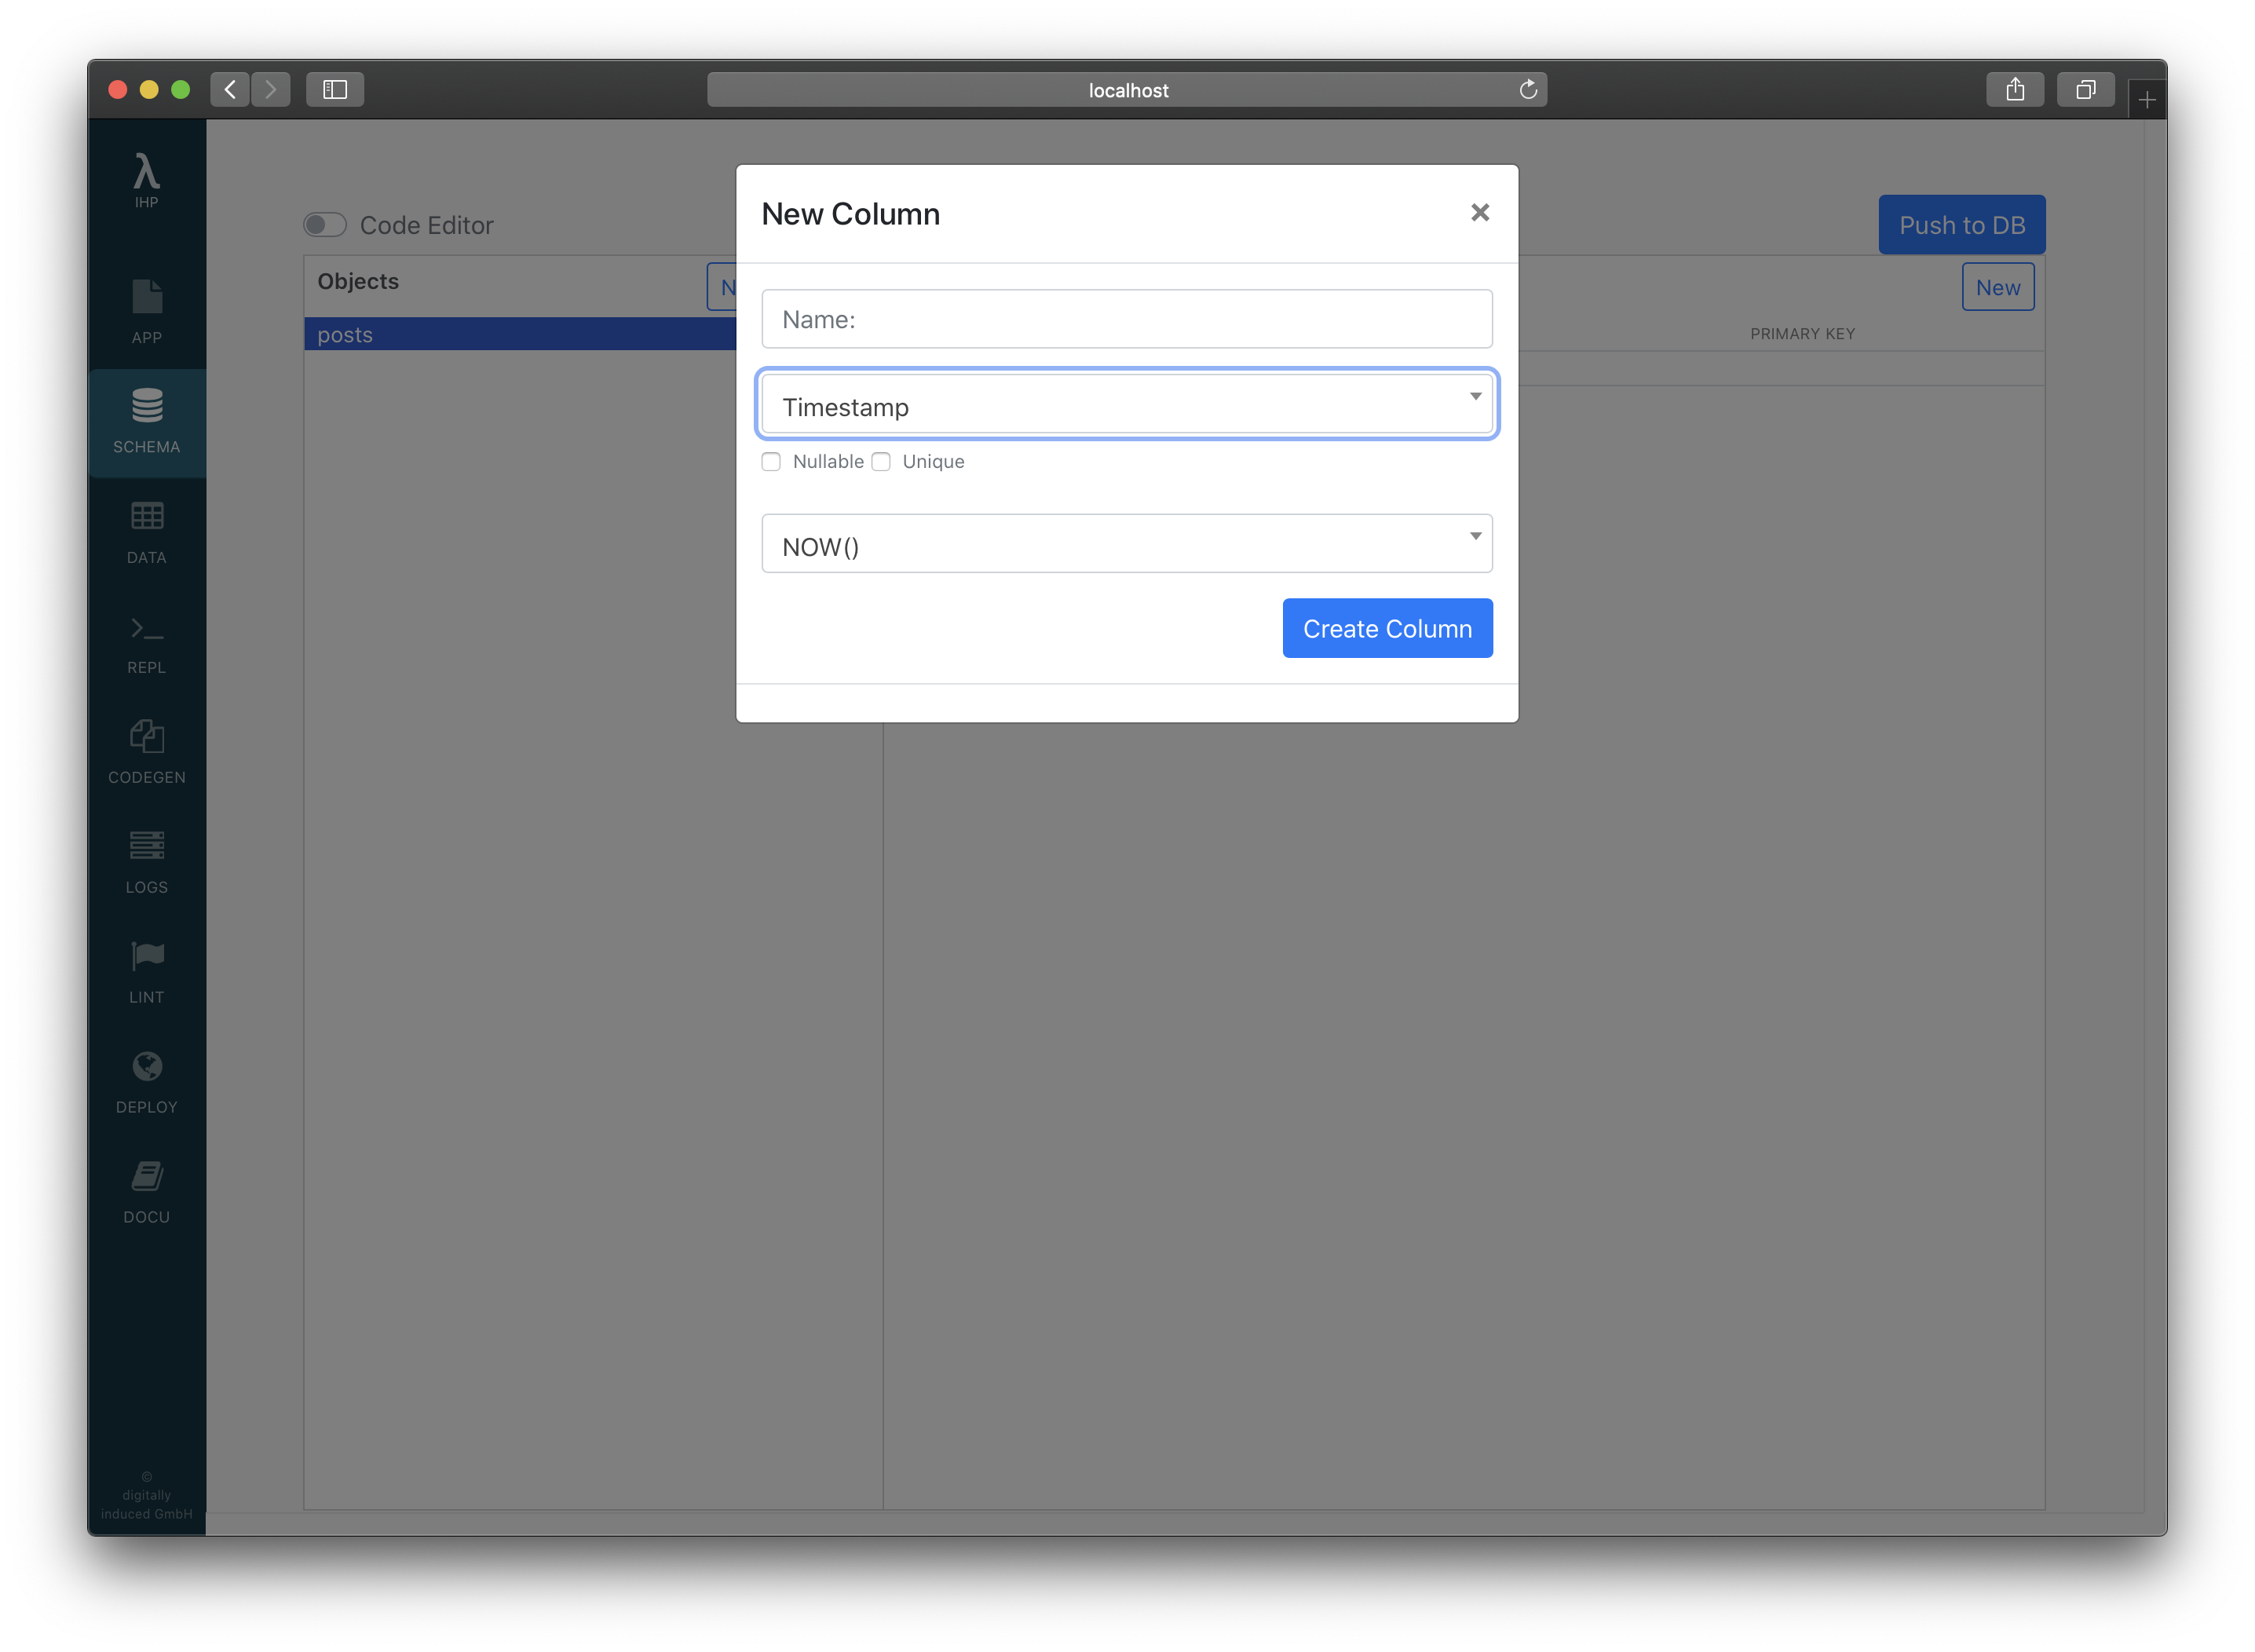
Let’s add a new created_at column. Open http://localhost:8001/Tables, right-click on posts, select Add Column to Table, enter created_at for the name, select Timestamp for the type, set the default value to NOW(), and press Create Column.
Now open the /Posts again inside your browser. You will see this error:
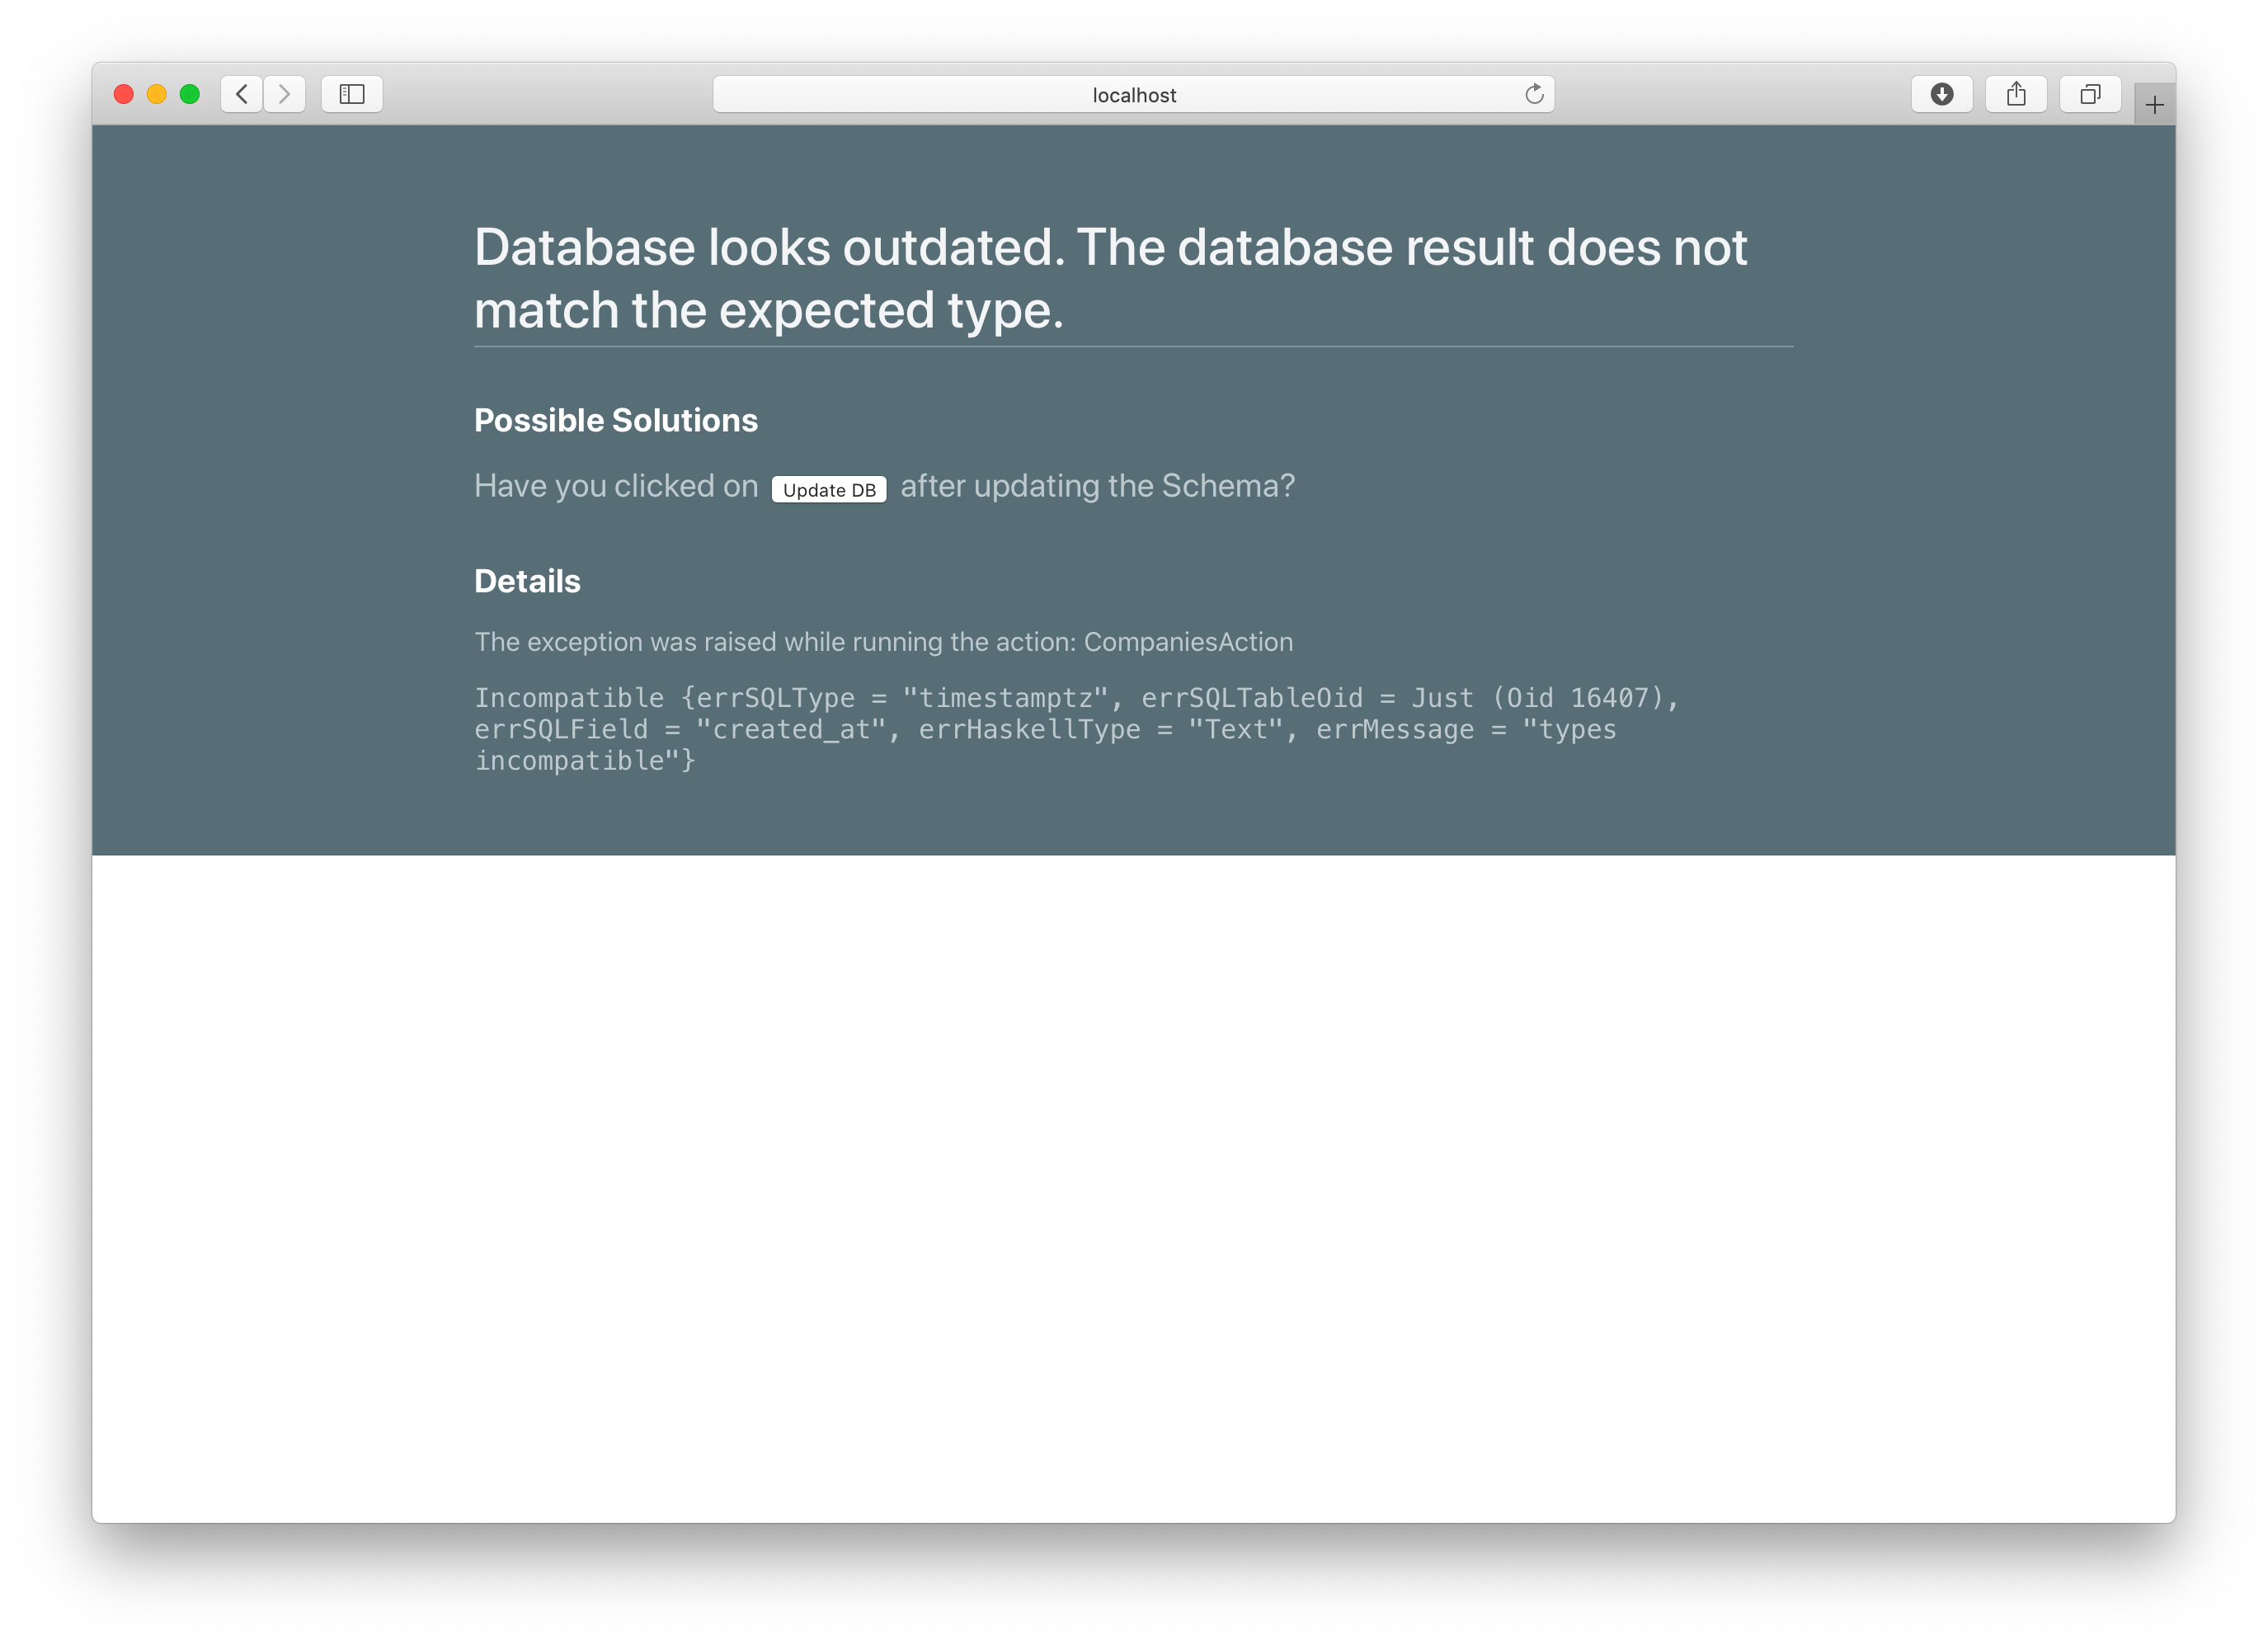
This happens because we only added the created_at column to the Application/Schema.sql file by using the Schema Designer. But the actual running Postgres server still uses the older database schema.
To update the local database, open the Schema Designer, and click the Migrate DB button. Then click Run Migration. This button will then bring the Schema and the actual database sync again by adding the missing column.
In general, the workflow for making database schema changes locally is: Make changes to the Schema.sql and update Database with Migrate DB.
You can open http://localhost:8000/Posts again. The error is gone now.
Now we can order the posts by our new created_at field. Open Web/Controller/Posts.hs and add orderByDesc #createdAt like this inside the action PostsAction:
action PostsAction = do
    posts <- query @Post
        |> orderByDesc #createdAt
        |> fetch
    render IndexView { .. }
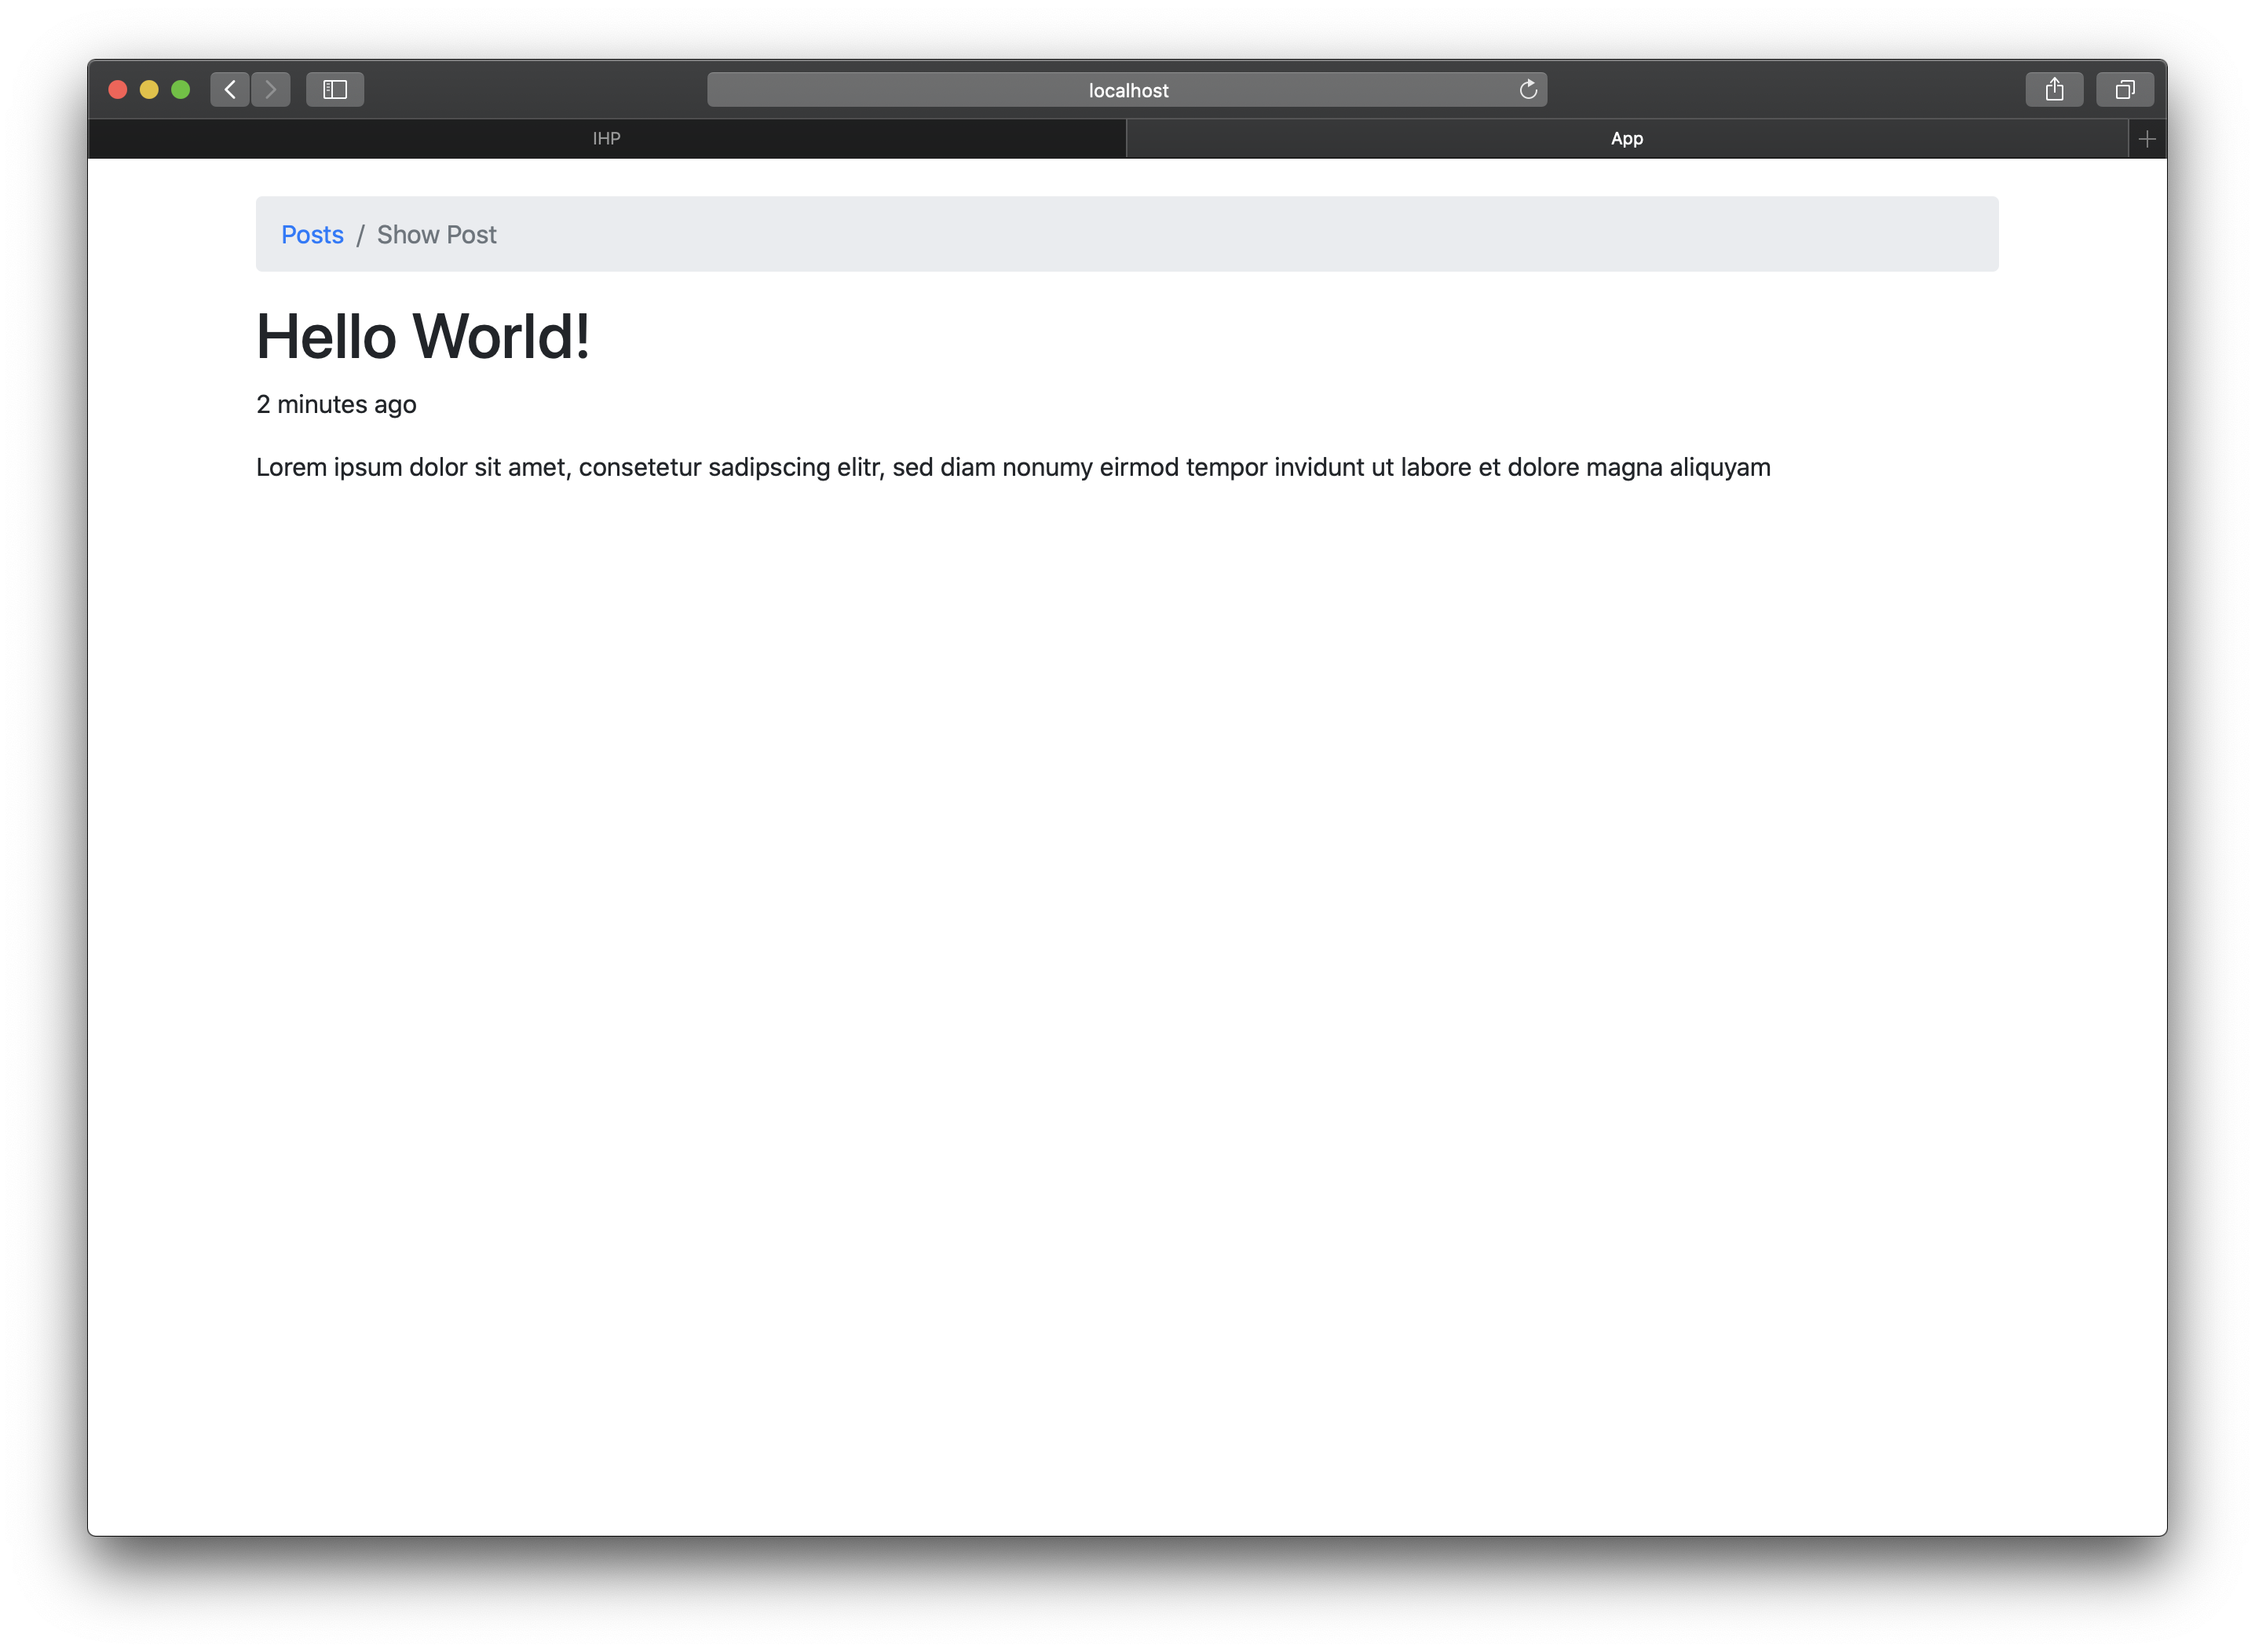
Let’s also show the creation time in the ShowView in Web/View/Posts/Show.hs. There we add <p>{post.createdAt |> timeAgo}</p> below the title:
    html ShowView { .. } = [hsx|
        {breadcrumb}
        <h1>{post.title}</h1>
        <p>{post.createdAt |> timeAgo}</p>
        <div>{post.body}</div>
    |]
Open the view to check that it’s working. If everything is fine, you will see something like 5 minutes ago below the title. The timeAgo helper uses a bit of JavaScript to automatically display the given timestamp in the current time zone and in a relative format. In case you want to show the absolute time (like 10.6.2019, 15:58), just use dateTime instead of timeAgo.
Markdown
Right now our posts can only be plain text. Let’s make it more powerful by adding support for Markdown.
Adding a Markdown Library
To deal with Markdown, instead of implementing a custom Markdown parser, let’s just use an existing package. There’s the excellent mmark package we can use.
To install this package, open the flake.nix file and append mmark to the haskellPackages list. The file will now look like this:
{
    inputs = {
        ihp.url = "github:digitallyinduced/ihp/v1.1";
        nixpkgs.follows = "ihp/nixpkgs";
        flake-parts.follows = "ihp/flake-parts";
        devenv.follows = "ihp/devenv";
        systems.follows = "ihp/systems";
    };

    outputs = inputs@{ ihp, flake-parts, systems, ... }:
        flake-parts.lib.mkFlake { inherit inputs; } {

            systems = import systems;
            imports = [ ihp.flakeModules.default ];

            perSystem = { pkgs, ... }: {
                ihp = {
                    enable = true;
                    projectPath = ./.;
                    packages = with pkgs; [
                        # Native dependencies, e.g. imagemagick
                    ];
                    haskellPackages = p: with p; [
                        # Haskell dependencies go here
                        p.ihp
                        base
                        wai
                        text
                        mmark # <--------- OUR NEW PACKAGE ADDED HERE
                    ];
                };
            };

        };
}
Stop the development server by pressing CTRL+C. Then update the local development environment by running devenv up. This will download and install the mmark package.
Markdown Rendering
Now that we have mmark installed, we need to integrate it into our ShowView. First, we need to import it: add the following line to the top of Web/View/Posts/Show.hs:
import qualified Text.MMark as MMark
Next change {post.body} to {post.body |> renderMarkdown}. This pipes the body field through a function renderMarkdown. Of course, we also have to define the function now.
Add the following to the bottom of the show view:
renderMarkdown text = text
This function now does nothing except return its input text. Our Markdown package provides two functions, MMark.parse and MMark.render to deal with the Markdown. Let’s first deal with parsing:
renderMarkdown text = text |> MMark.parse ""
The empty string we pass to MMark.parse is usually the file name of the .markdown file. As we don’t have any Markdown file, we just pass an empty string.
Now open the web app and take a look at a blog post. You will see something like this:
Right MMark {..}
This is the parsed representation of the Markdown. Of course, that’s not very helpful. We also have to connect it with MMark.render to get HTML code for our Markdown. Replace the renderMarkdown with the following code:
renderMarkdown text =
    case text |> MMark.parse "" of
        Left error -> "Something went wrong"
        Right markdown -> MMark.render markdown |> tshow |> preEscapedToHtml
The show view will now show real formatted text, as we would have expected.
Forms & Validation
Let’s also quickly update our form. Right now we have a one-line text field there. We can replace it with a text area to support multi-line text.
Open Web/View/Posts/Edit.hs and change {(textField #body)} to {(textareaField #body)}. We can also add a short hint that the text area supports Markdown: Replace {(textareaField #body)} with {(textareaField #body) { helpText = "You can use Markdown here"} }.
renderForm :: Post -> Html
renderForm post = formFor post [hsx|
    {(textField #title)}
    {(textareaField #body) { helpText = "You can use Markdown here"} }
    {submitButton}
|]
After that, do the same in Web/View/Posts/New.hs.
We can also add an error message when the user tries to save invalid Markdown. We can quickly write a custom validator for that:
Open Web/Controller/Posts.hs and import MMark at the top:
import qualified Text.MMark as MMark
Then add this custom validator to the bottom of the file:
isMarkdown :: Text -> ValidatorResult
isMarkdown text =
    case MMark.parse "" text of
        Left _ -> Failure "Please provide valid Markdown"
        Right _ -> Success
We can use the validator by adding a new validateField #body isMarkdown line to the buildPost function:
buildPost post = post
    |> fill @["title","body"]
    |> validateField #title nonEmpty
    |> validateField #body nonEmpty
    |> validateField #body isMarkdown
Create a new post with just # (a headline without any text) as the content to see our new error message.
6. Adding Comments
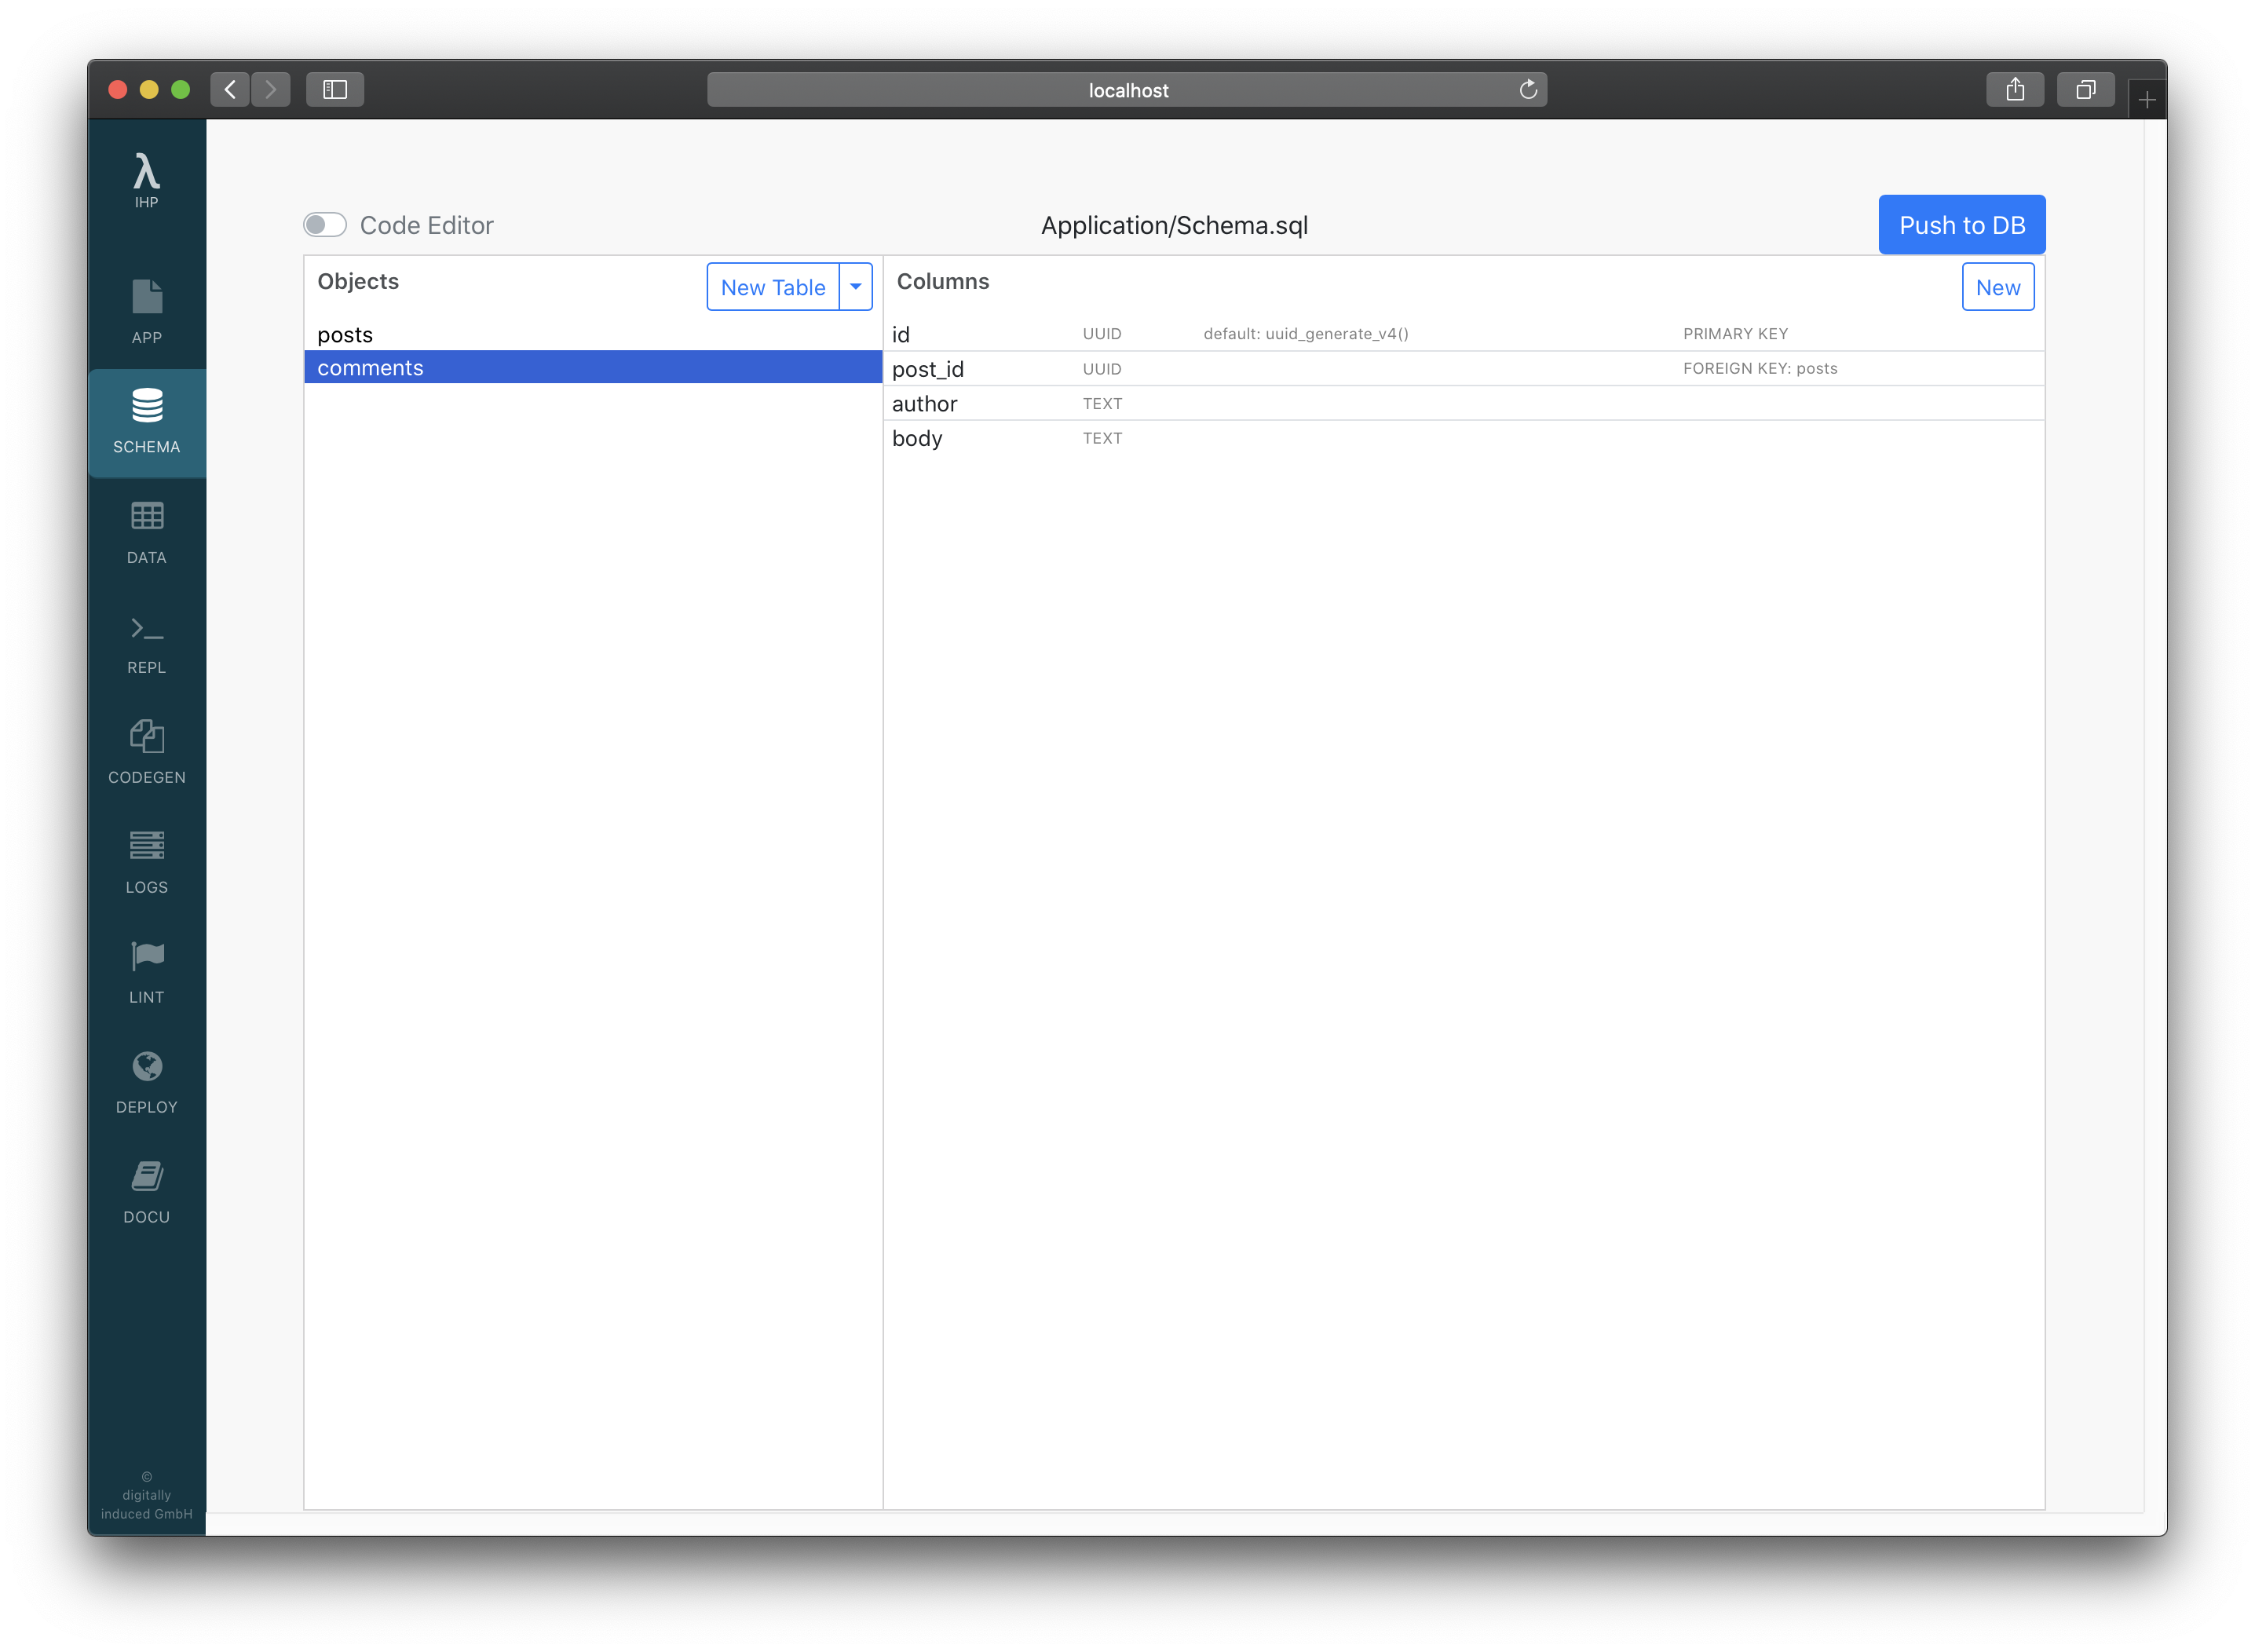
It’s time to add comments to our blog. For that open the Schema Designer and add a new table comments with the fields id, post_id, author and body:
When adding the post_id column, it will automatically set the type to UUID. Unless you unselect the checkbox References posts it will also automatically create a foreign key constraint for this column:
By default the foreign key constraint has set its ON DELETE behavior to NO ACTION. To change the ON DELETE, click on the FOREIGN KEY: posts next to the post_id field.
Press the Migrate DB to add our new comments table to the dev database.
The Controller
Let’s add a controller for our comments. We can use the visual code generator for this:
Use Comments as the controller name:
Click Preview > Generate:
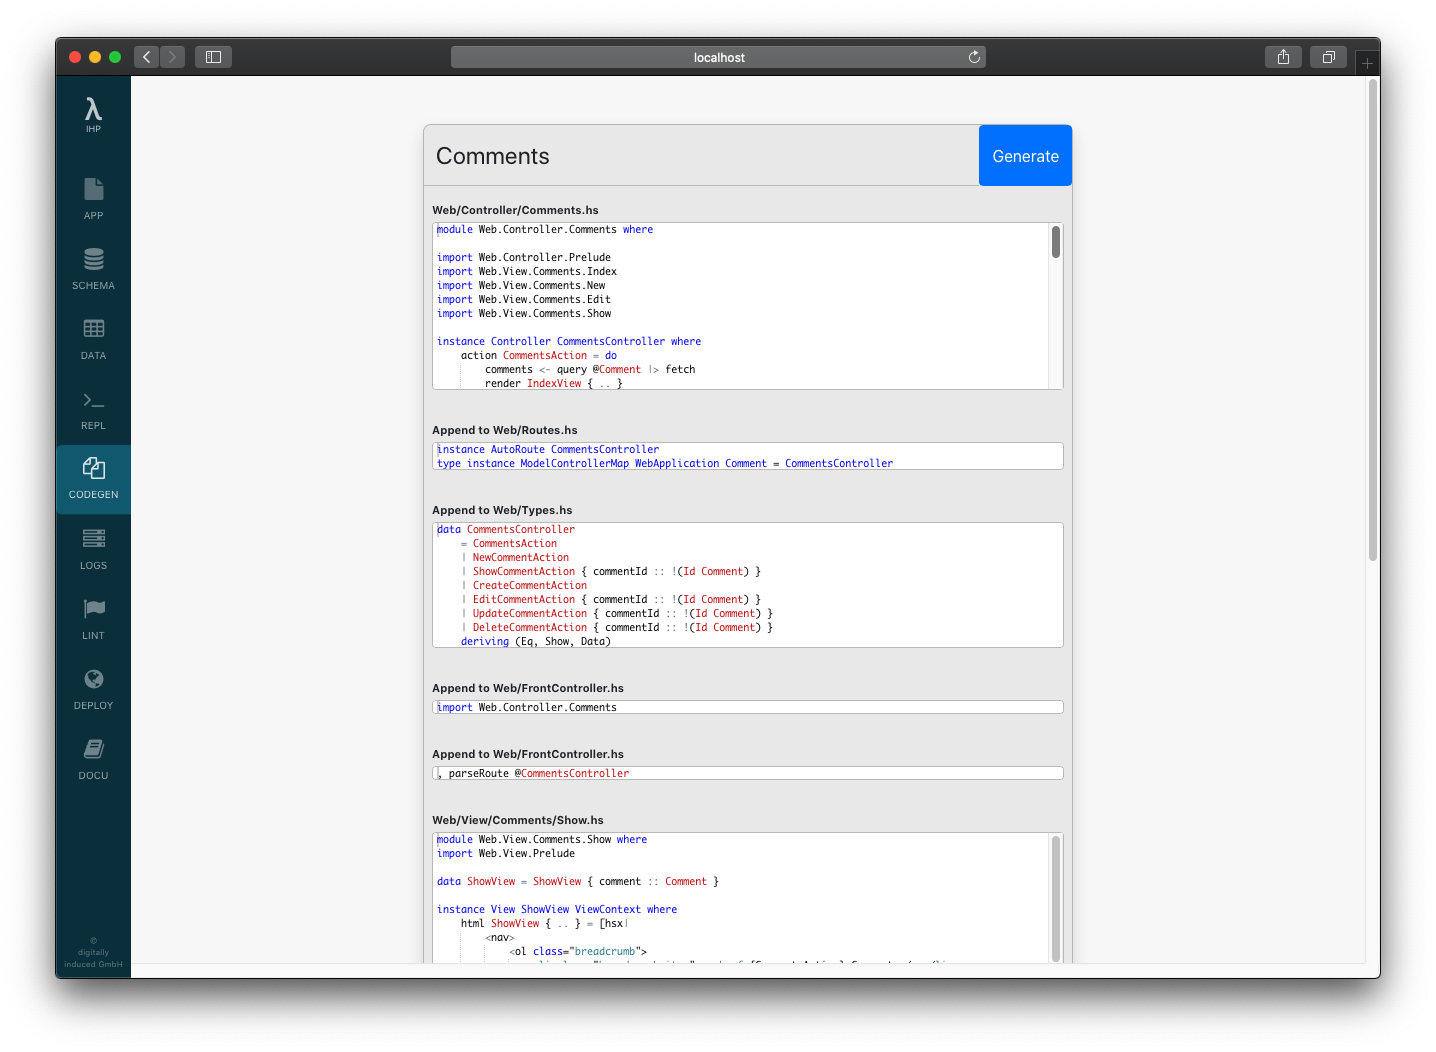
The controller is generated now. But we need to do some adjustments to better integrate the comments into the posts.
“Add comment”
First we need to make it possible to create a new comment for a post. Open Web/View/Posts/Show.hs and append <a href={NewCommentAction}>Add Comment</a> to the HSX code:
instance View ShowView where
    html ShowView { .. } = [hsx|
        {breadcrumb}
        <h1>{post.title}</h1>
        <p>{post.createdAt |> timeAgo}</p>
        <div>{post.body |> renderMarkdown}</div>

        <a href={NewCommentAction}>Add Comment</a>
    |]
        where
            breadcrumb = renderBreadcrumb
                            [ breadcrumbLink "Posts" PostsAction
                            , breadcrumbText "Show Post"
                            ]
This creates an Add Comment link, which links to the New Comment Form we just generated. After clicking the Add Comment link, we can see this:
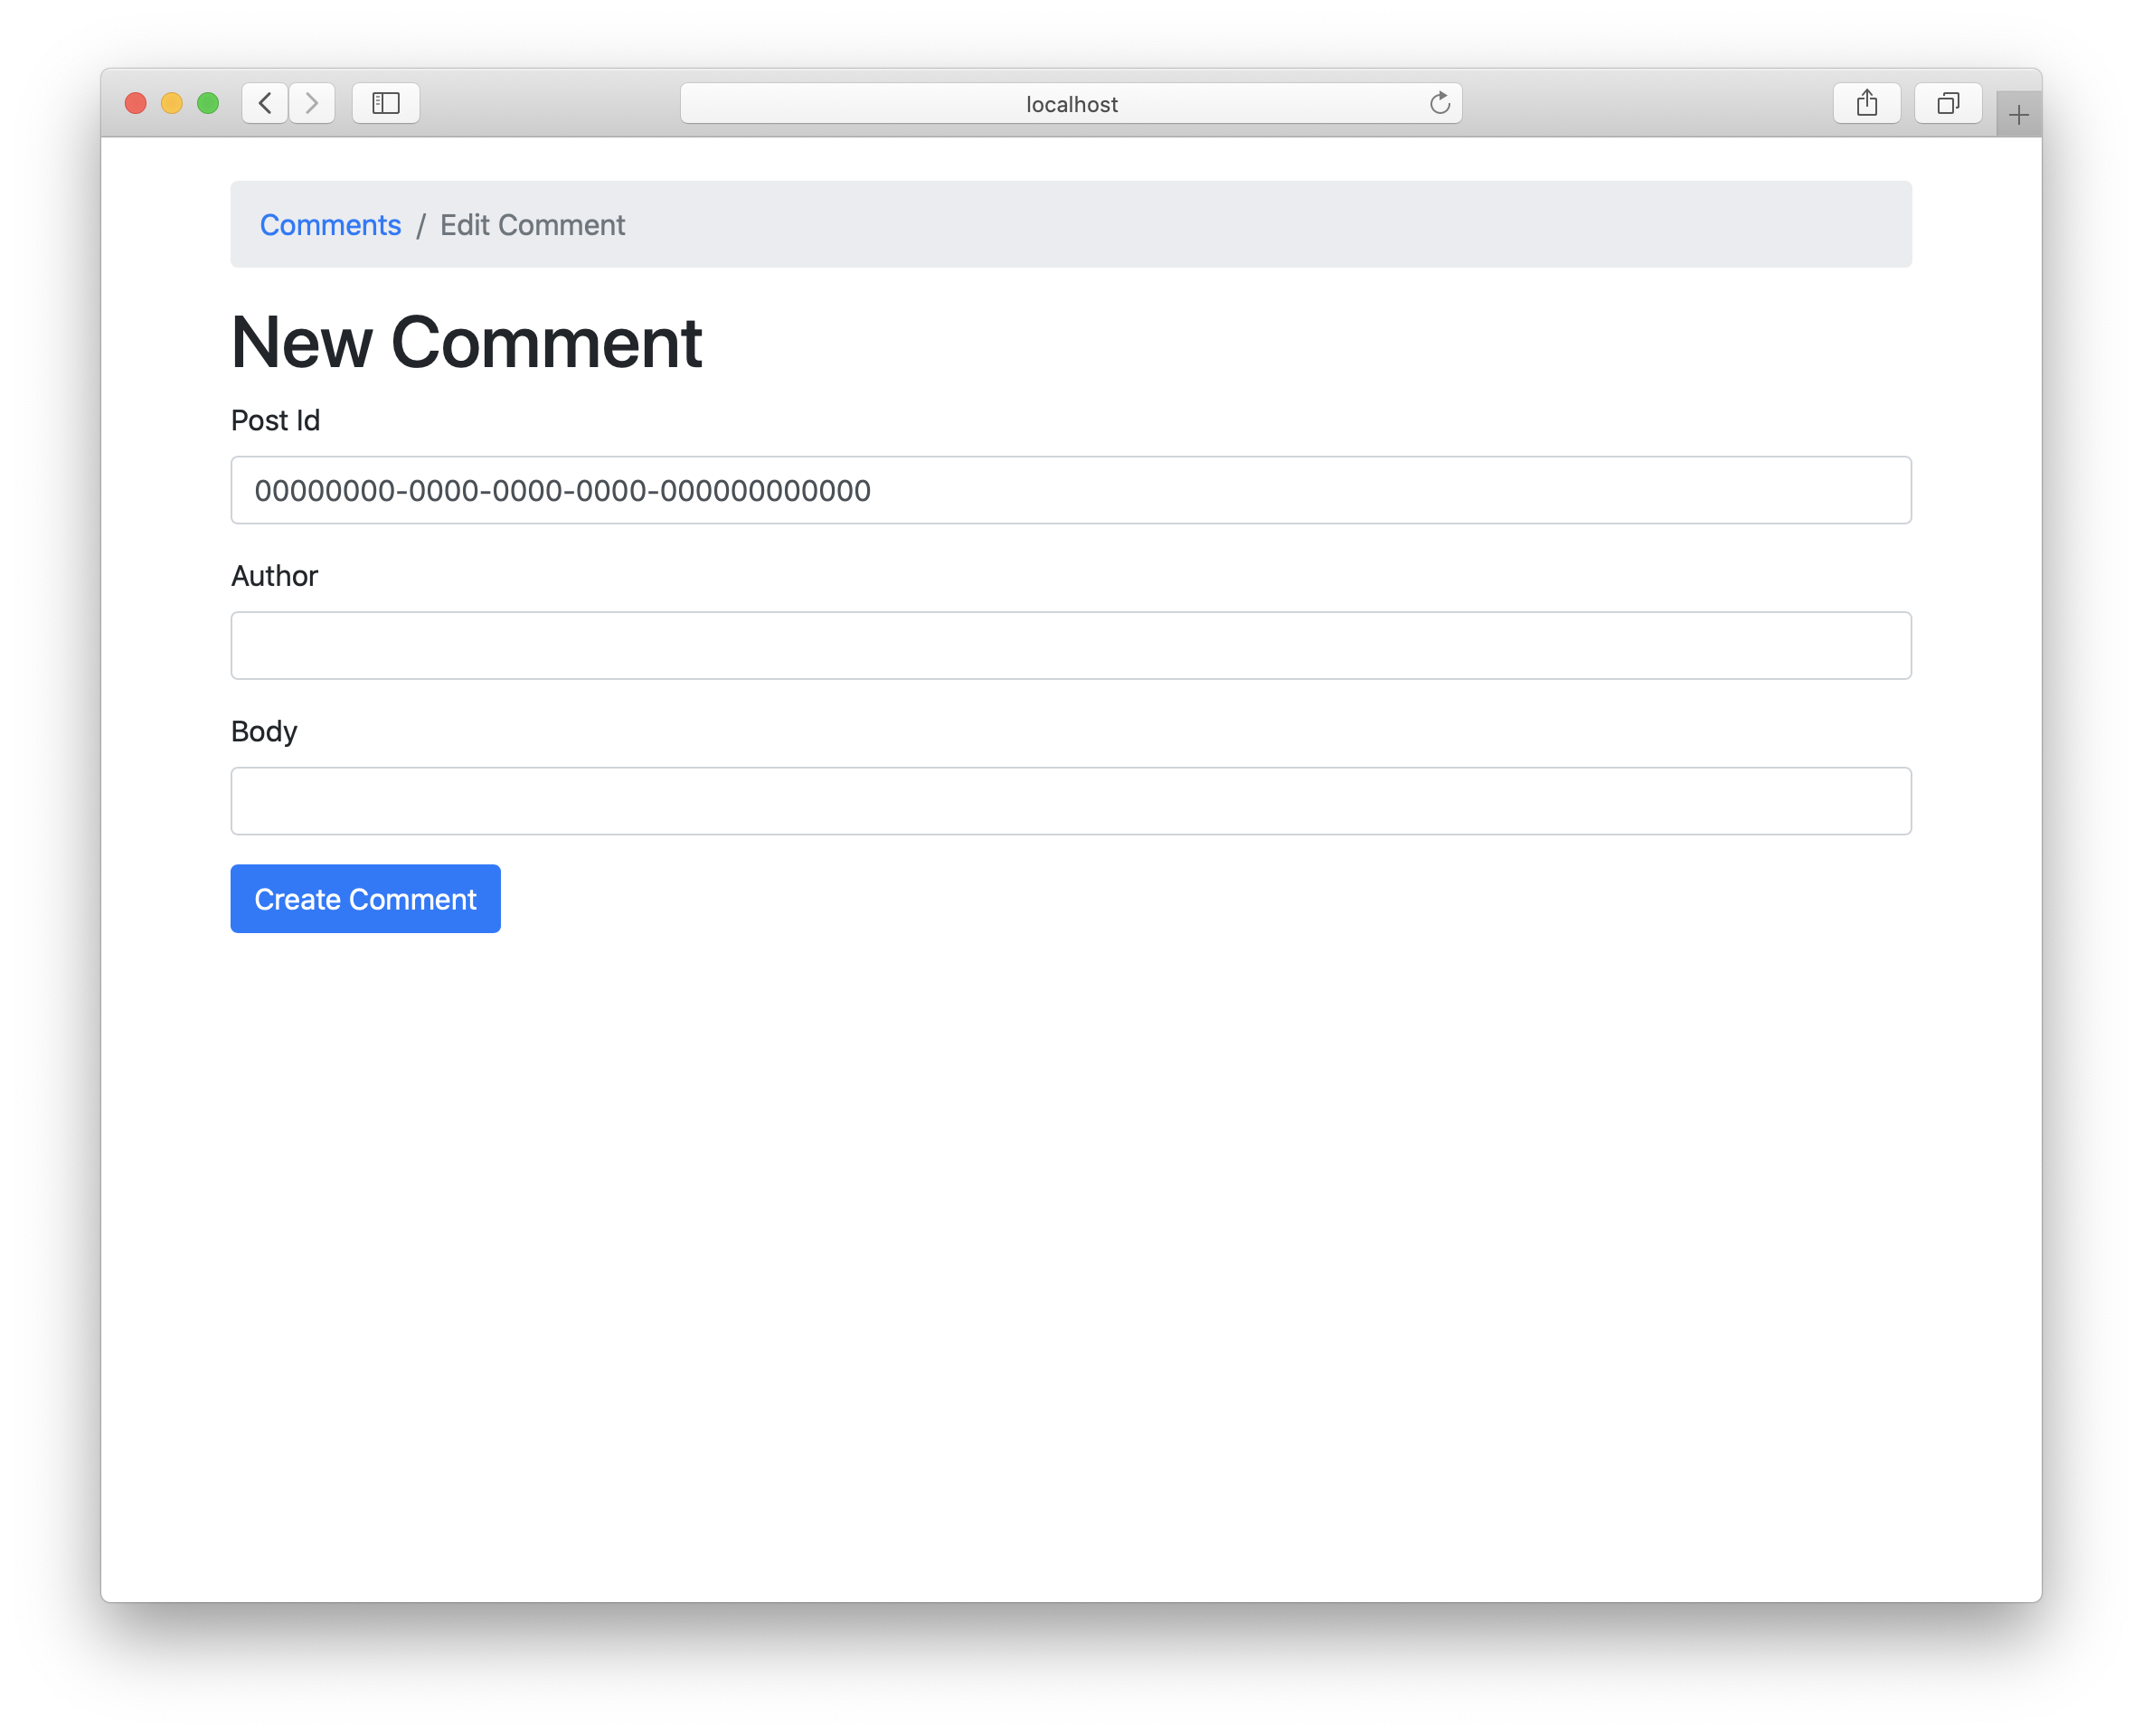
We can see, there is a post id field which is a field with a lot of 0s. When we try to submit this form, it will fail because there is no post with this id. Let’s first make it possible, that the post id is automatically set to the post where we originally clicked on “New Comment”.
For that, open Web/Types.hs. We can see the definition of CommentsController:
data CommentsController
    = CommentsAction
    | NewCommentAction
    | ShowCommentAction { commentId :: !(Id Comment) }
    | CreateCommentAction
    | EditCommentAction { commentId :: !(Id Comment) }
    | UpdateCommentAction { commentId :: !(Id Comment) }
    | DeleteCommentAction { commentId :: !(Id Comment) }
    deriving (Eq, Show, Data)
Let’s add an argument postId :: !(Id Post) to NewCommentAction:
data CommentsController
    -- ...
    | NewCommentAction { postId :: !(Id Post) }
    -- ...
After making this change, we can see some of the type errors in the browser. This is because all references to NewCommentAction now need to be passed the postId value. Think of these type errors as a TODO list of changes to be made, reported to us by the compiler.
Open Web/View/Posts/Show.hs and change <a href={NewCommentAction}>Add Comment</a> to:
<a href={NewCommentAction post.id}>Add Comment</a>
After that, another type error can be found in Web/View/Comments/Index.hs. In this auto-generated view we have an Index button at the top:
<h1>Index <a href={pathTo NewCommentAction} class="btn btn-primary ml-4">+ New</a></h1>
Let’s just remove this button by changing this line to:
<h1>Comments</h1>
Now we see another type error:
Web/Controller/Comments.hs:14:12: error:
    • The constructor ‘NewCommentAction’ should have 1 argument, but has been given none
    • In the pattern: NewCommentAction
      In an equation for ‘action’:
          action NewCommentAction
            = do let comment = ...
                 render NewView {..}
      In the instance declaration for ‘Controller CommentsController’
   |
14 |     action NewCommentAction = do
   |            ^^^^^^^^^^^^^^^^
Open Web/Controller/Comments.hs and add the missing { postId } in the pattern match at line 14:
    action NewCommentAction { postId } = do
        let comment = newRecord
        render NewView { .. }
Now all type errors should be fixed.
Open http://localhost:8000/Posts and open the Show View of a post by clicking its title. Now Click Add Comment. Take a look at the URL, it will look something like:
http://localhost:8000/NewComment?postId=7f37115f-c850-4fcb-838f-1971cea0544e
You can see that the postId has been passed as a query parameter. In the form, the post id field is still filled with 0s. Let’s fix this. Open Web/Controller/Comments.hs and change the NewCommentAction to this:
    action NewCommentAction { postId } = do
        let comment = newRecord
                |> set #postId postId
        render NewView { .. }
This will set the postId of our new comment record to the postId given to the action.
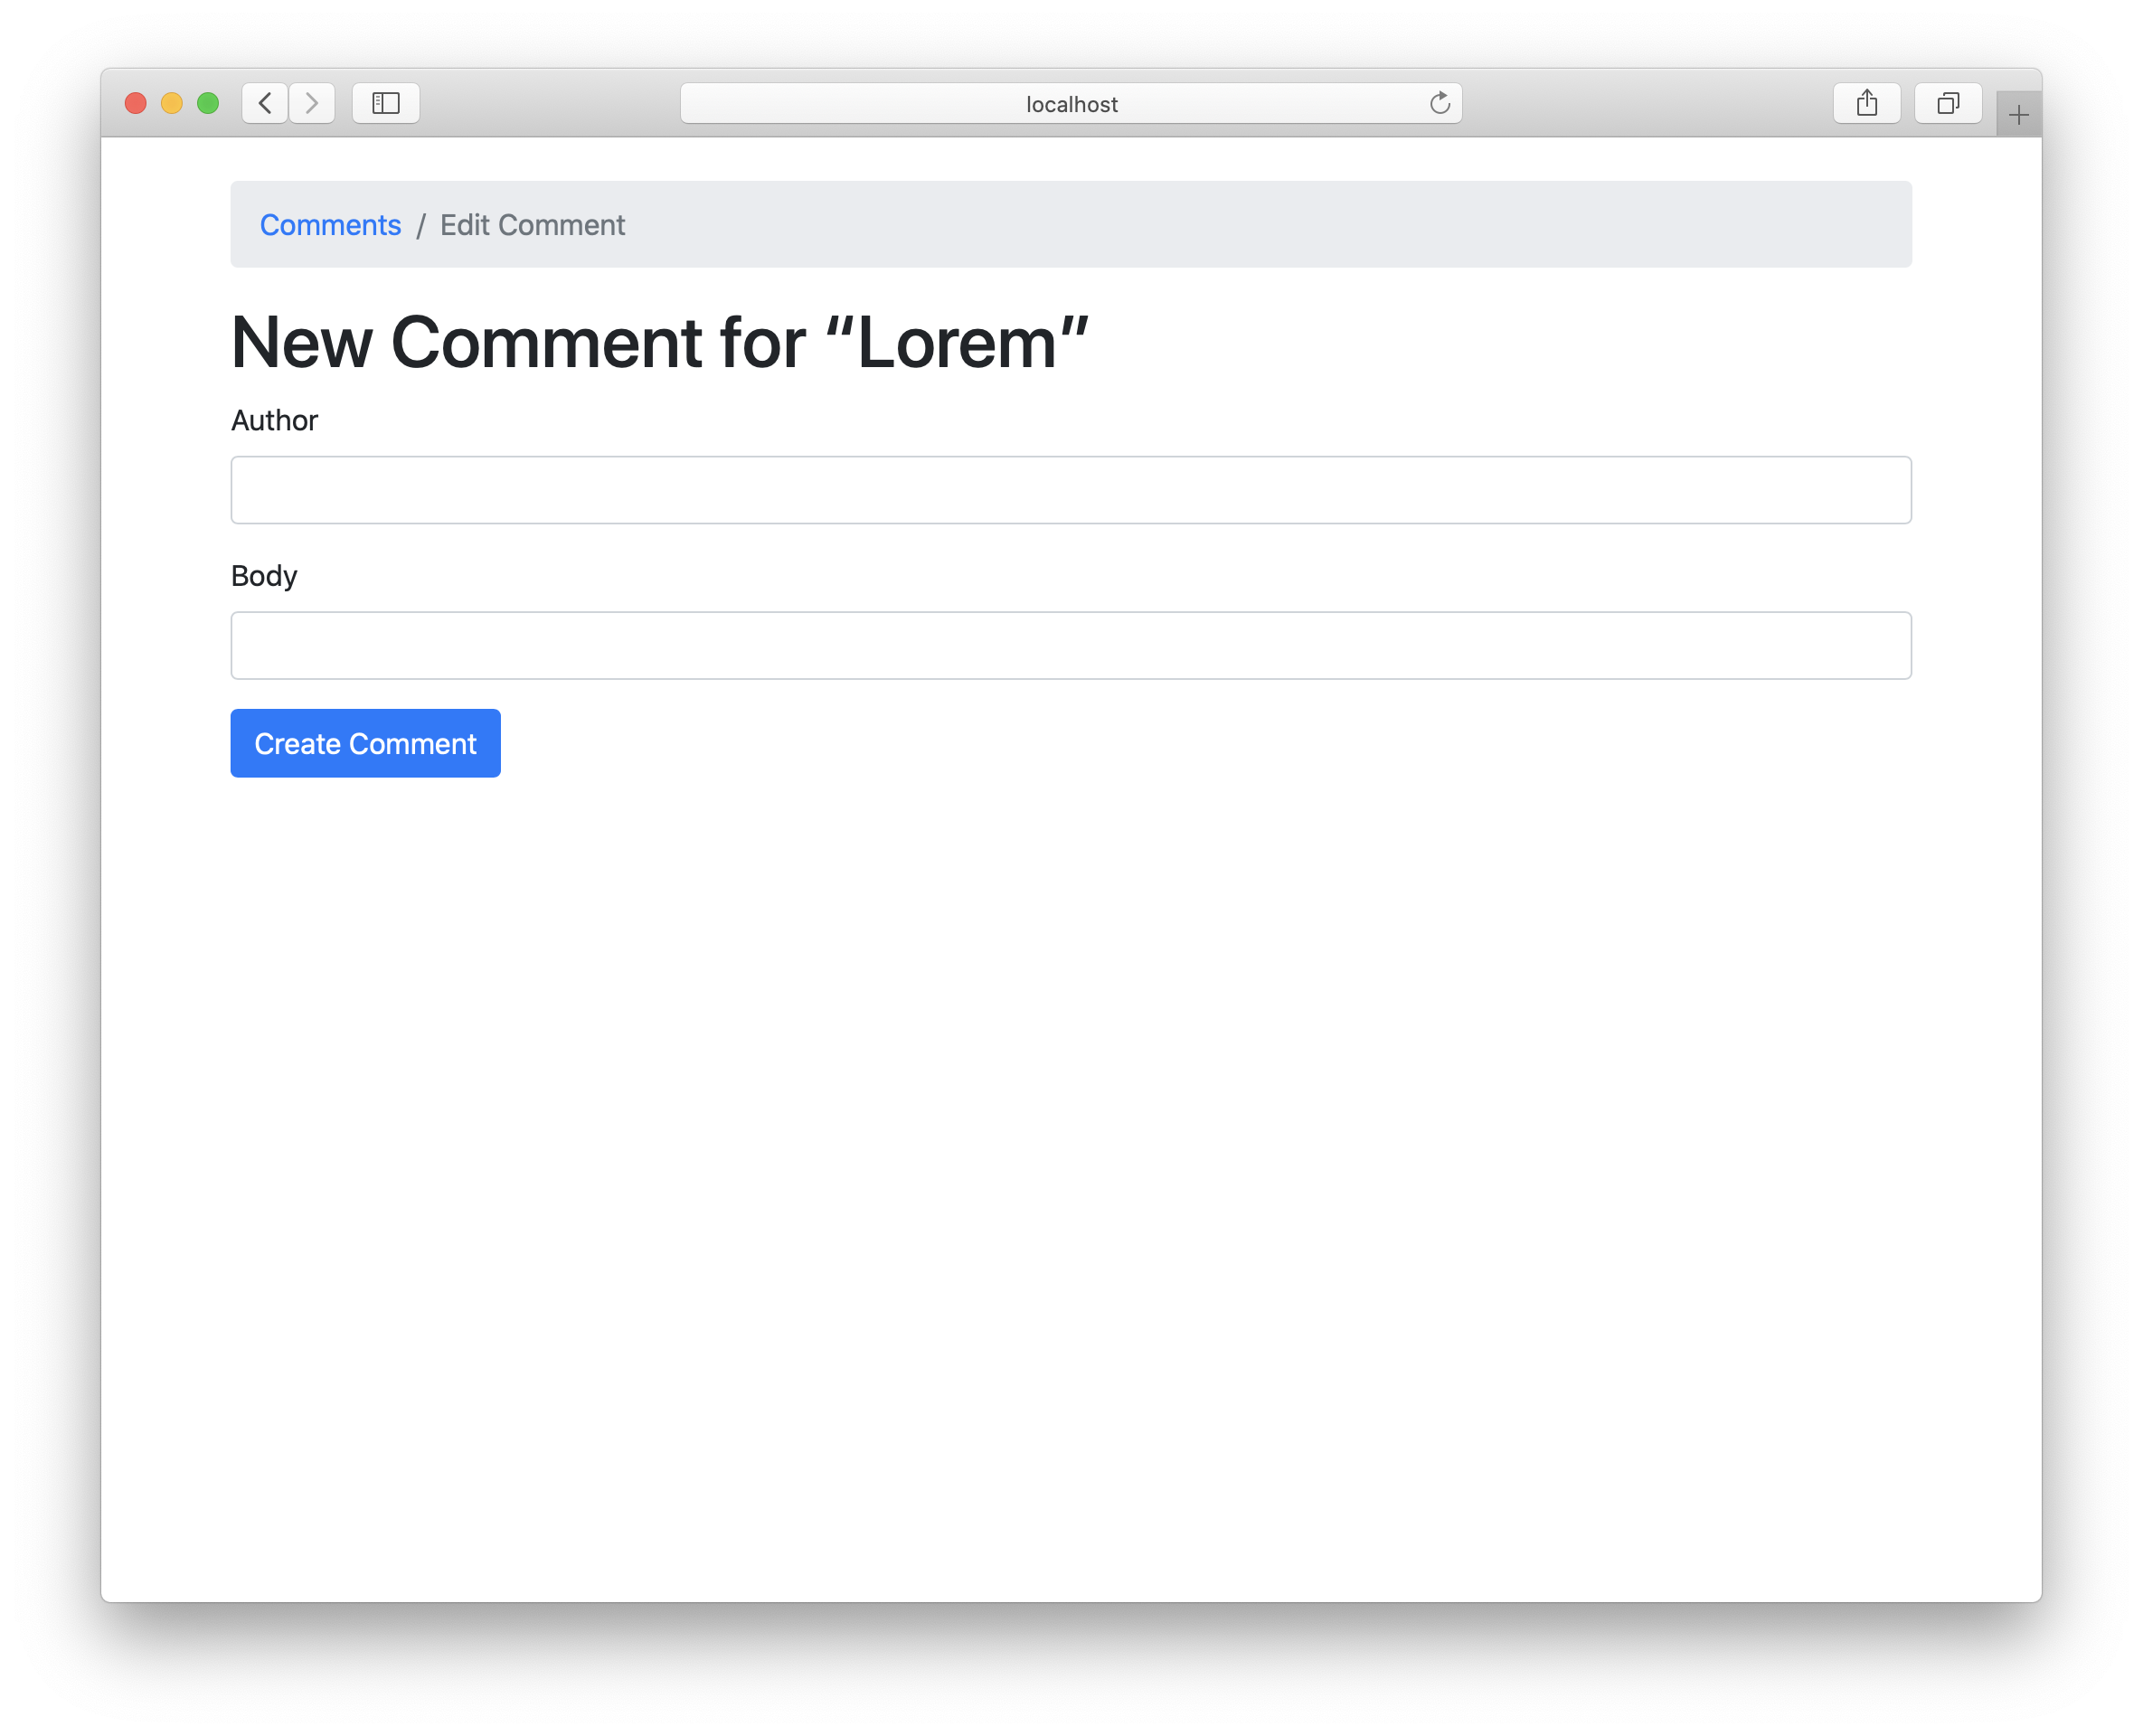
Now take a look at your form. The postId will be pre-filled now:

Of course, seeing the UUID is not very human-friendly. It would be better to just show the post title to our users. For that, we have to fetch and pass the post to our form and then make the postId a hidden field.
Append post <- fetch postId to fetch the post to the NewCommentAction:
    action NewCommentAction { postId } = do
        let comment = newRecord
                |> set #postId postId
        post <- fetch postId
        render NewView { .. }
Because the error view is rendering our NewView in an error case, we also have to update the CreateCommentAction:
    action CreateCommentAction = do
        -- ...
                Left comment -> do
                    post <- fetch comment.postId -- <---- NEW
                    render NewView { .. }
                Right comment -> - ....
Inside the Web/View/Comments/New.hs retrieve the post variable from the action by updating the NewView:
data NewView = NewView
    { comment :: Comment
    , post :: Post
    }
This way the post is passed from the action to our view.
Now we can use the post variable to show the post title. Change <h1>New Comment</h1> to:
<h1>New Comment for <q>{post.title}</q></h1>
Let’s also make the text field for postId a hidden field:
renderForm :: Comment -> Html
renderForm comment = formFor comment [hsx|
    {(hiddenField #postId)}
    {(textField #author)}
    {(textField #body)}
    {submitButton}
|]
Our form is complete now :-) Time to take a look:
Great, let’s add our first comment:
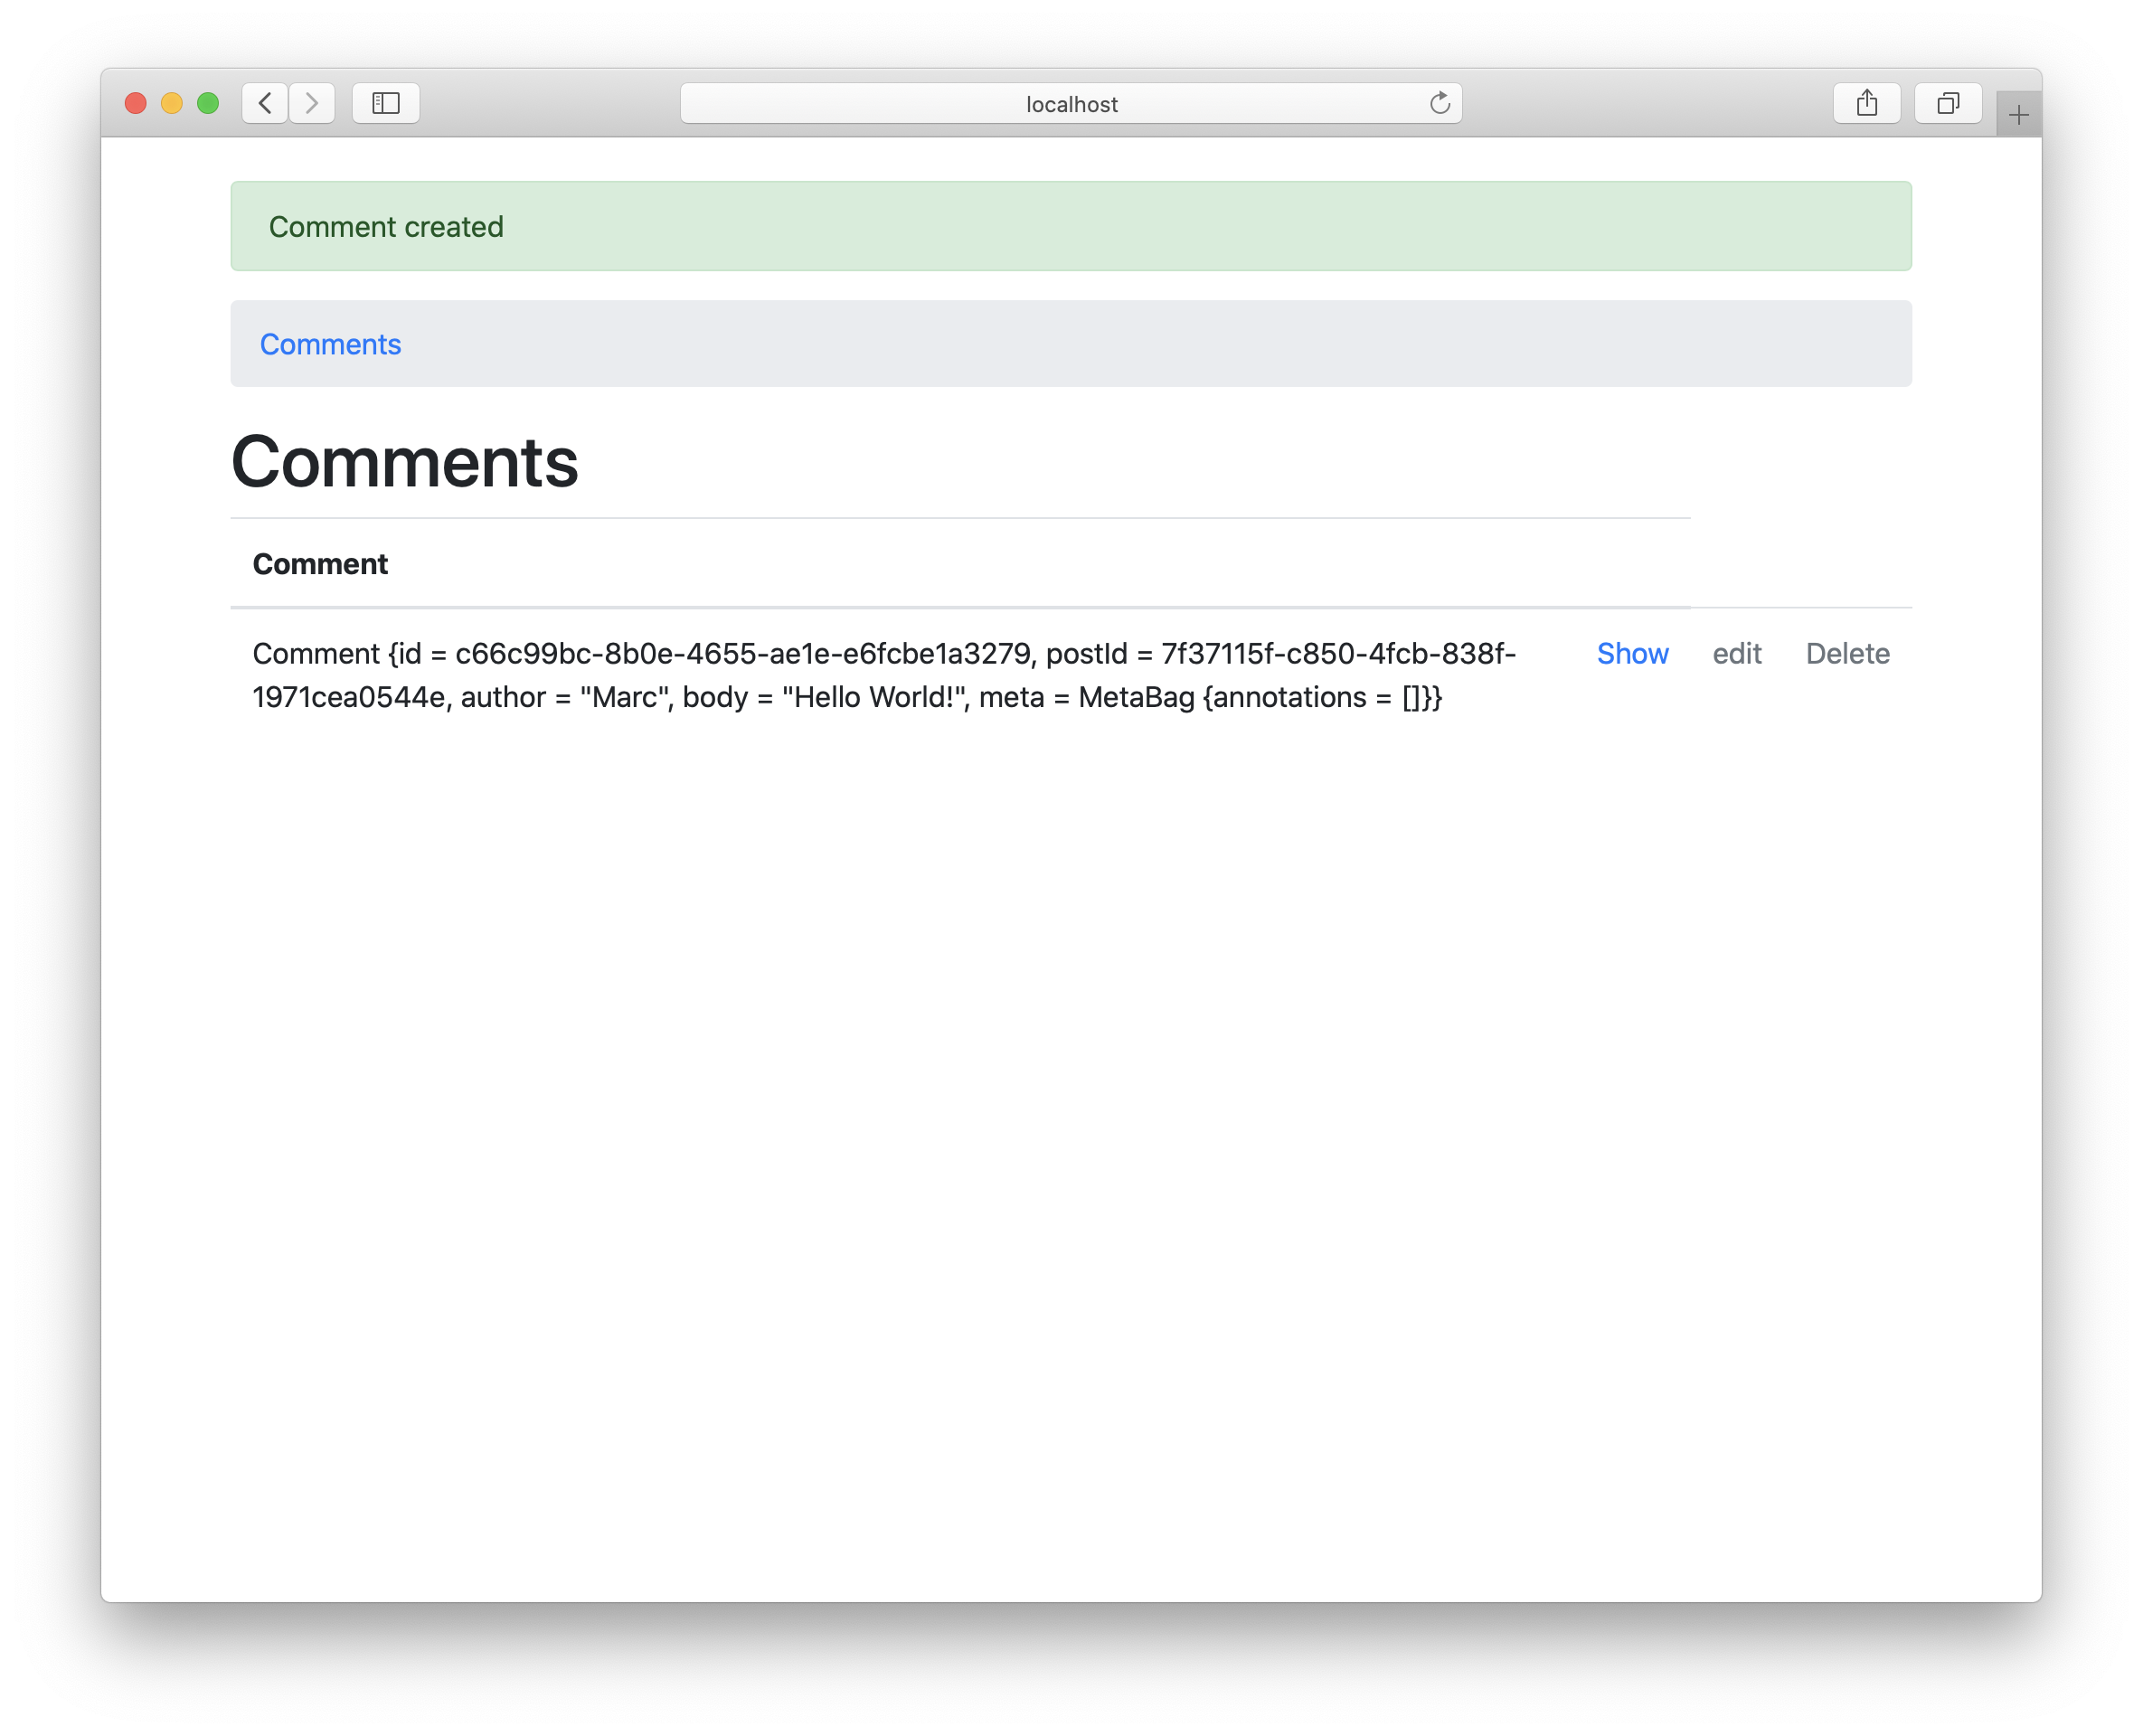
It works. We’re redirected to the CommentsAction. If you look at the table, we can see that our postId has been set successfully.
Let’s change our CreateCommentAction to make it redirect back to our Post again after commenting. Open Web/Controller/Comments.hs and take a look at the CreateCommentAction.
In the success case (Right comment -> ...) we see:
redirectTo CommentsAction
Change this to:
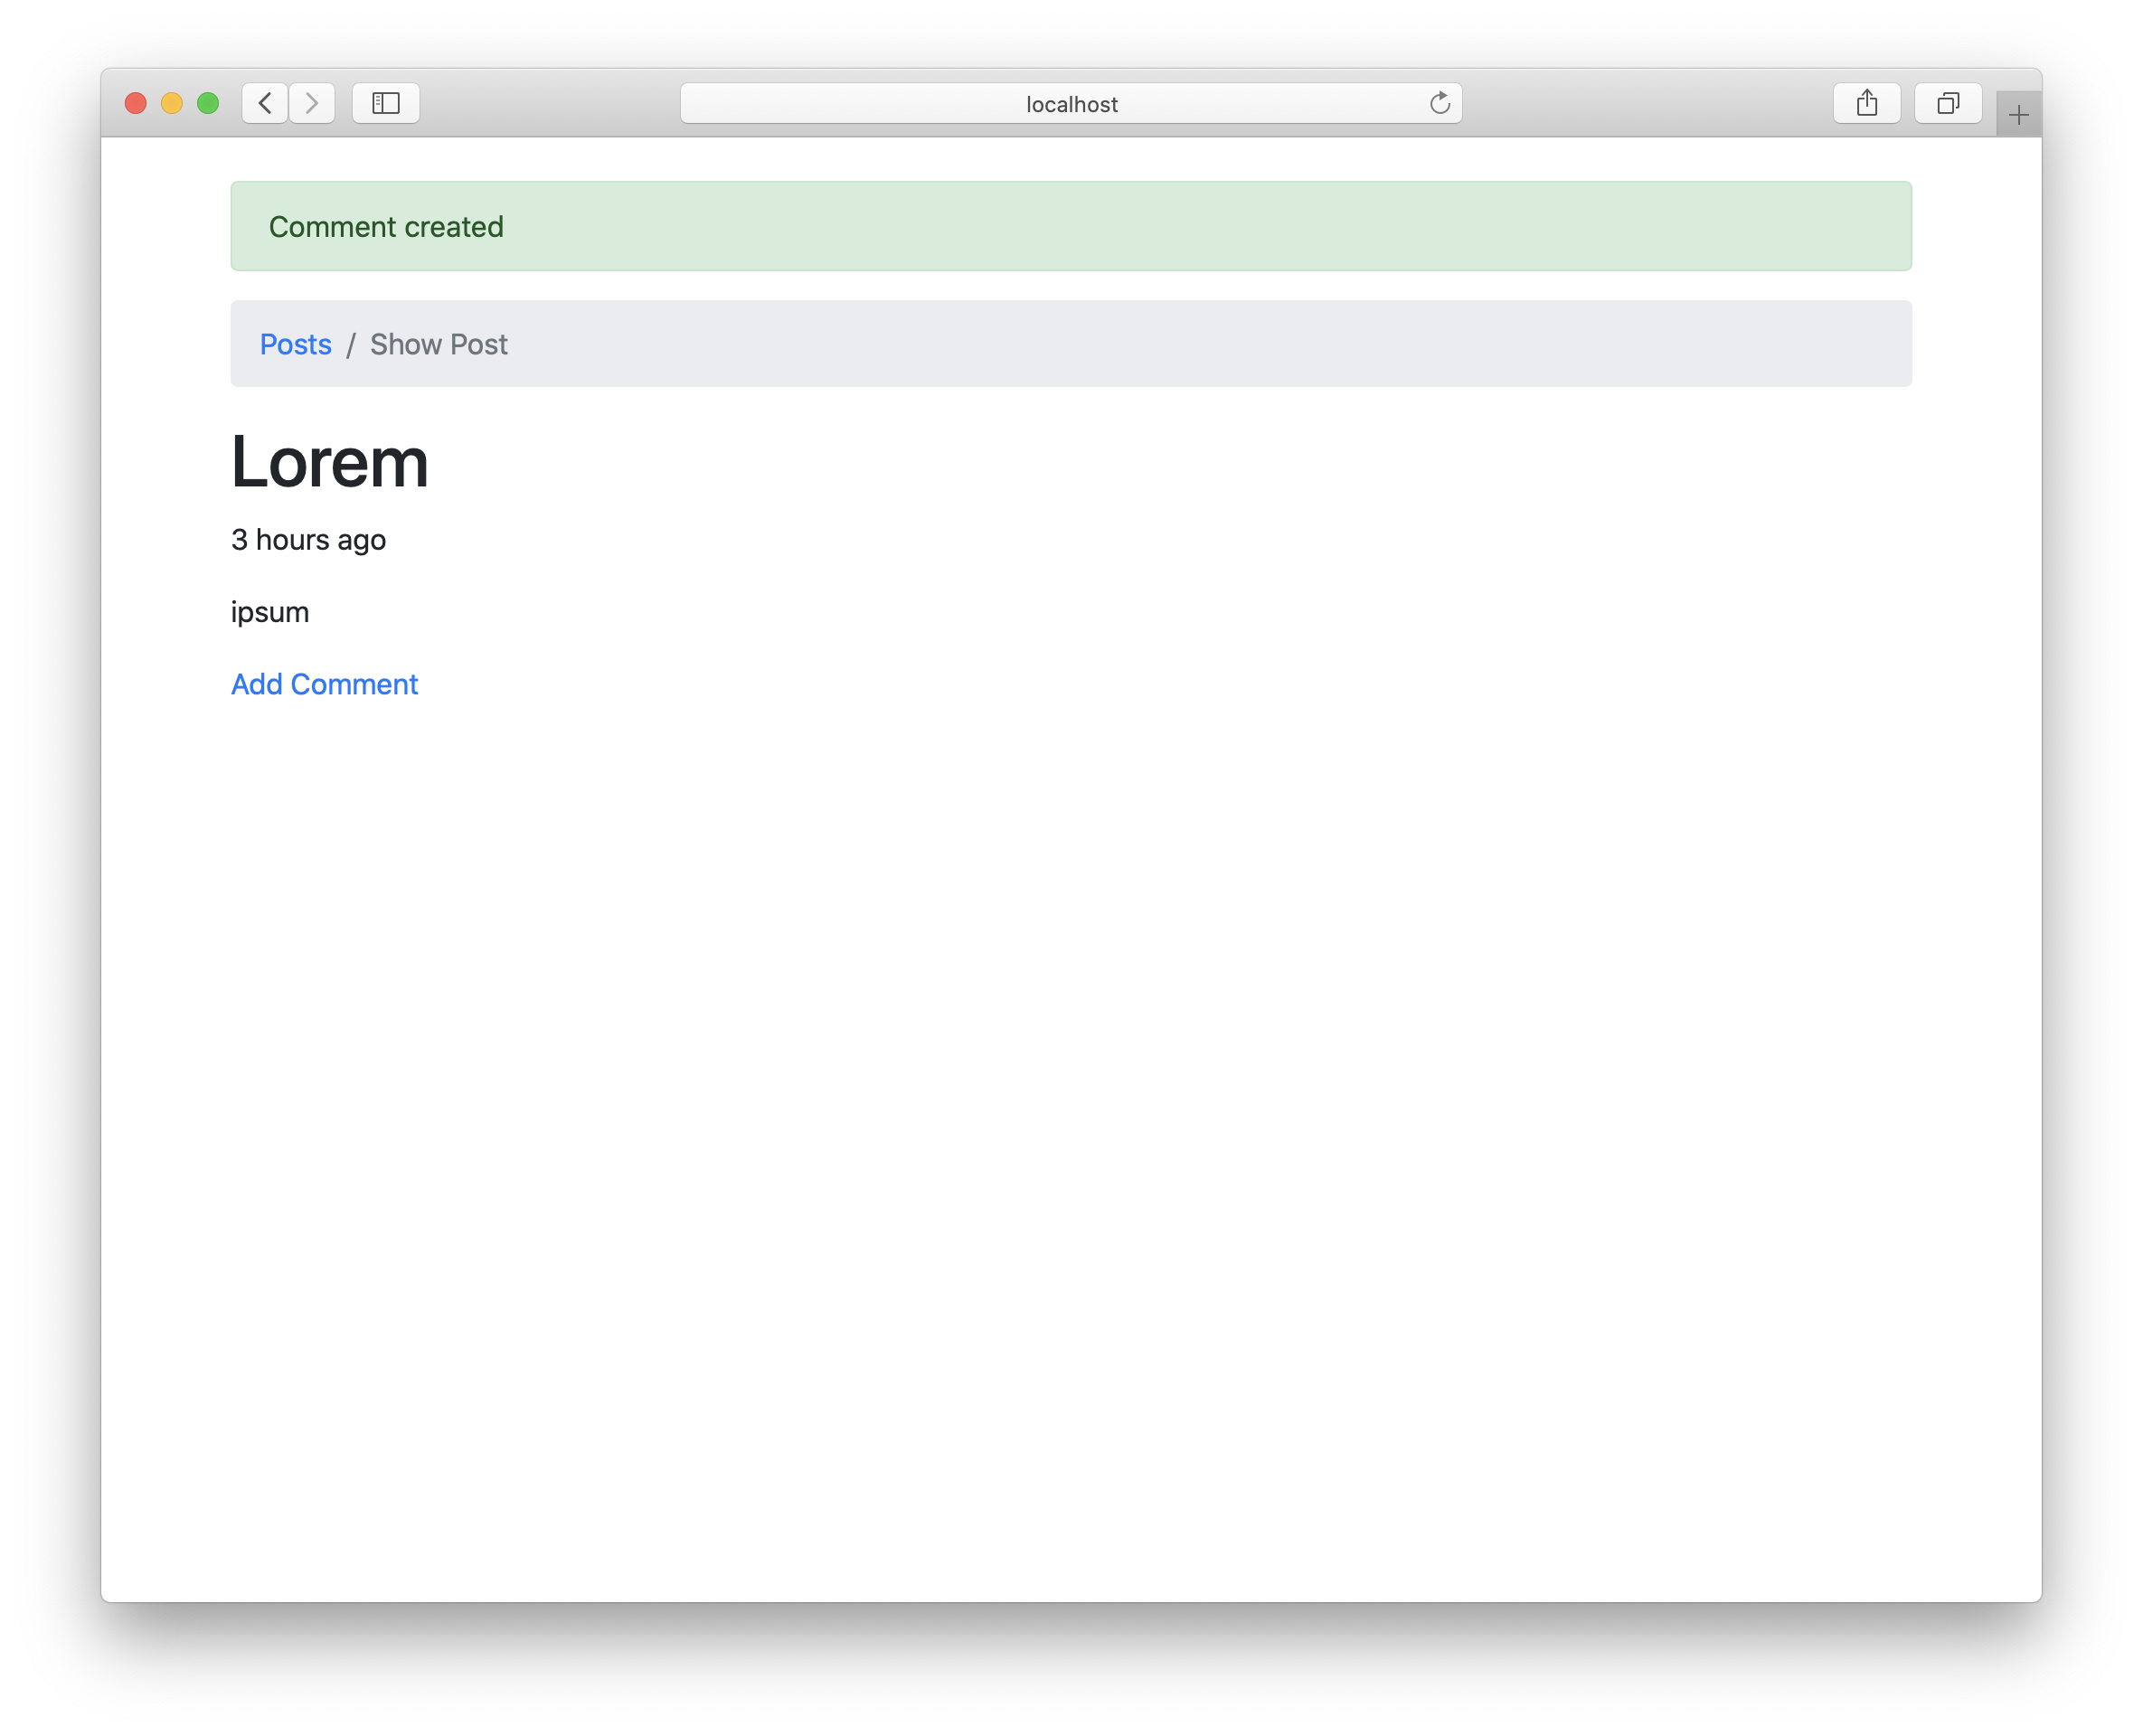
redirectTo ShowPostAction { postId = comment.postId }
Open the browser and create a new comment to verify that this redirect is working:
Show Comments of a Post
Next we’re going to display our comments below the post. Open Web/View/Posts/Show.hs and append the following code to the HSX block:
<div>{post.comments}</div>
It will display something like this:
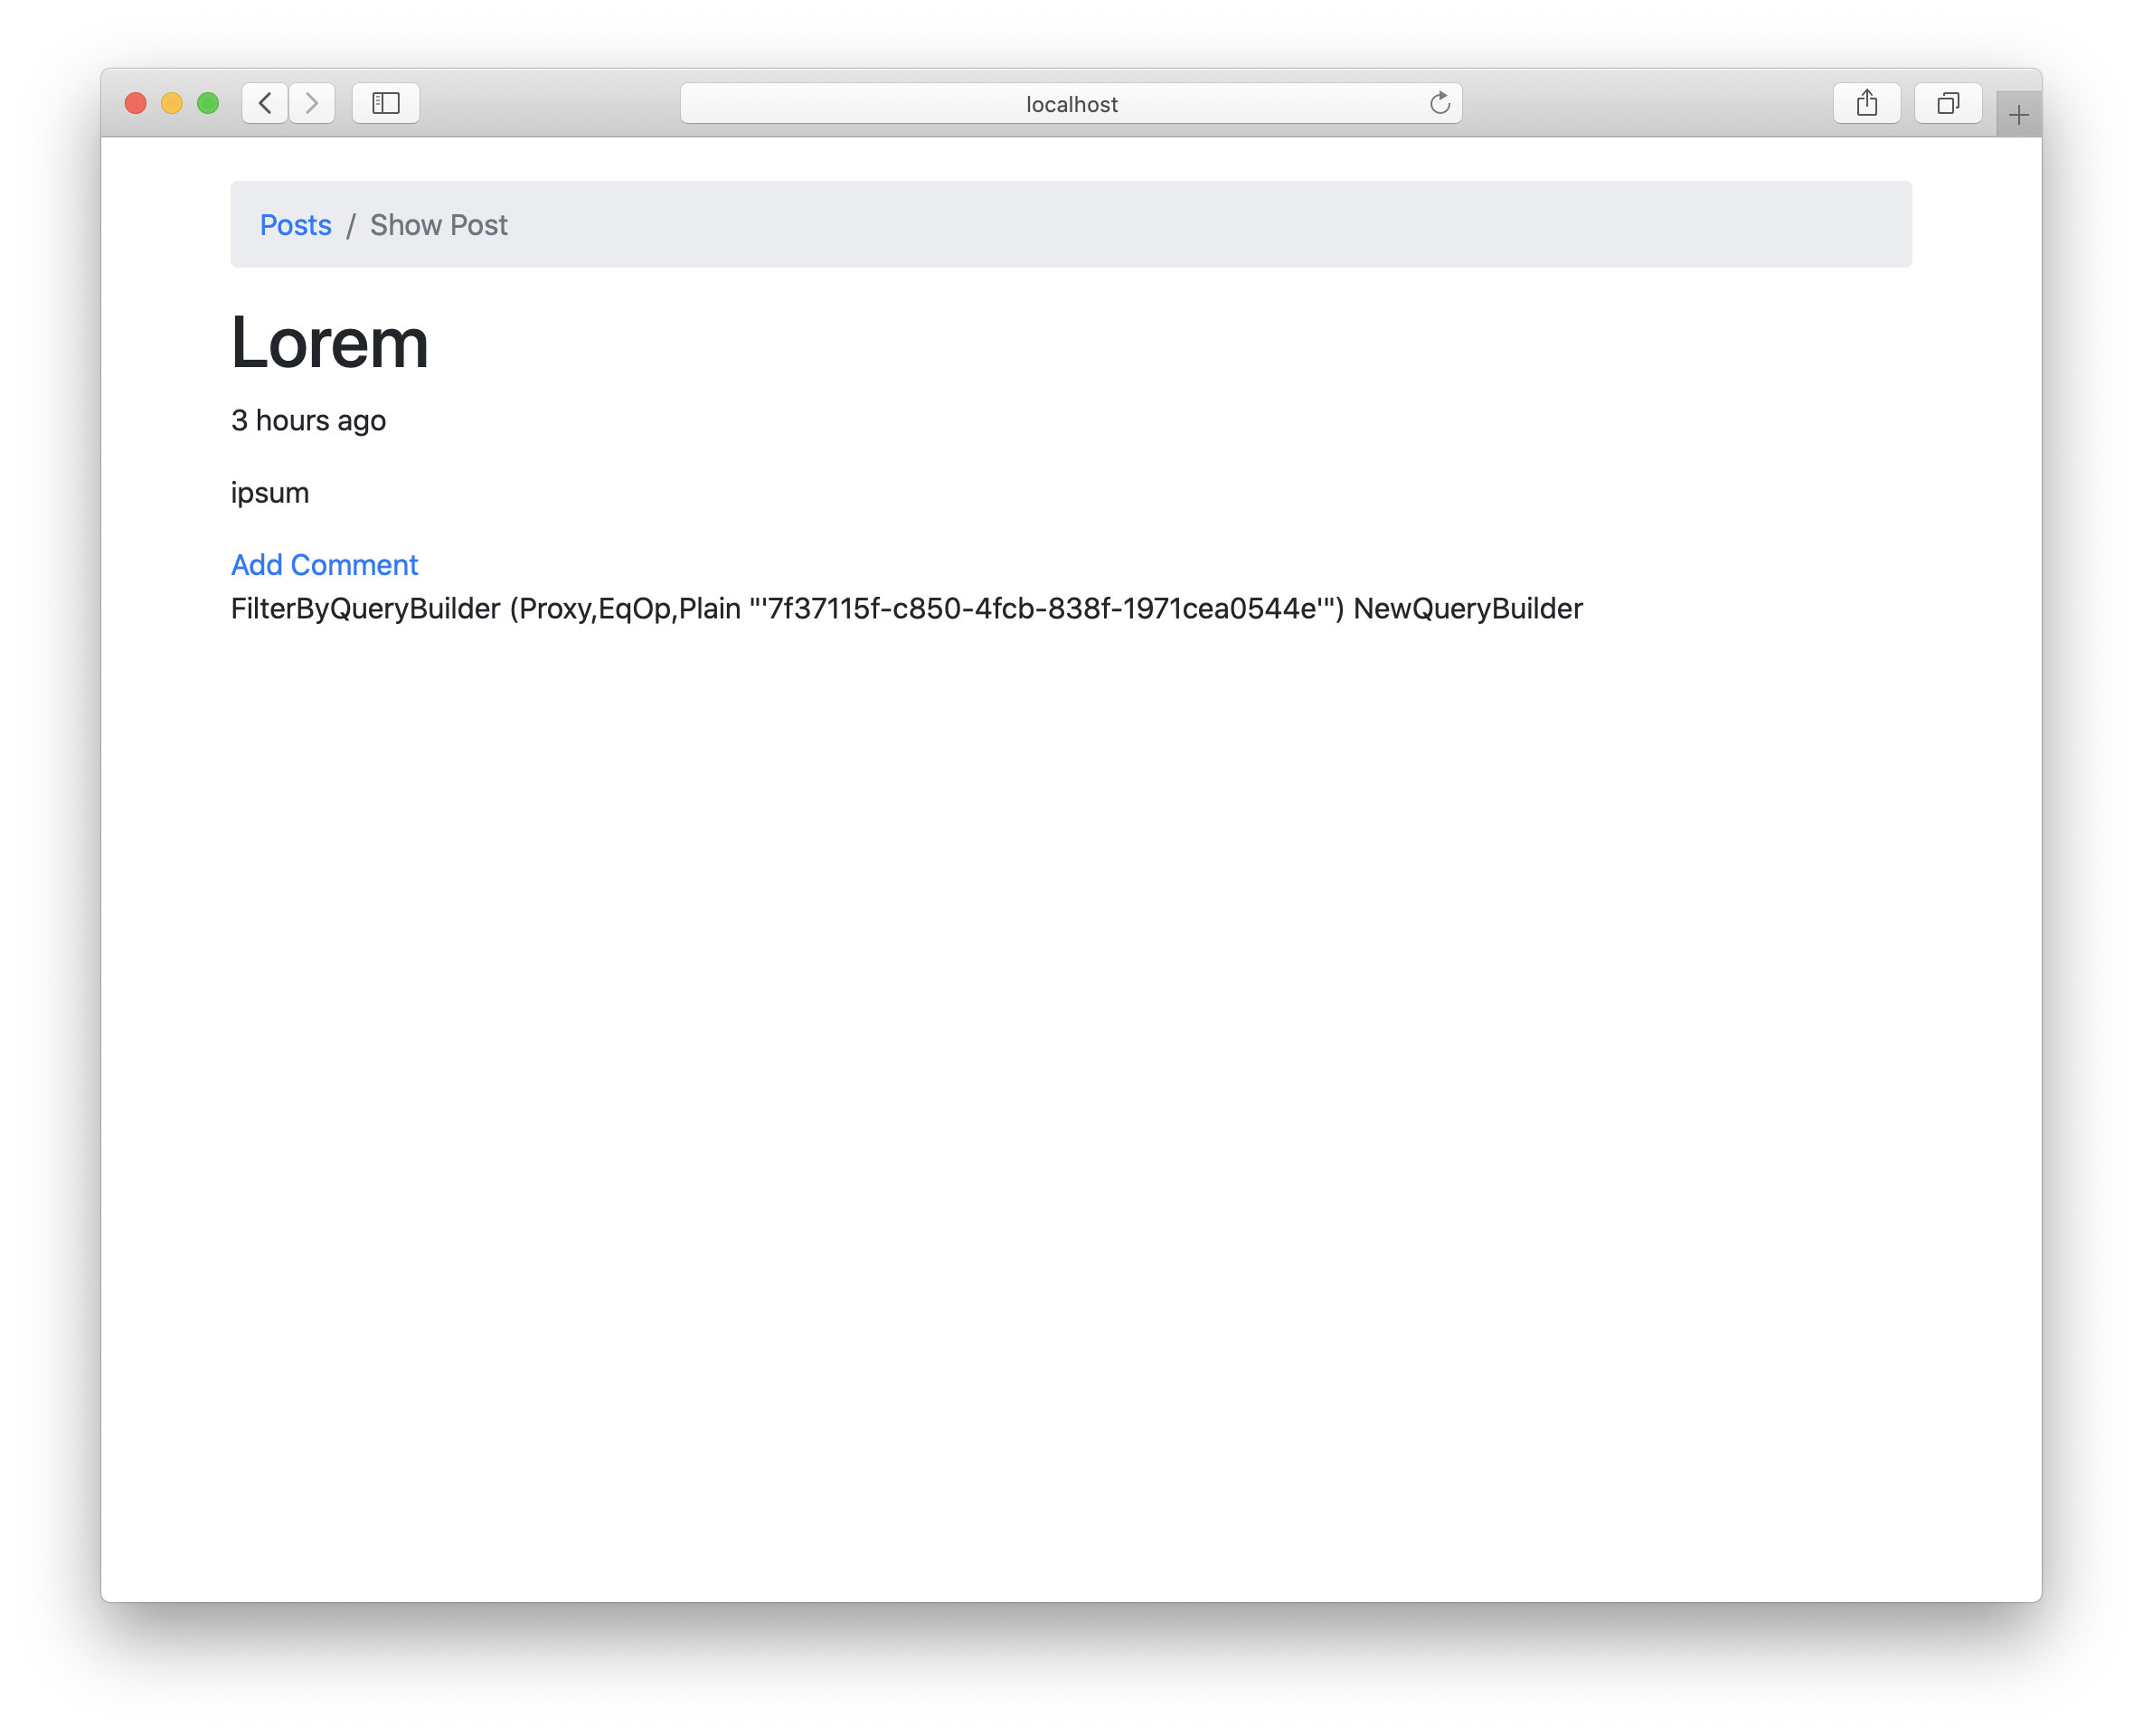
What is shown is the technical representation of a query like query @Comment |> filterWhere (#id, "'7f37115f-c850-4fcb-838f-1971cea0544e") (this representation changes a bit between versions still, so don’t worry if yours does not look exactly like this). But we don’t want just the query, we want the actual comments. We cannot do this from our view, because views should be pure functions without IO. So we need to tell the action to actually fetch them for us.
Inside the Show.hs we need to update the type signature to tell our action what we want. Right now we have:
data ShowView = ShowView { post :: Post }
Add an Include "comments" like this:
data ShowView = ShowView { post :: Include "comments" Post }
This specifies that our view requires a post and should also include its comments. This will trigger a type error to be shown in the browser because our ShowPostAction is not passing the comments yet.
To fix this, open Web/Controller/Posts.hs and take a look at the ShowPostAction. Right now we have a fetch call:
post <- fetch postId
We need to extend our fetch to also include comments. We can use fetchRelated for this:
post <- fetch postId
    >>= fetchRelated #comments
The type of post has changed from Post to Include "comments" Post. In general, when you’re dealing with has-many relationships, use Include "relatedRecords" and fetchRelated to specify and fetch data according to your needs.
The type error is fixed now. When opening the Show View of a post, you will see that the comments are displayed. When you take a look at the Logs in the Dev tools you can see, that when opening a Post, two SQL queries will be fired:
("SELECT posts.* FROM posts WHERE id = ?  LIMIT 1",[Plain "'7f37115f-c850-4fcb-838f-1971cea0544e'"])
("SELECT comments.* FROM comments WHERE post_id = ?  ",[Plain "'7f37115f-c850-4fcb-838f-1971cea0544e'"])
Right now the view is displaying the comments as a string. Let’s make it more beautiful. Open Web/View/Posts/Show.hs.
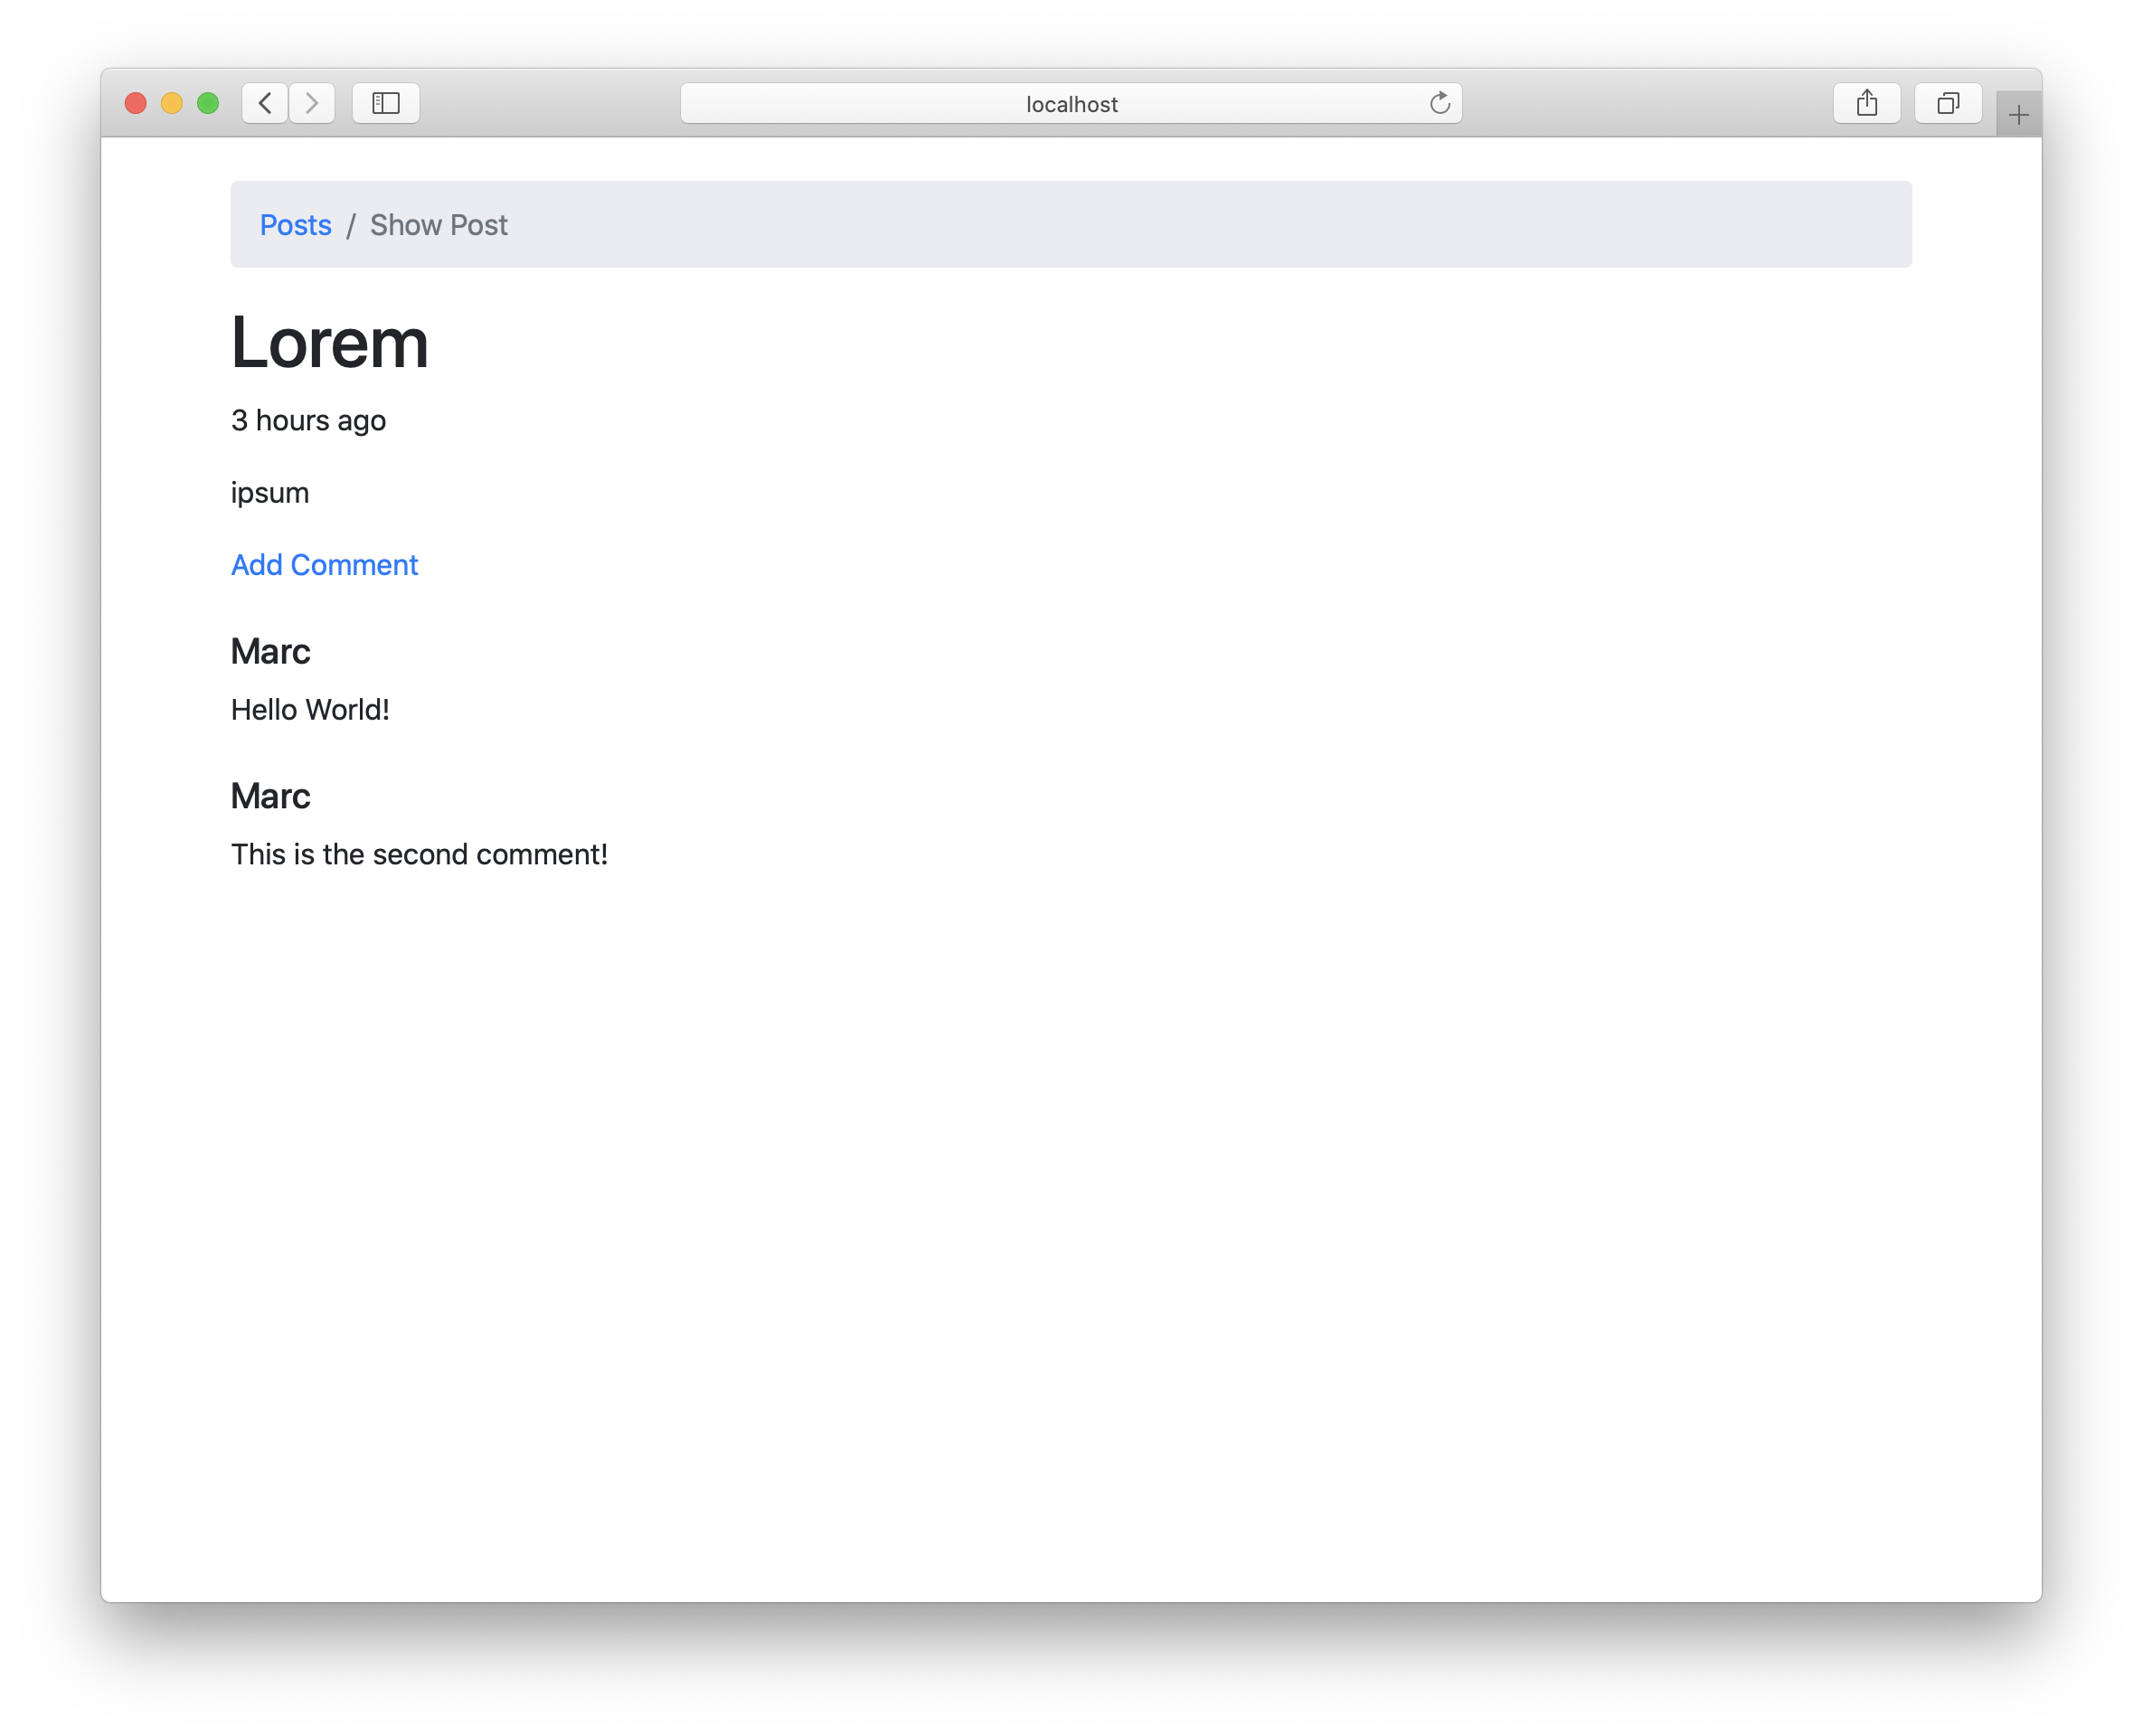
Let’s first change the {post.comments} to make a <div> for each comment:
<div>{forEach post.comments renderComment}</div>
We also need to define the renderComment at the end of the file:
renderComment comment = [hsx|<div>{comment}</div>|]
Let’s also add some more structure for displaying the comments:
renderComment comment = [hsx|
        <div class="mt-4">
            <h5>{comment.author}</h5>
            <p>{comment.body}</p>
        </div>
    |]
This is how it looks now:
Ordering Comments
Right now comments are displayed in the order they’re stored in the database. So updating a comment will change the order. Let’s change this so that the newest comment is always displayed first.
Open the Schema Designer. Select the comments Table. Right-click in the Columns Pane, Click Add Column. Enter created_at. The column type will be auto-selected, and the default value automatically sets to NOW(). Click Create Column.
Now click Migrate DB to add the new column to the local dev database.
Now we have a created_at timestamp we can use for ordering. Open Web/Controller/Posts.hs and change the action from:
    action ShowPostAction { postId } = do
        post <- fetch postId
            >>= fetchRelated #comments
        render ShowView { .. }
To the following:
    action ShowPostAction { postId } = do
        post <- fetch postId
            >>= pure . modify #comments (orderByDesc #createdAt)
            >>= fetchRelated #comments
        render ShowView { .. }
The modify #comments (orderByDesc #createdAt) basically just does a |> orderByDesc #createdAt to the query builder inside the #comments field. Then it just writes it back to the field. The fetchRelated #comments will then use the query builder stored inside #comments to fetch the comments, thus using the ORDER BY we added to the query.
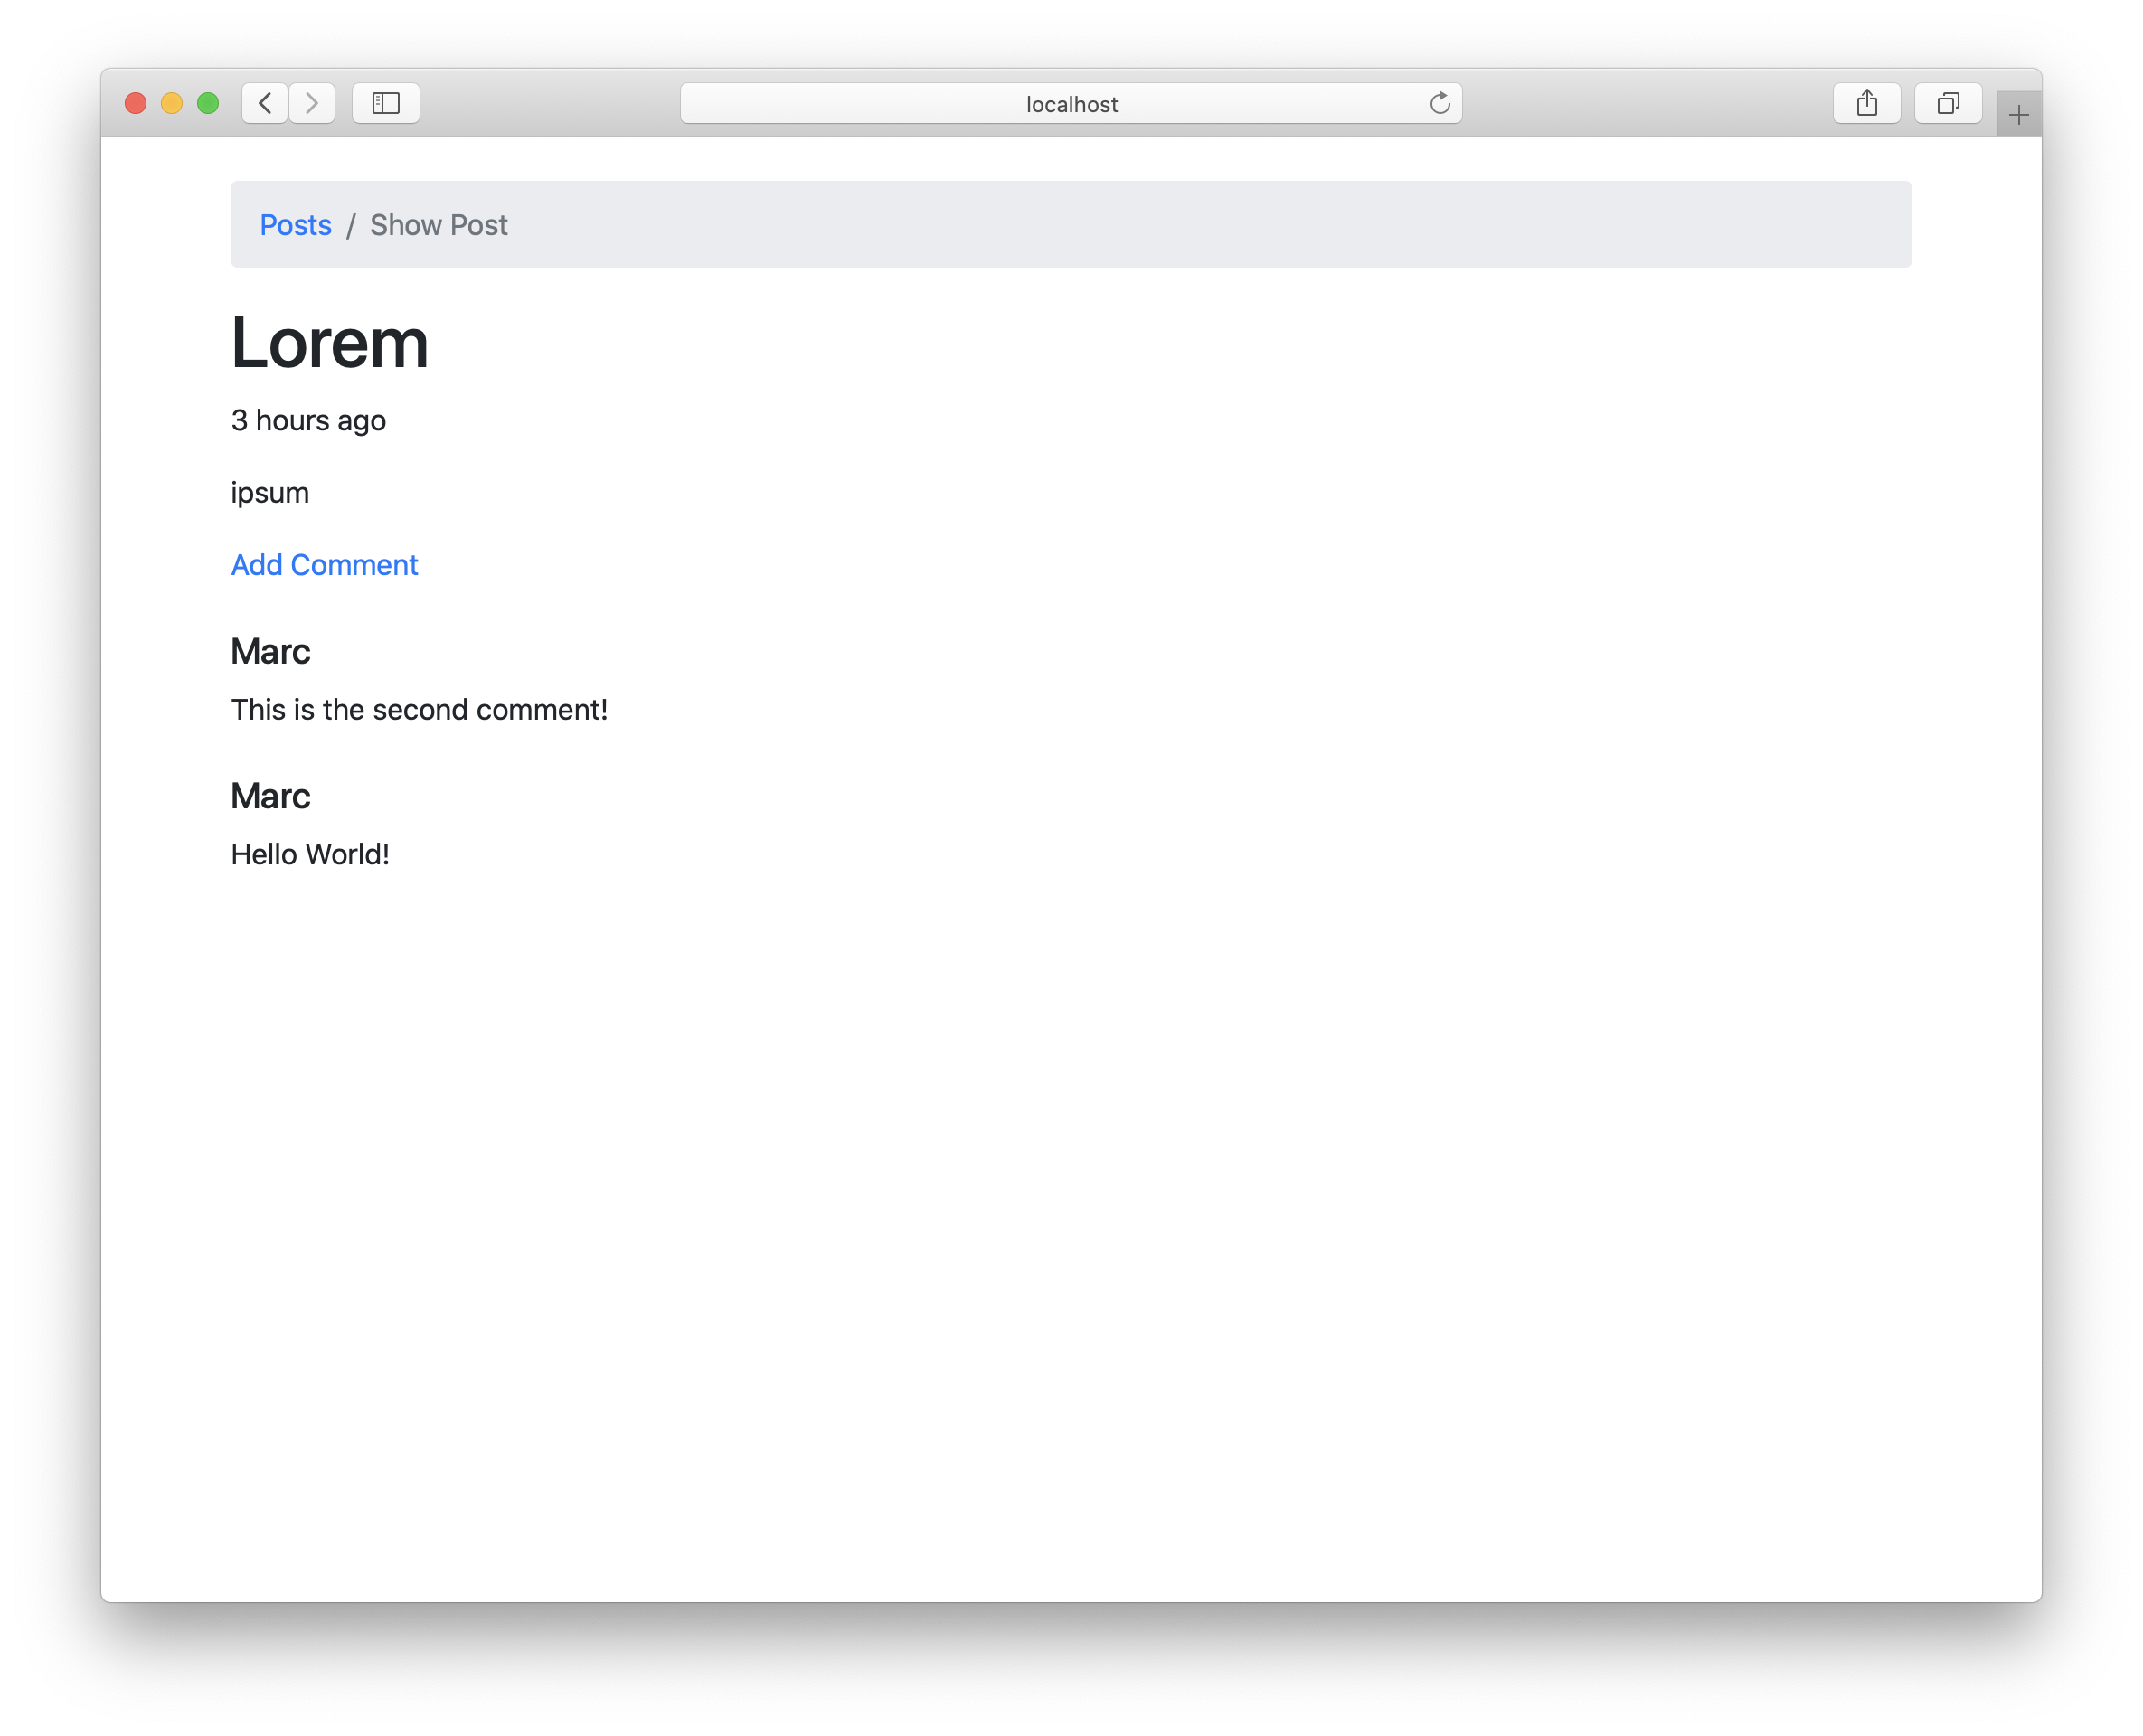
That’s it already. Taking a look at our post, we can see that the newest comment is shown first now.
We hope you enjoyed the journey so far! Tell us on twitter or celebrate your first haskell app in our slack community! :)
Have Fun!
You now understand enough of IHP and Haskell to be dangerous. The best way to continue your journey is to start building things. Take a look at the The Basics Section to learn more about all the provided modules.
- Leave a Star on the IHP-GitHub repo and join the IHP community to work on the future of typesafe, FP-based software development.
- To stay in the loop, subscribe to the IHP release emails.
- Questions, or need help with Haskell type errors? Join our Slack: Join IHP Slack
Good to know for playing with IHP: When you want to delete a project just delete the project directory and it’s gone.
