Building Realtime Single Page Apps with IHP
- Introduction
- Todo List App
- Common DataSync Operations
- Using DataSync library without a bundler
- Advanced IHP DataSync
Introduction
While IHP has a strong preference for server-side rendering, specific functionality in your app might require interactivity that can only be implemented with JavaScript. In these cases we recommend that you follow a hybrid approach: Implement interactive functionality as a small single page app, while keeping unrelated functionality like the login and signup still server side rendered.
The hybrid approach gives you the best of both worlds: The low interactivity of a single page app where needed, while keeping the simplicity and high performance advantages of server side rendered IHP apps.
This guide will help you understand the best-practices of building hybrid applications with IHP and React.
Todo List App
Adding React to your IHP project
Adding NodeJS to a project
To access the JavaScript ecosystem we need to add NodeJS to our project. You should also follow this step if you have NodeJS already installed on your system. Installing the NodeJS version via nix allows all people working on your project to get the exact NodeJS version you’re using.
For that open your projects flake.nix and add nodejs to packages:
                    packages = with pkgs; [
                        # Native dependencies, e.g. imagemagick
                        nodejs
                    ];
Now you need to rebuild your local dev environment:
devenv up
After that, you have node and npm available in your project.
While nix can theoretically also install NPM modules, it’s easier to just use NPM directly. Otherwise, you will spend lots of time with nix-related issues. Because nodejs and npm are managed by nix we still have reproducible builds. Every developer on your team will use the same NodeJS and NPM version.
The Frontend directory
Create a new Frontend directory. We’ll place all JS source files in that directory in the next steps:
mkdir Frontend
NPM Init
Before we can install dependencies, we need to generate a package.json:
cd Frontend # npm needs to be run from the Frontend directory
npm init
Add the Frontend/package.json and the Frontend/package.lock to your git repository.
Installing React
Now we can just install node modules as required by calling npm install:
cd Frontend # npm needs to be run from the Frontend directory

# Install react and react-dom
npm add react react-dom

# We also need esbuild for bundling
npm add esbuild

# Install IHP JS helpers
npm add "https://gitpkg.now.sh/digitallyinduced/ihp/lib/IHP/DataSync?0babfec7a90675ca37d56c38dac69e784e64fc83"
Adding an Entrypoint
Next we need a new entrypoint for our SPA. Create a new file Frontend/app.jsx with the following content:
import * as React from 'react';
import * as ReactDOM from 'react-dom';

import { DataSubscription, createRecord, updateRecord, deleteRecord, createRecords } from 'ihp-datasync/ihp-datasync';
import { query } from 'ihp-datasync/ihp-querybuilder';
import { useQuery } from 'ihp-datasync/ihp-datasync-react';

function HelloWorld() {
    return <div>
        Hello from react!
    </div>
}

function startApp() {
    ReactDOM.render(<HelloWorld/>, document.getElementById('hello-world'));
}

$(document).on('ready turbolinks:load', function () {
    // This is called on the first page load *and* also when the page is changed by turbolinks
    startApp();
});
Adding Make Tasks
Open your project’s Makefile and append these tasks:
Frontend/node_modules:
    cd Frontend && npm install

static/app.js: Frontend/node_modules Frontend/app.jsx
    cd Frontend && ./node_modules/.bin/esbuild app.jsx --bundle --outfile=../static/app.js ${ESBUILD_FLAGS}

watch-frontend:
    touch Frontend/app.jsx # Force rebuild
    $(MAKE) static/app.js ESBUILD_FLAGS="--watch"
This will allow us to run make static/app.js to bundle Frontend/app.jsx with esbuild and save it to static/app.js.
The make watch-frontend command is a shorthand to run the bundler with the --watch flag.
To get the JS automatically build on deployment, append the following somewhere at the top of the file, after the existing JS_FILES definitions:
JS_FILES += static/app.js
Running the Bundler
Open a new terminal tab and start the dev bundler:
make watch-frontend
This will recompile our Frontend/app.jsx whenever the file changes.
Mounting the React Component
Open Web/Static/Welcome.hs (or any other IHP view) and add this div somewhere to the view:
<div id="hello-world"/>
Now open the view in the browser. You should see Hello from react! on the page.
Building a Realtime SPA with IHP DataSync
The following section assumes that your app already has a login as described in the Authentication section.
IHP DataSync is an IHP API that allows your to query your app’s database from within JS. Basically it provides functions like query, fetchOne or createRecord, which you’re already familiar with from the Haskell side, but makes them available in JavaScript land.
E.g. you could fetch all posts of a user with this DataSync call:
const posts = await query('posts')
    .orderBy('createdAt')
    .fetch()
This is very similar to how you would do it on the Haskell backend side:
posts <- query @Post
    |> orderBy #createdAt
    |> fetch
Setting up the Schema
In this example we’re going to build a simple todo list.
-
For that create a new table
todoswith the IHP Schema Designer. It needs the following structure:CREATE TABLE todos ( id UUID DEFAULT uuid_generate_v4() PRIMARY KEY NOT NULL, title TEXT NOT NULL, is_completed BOOLEAN DEFAULT false NOT NULL, created_at TIMESTAMP WITH TIME ZONE DEFAULT NOW() NOT NULL, user_id UUID NOT NULL ); CREATE INDEX todos_user_id_index ON todos (user_id); ALTER TABLE todos ADD CONSTRAINT todos_ref_user_id FOREIGN KEY (user_id) REFERENCES users (id) ON DELETE CASCADE;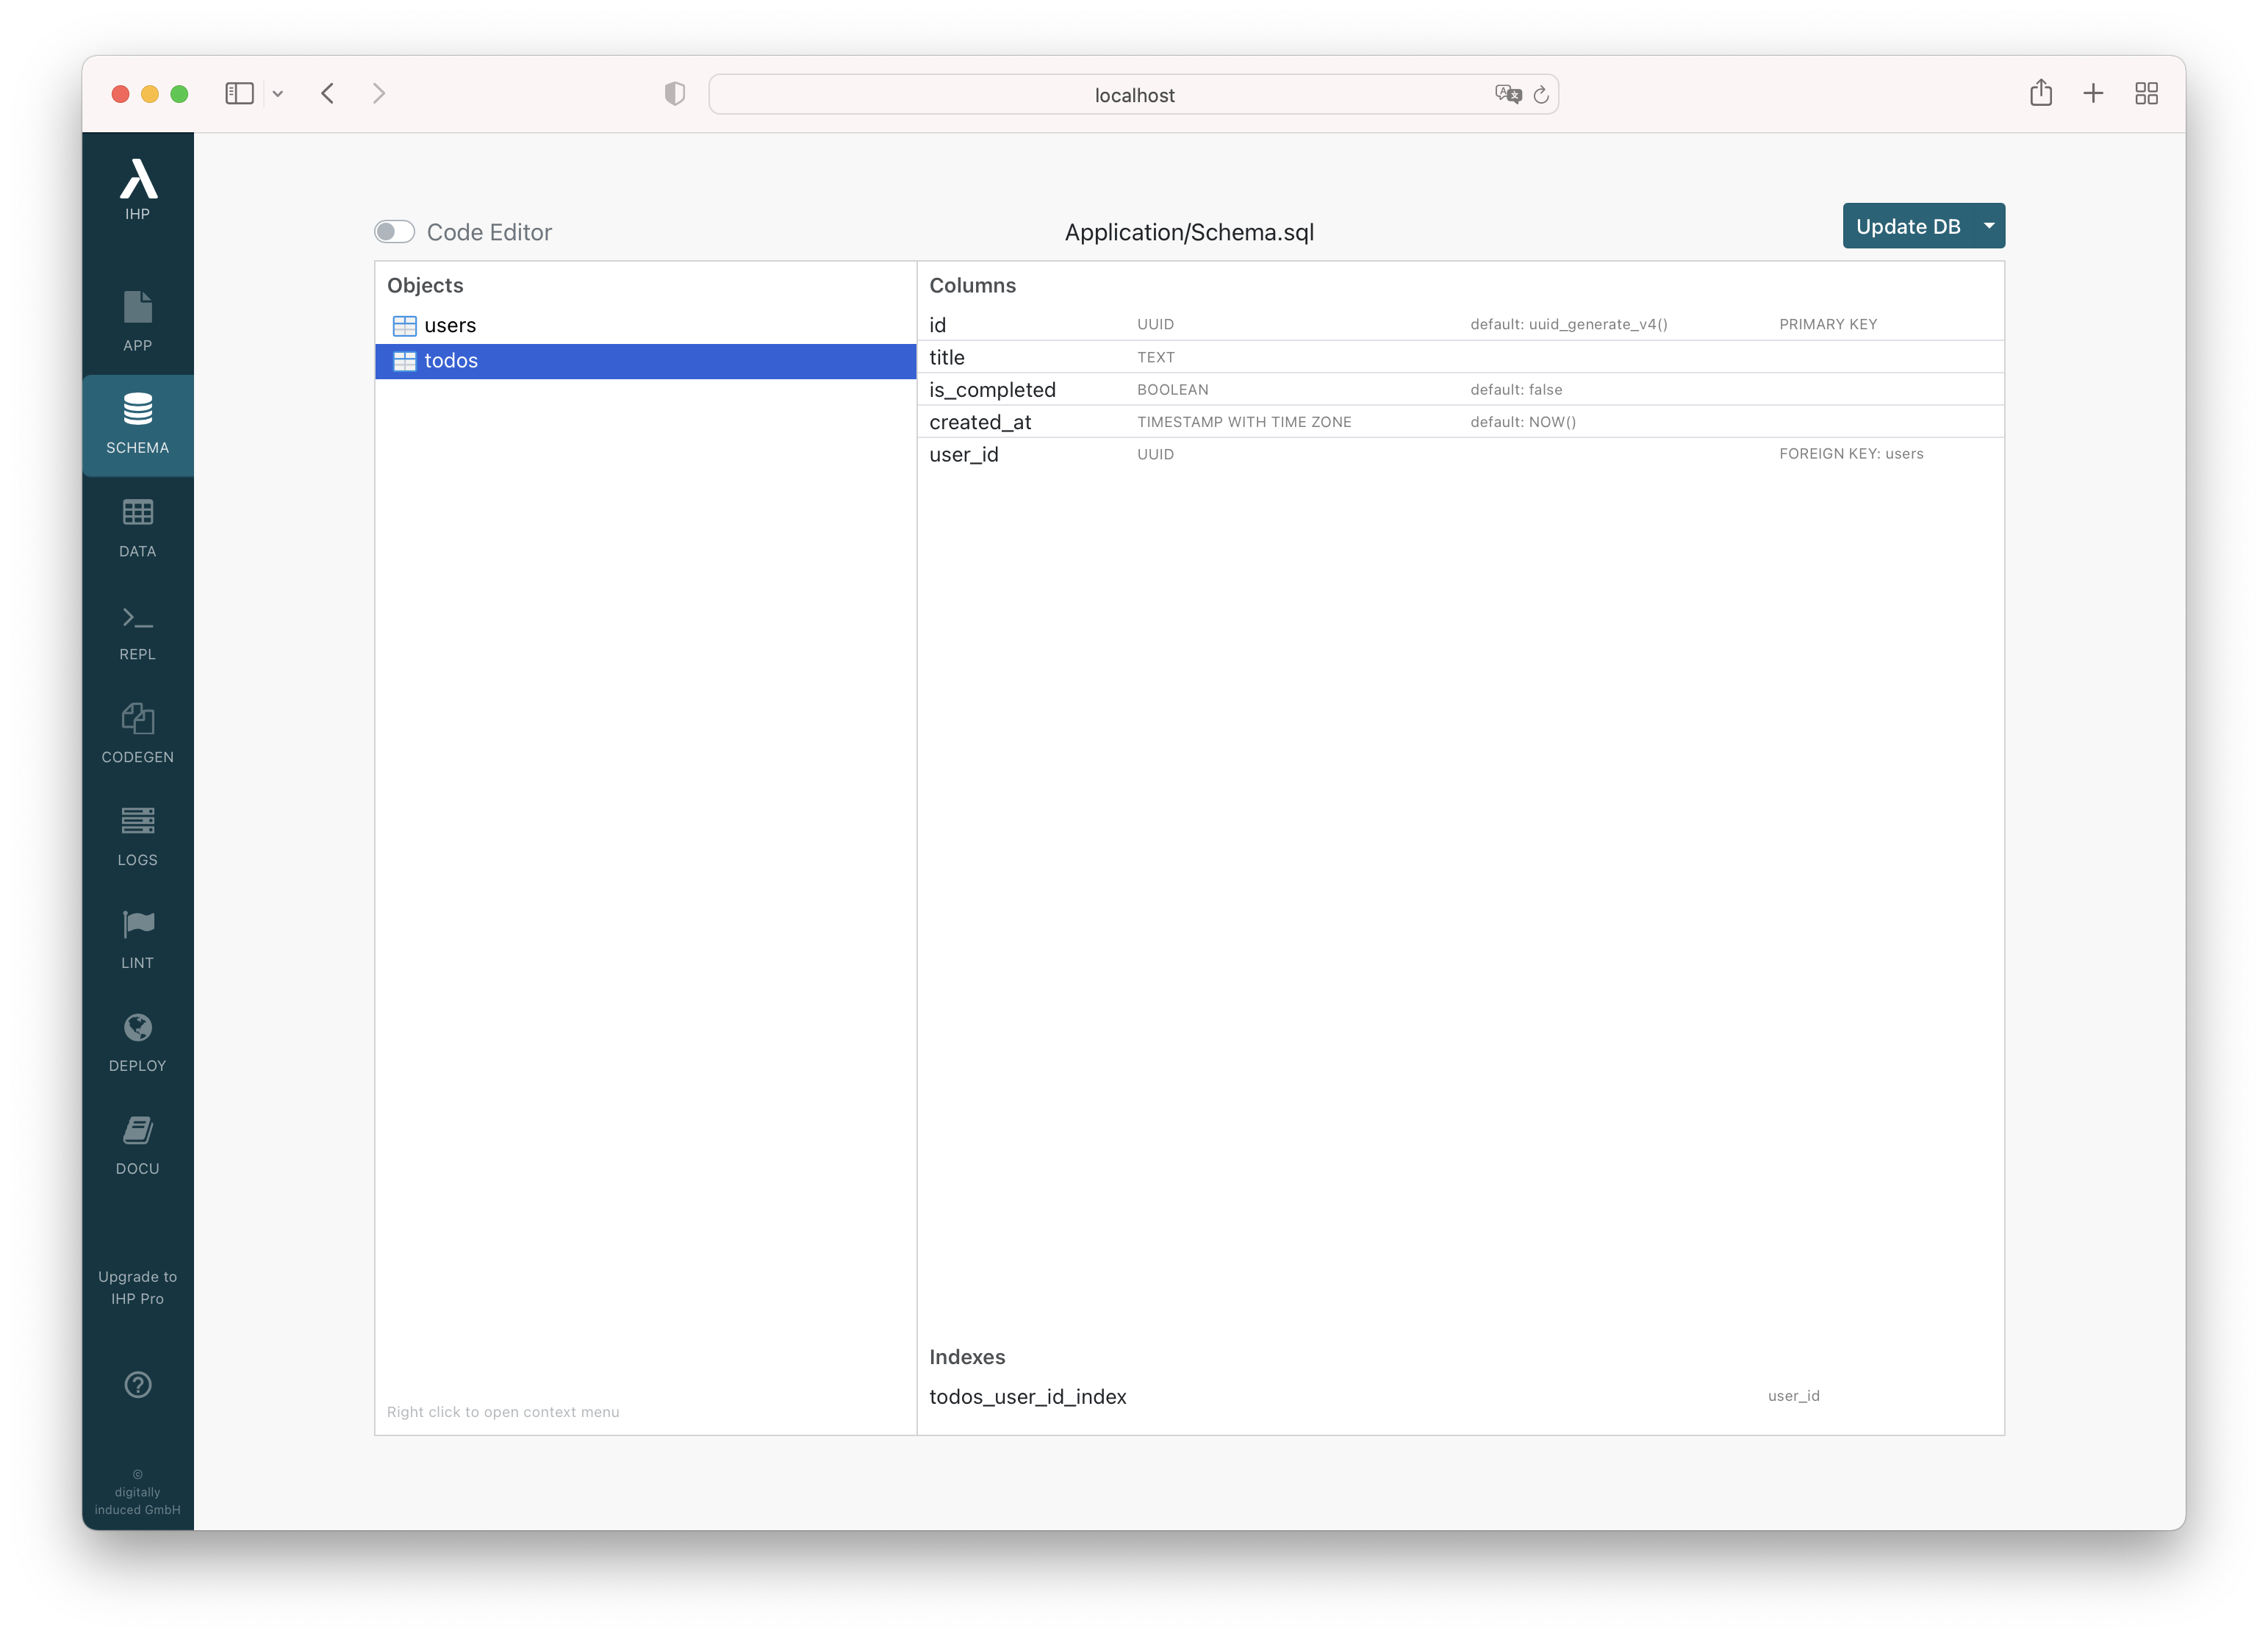
-
Run
Update DBto insert the new table into your local database.
Adding the ihp_authenticated role
IHP DataSync uses Postgres Row Level Security for making sure that users can only access rows that belong to them. The default database role used by IHP is also the owner of all the database tables. In postgres the table owner can always access all rows. Therefore IHP DataSync uses a second database role called ihp_authenticated to access the tables.
Follow these steps to set up the second database role.
-
Open
Config/Config.hs -
Add an import:
import qualified IHP.DataSync.Role as Role -
Call
Role.ensureAuthenticatedRoleExistson app startup by adding an initializer toconfig:config :: ConfigBuilder config = do -- ... addInitializer Role.ensureAuthenticatedRoleExistsThe
Role.ensureAuthenticatedRoleExistscall makes sure that this second role exists and has permissions to access tables with Row level security policies applied.
Enabling the DataSync Controllers
We also need to enable the DataSync controllers before we can use the APIs.
-
Open
Web/FrontController.hs -
Add these imports:
-- DataSync import IHP.DataSync.Types import IHP.DataSync.Controller import IHP.DataSync.REST.Types import IHP.DataSync.REST.Controller -
Mount the controller:
instance FrontController WebApplication where controllers = [ startPage WelcomeAction -- DataSync , webSocketApp @DataSyncController -- ADD THIS , parseRoute @ApiController -- AND ALSO THIS -- Generator Marker ] -
Open
Web/Routes.hs -
Add this import:
import IHP.DataSync.REST.Routes
Loading the JS SDK
DataSync comes with a couple of JS files we need to load on our page before we can use it.
-
Open
Web/View/Layout.hsand add these JavaScript files:scripts :: Html scripts = [hsx| <!-- ... --> <!-- DataSync --> <script src={assetPath "/vendor/ihp-datasync.js"}></script> <script src={assetPath "/vendor/ihp-querybuilder.js"}></script> <-- Make sure that the datasync js files are included before the app.js --> <script src={assetPath "/app.js"}></script> |]Now DataSync is enabled in your app.
-
Remove the
helpers.jsfrom yourWeb/View/Layout.hs:Inside
Web/View/Layout.hsyou have a<script src={assetPath "/helpers.js"}></script>. Remove this line. The IHP JS helpers typically cause more troubles than necessary when working with react. -
Open your IHP app and then run this in the chrome JS console:
await query('todos').fetch();This will output an error like this:
Uncaught {tag: 'DataSyncError', requestId: 1}Take a look at the output of the IHP server. You will see a line with this:
Row level security is required for accessing this tableWe can only access tables that have security policies defined. We didn’t do that yet, and so IHP is blocking access to our
todostable.
Defining a Security Policy
-
Open the Schema Designer at
http://localhost:8001/ -
Select the
todostable, open the context menu and clickAdd Policy
-
You’re now in the policy editor. Policies are a standard Postgresql feature. It’s used by IHP to tell which user is allowed to see and edit your data.

IHP detected that the
todostable has auser_idcolumn, and used this to auto-suggest the name and the fields of our policy:The
Visible if:field containsuser_id = ihp_user_id(). It tells postgres that atodosrow is only visible to a user ifuser_id = ihp_user_id(). Theihp_user_id()is a database function provided by IHP that returns the user id of the logged in user of the IHP application.The
Additionally, allow INSERT and UPDATE only if:field containsuser_id = ihp_user_id()as well. This is a validation that is run forINSERTandUPDATEqueries. It makes sure that a user can onlyINSERTtodos for himself, and cannot change the user id with anUPDATEquery to move the todo to someone else. -
Click
Create Policyto save the new policy -
Run
Update DBto apply the schema changes to your local dev db.
Fetching Data
-
Now open your local app again and try again to run the following JS snippet in the JS console:
await query('todos').fetch();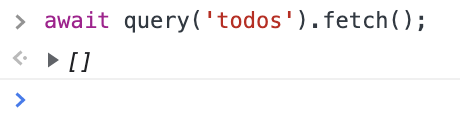
This time it will output an empty array. That makes sense as we don’t have any todos yet.
-
Let’s add our first todo from JS land. Like on the backend side we can use the
createRecordfunction. Type this into the JS console:await createRecord('todos', { title: 'Hello World!', userId: '<PUT YOUR USER ID HERE>' })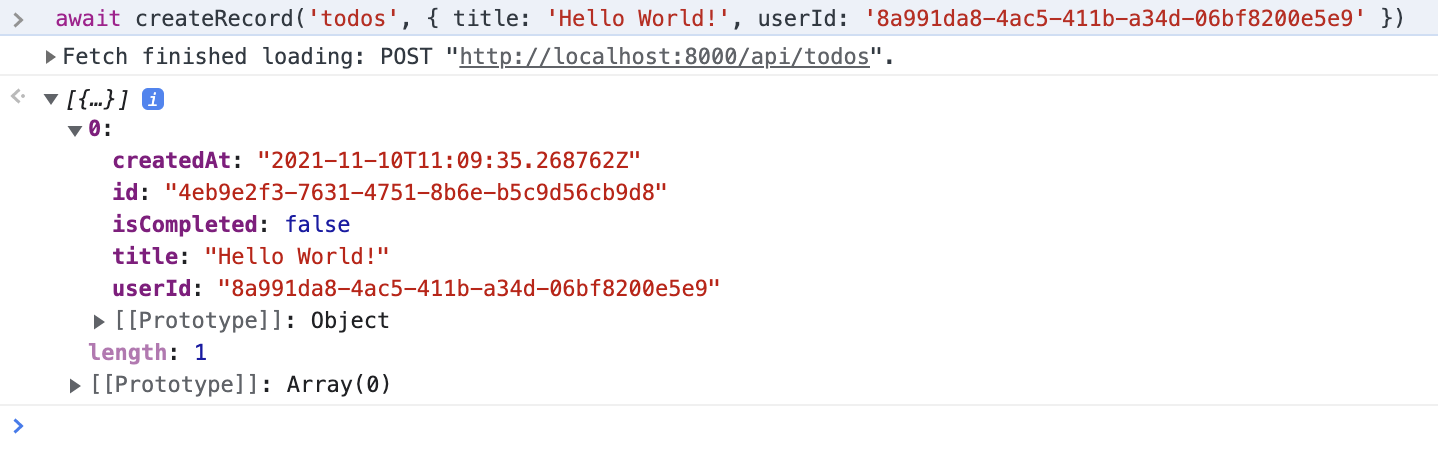
-
Now that we’ve created a todo, let’s try to fetch them again:
await query('todos').fetch();
This returned a list with our todo in there.
Like on the backend we can also use
fetchOnehere to only get returned a singleTodoobject instead of a[Todo]:await query('todos').fetchOne();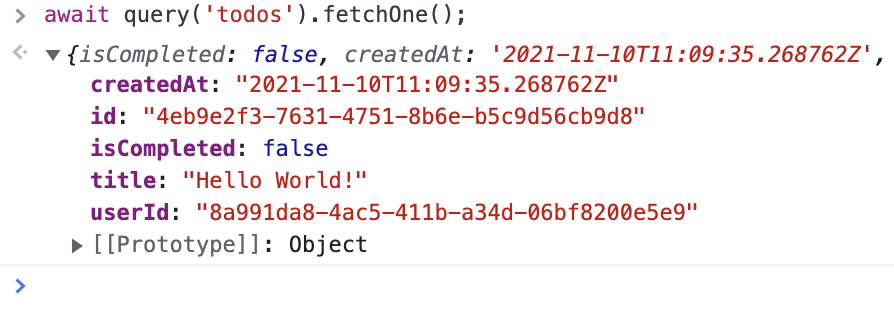
Now you should already have a good feeling for the basics of IHP DataSync. In the next steps we’ll use
createRecord,updateRecordandfetchto make a simple todo manager with react.
Implementing our Todo List
Let’s first display our todo list:
-
Open
Frontend/app.jsxand append this react component beforestartApp:function TodoList() { const todos = useQuery(query('todos')); if (todos === null) { return <div className="spinner-border text-primary" role="status"> <span className="sr-only">Loading...</span> </div>; } return <div> {todos.map(todo => <div>{todo.title}</div>)} </div> } -
Next we want to render our
<TodoList/>in the<HelloWorld>component. For that replace theclass HelloWorldinapp.jsxwith this:function HelloWorld() { return <div> <TodoList/> </div> } -
Open the app in the browser. The first
Hello World!todo we’ve created in the previous step should be visible now: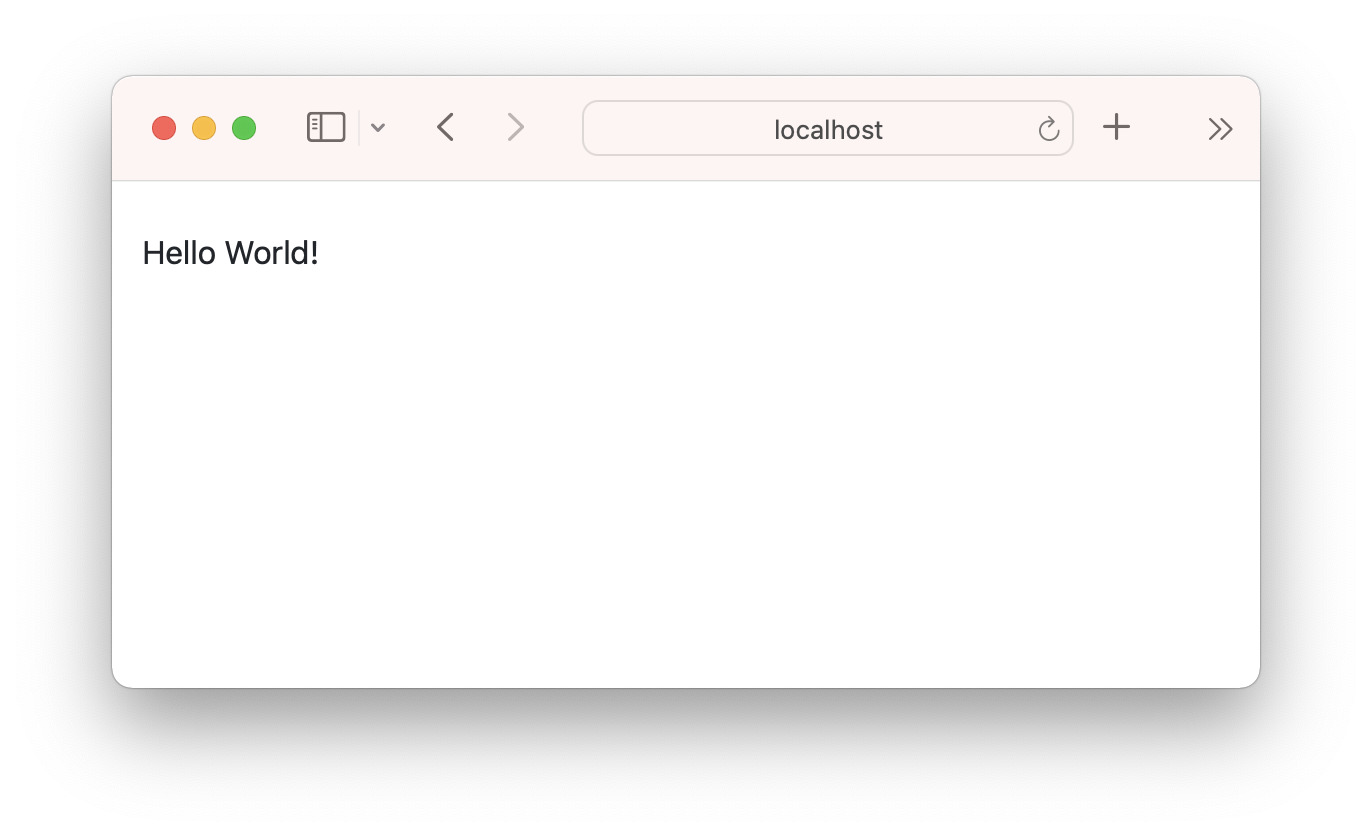
Adding Todos
Next we’re going to add a todo form to create new todos:
-
Add this component to
app.jsx:function NewTodo() { let [title, setTitle] = useState(""); async function handleSubmit(event) { const form = event.target; event.preventDefault(); this.setState({ loading: true }); await createRecord('todos', { title: title, userId: this.props.userId }); this.setState({ loading: false, title: '' }); } return <form onSubmit={this.handleSubmit} disabled={this.state.loading}> <div className="mb-3 d-flex flex-row"> <input type="text" className="form-control" placeholder="New todo" value={this.state.title} onChange={event => this.setState({ title: event.target.value })} disabled={this.state.loading} /> <button type="submit" className="btn btn-primary" disabled={this.state.loading}>Save</button> </div> </form> }This is mostly a conventional react form. The interesting part is inside the
handleSubmit, where we callawait createRecord('todos', { title: title, userId: this.props.users });. -
Change the
HelloWorldcomponent to also display our<NewTodo/>component:function HelloWorld() { return <div> <TodoList/> <NewTodo userId={this.props.userId}/> </div> } -
We also need to pass the
userIdprop to theHelloWorldcomponent. For that we’re going to change thestartApp()function to pass it via a data attribute from the haskell side to our JS frontend.Replace the
startAppinapp.jsxwith this:function startApp() { const appElement = document.getElementById('hello-world'); ReactDOM.render(<HelloWorld userId={appElement.dataset.userId}/>, appElement); }Also open
Welcome.hs(or any other haskell view where you’re rendering the JS app) and add the data attribute for theuserId:instance View WelcomeView where html WelcomeView = [hsx| <div id="hello-world" data-user-id={show currentUser.id} /> |]Now the user id is passed from the
hello-worldreact root to the<HelloWorld/>component, and from there to our<NewTodo/>element. -
Now you should be able to enter a new todo:
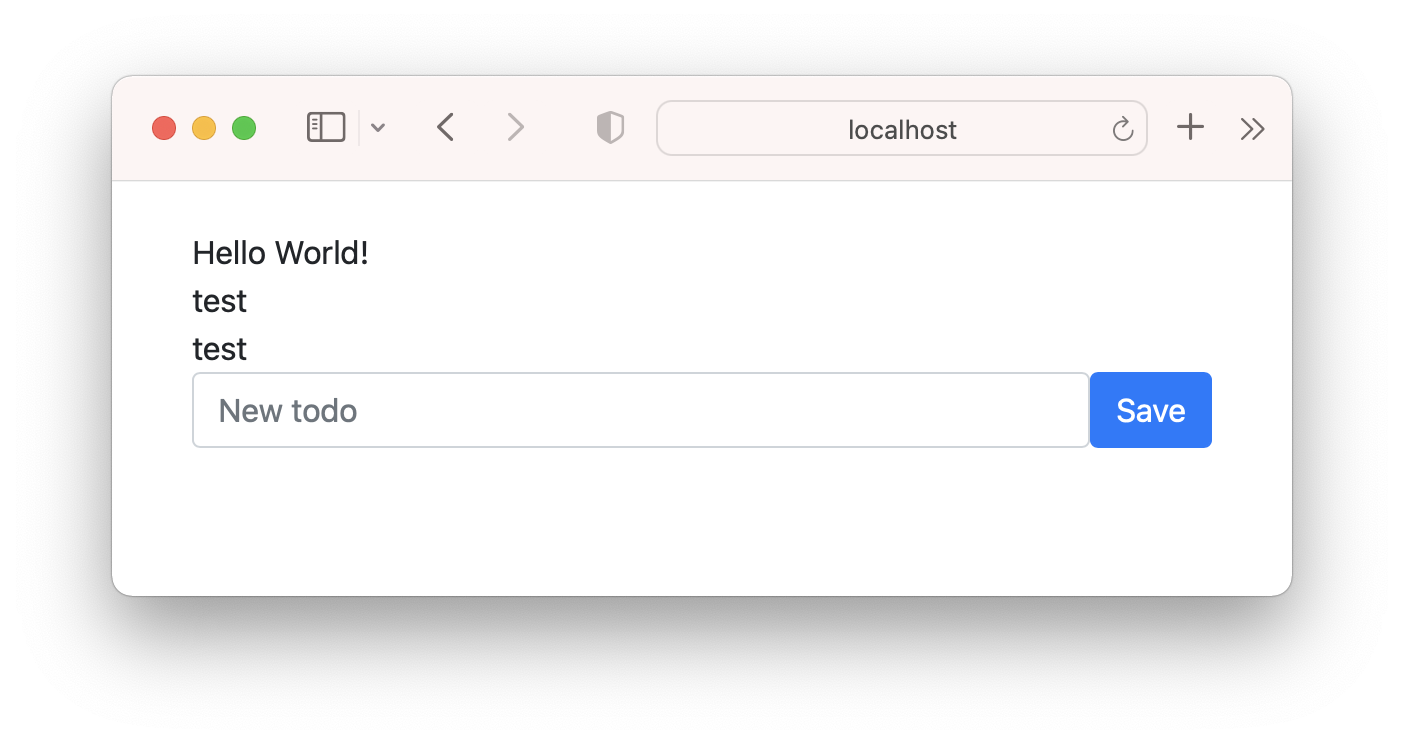
After you click the
Savebutton, you need to manually refresh the page to make the new todo show up inside the<TodoList/>component. In the next section we will make this show up in realtime.
Making the <TodoList/> Realtime
Our todo app is already realtime. Open the app again and enter a new todo. You will now see it showing up instantly. You can also open a second browser window (keep in mind that you need to be logged in), and changes will appear in both windows at the same time.
The useQuery(query('todos')) call in our TodoList has set up a subscription behind the scenes. Whenever the result set of our query('todos') we fired here changes, it will trigger a re-render of our component.
Checking off Todos
Our todo list is a little incomplete without the ability to check things off.
First we need to add a new TodoItem component. For that add this function to the app.jsx:
function TodoItem({ todo }) {
    const todoIdAttr = "todo-" + todo.id;

    return <div className="mb-3 form-check">
        <input
            id={todoIdAttr}
            type="checkbox"
            checked={todo.isCompleted}
            onChange={() => updateRecord('todos', todo.id, { isCompleted: !todo.isCompleted })}
            className="me-2"
        />
        <label className="form-check-label" htmlFor={todoIdAttr}>{todo.title}</label>
    </div>
}
This displays a checkbox next to the todo title. When the checkbox is toggled it will call updateRecord('todos', todo.id, { isCompleted: !todo.isCompleted }). This function is similar to the updateRecord on the Haskell side, but only takes a patch object as a argument.
Now we need to use this new TodoItem component inside our TodoList. Change the render() function of the TodoList to this:
function TodoList() {
    const todos = useQuery(query('todos'));

    if (todos === null) {
        return <div className="spinner-border text-primary" role="status">
            <span className="sr-only">Loading...</span>
        </div>;
    }

    return <div>
        {todos.map(todo => <TodoItem todo={todo} key={todo.id}/>)}
    </div>
}
Open the app again and try to check off a couple of todos.
Deleting Todos
To complete our todo list, we need to add a way to delete todos. For that we’ll add a delete button to our TodoItem:
function TodoItem({ todo }) {
    const todoIdAttr = "todo-" + todo.id;

    return <div className="mb-3 form-check">
        <!-- .. -->

        <button className="btn btn-link text-danger" onClick={() => deleteRecord('todos', todo.id) }>Delete</button>
    </div>
}
Polishing
Our todo list is ready now. To make things look a little nicer you can optionally add this CSS to your static/app.css:
.mb-3 .text-danger {
    opacity: 0;
}

.text-danger {
    margin-left: 1rem;
    transition: all 0.1s;
    font-size: 12px;
}

.mb-3:hover .text-danger {
    opacity: 1;
}

label {
    user-select: none;
}
You have learned the basics of creating, updating and deleting database records while building a realtime app with IHP DataSync.

Common DataSync Operations
The IHP DataSync JS SDK supports the following operations right now:
Retrieving Records
Querying Records
You can retrieve all visible records of a table using query:
const todos = await query('todos').fetch();

for (const todo of todos) {
    console.log(todo.title);
}
This will run a SELECT * FROM todos query and put a list of Todo structures.
Realtime Queries
To keep the result set in sync with the actual database state, use subscribe:
function callback(todos) {
    console.log('todos did change', todos);
}

const todos = await query('todos').subscribe(callback);
The subscribe function is using a websocket to be notified about any changes to the selected data set. It’s using IHP’s DataSubscription API. For more fine grained control you can use the DataSubscription API directly instead of relying on subscribe.
Filtering
Filtering records works similar to normal IHP. Use where to filter by column values:
const todos = await query('todos')
        .where('id', 'd94173ec-1d91-421e-8fdc-20a3161b7802')
        .fetch()

// SQL:
// SELECT * FROM todos
// WHERE id = 'd94173ec-1d91-421e-8fdc-20a3161b7802'
Other Operators
The above syntax is actually a shorthand for:
const todos = await query('todos')
        .where(eq('id', 'd94173ec-1d91-421e-8fdc-20a3161b7802'))
        .fetch()

// SQL:
// SELECT * FROM todos
// WHERE id = 'd94173ec-1d91-421e-8fdc-20a3161b7802'
If you want to use a different operator than =, you can use the following functions:
-
notEqfor<>(shorthandwhereNot) -
lessThanfor<(shorthandwhereLessThan) -
lessThanOrEqualfor<=(shorthandwhereLessThanOrEqual) -
greaterThanfor>(shorthandwhereGreaterThan) -
greaterThanOrEqualfor>=(shorthandwhereGreaterThanOrEqual)
Multiple conditions
You can chain as many conditions as you want - they will be ANDed in the resulting SQL query:
const todos = await query('todos')
        .where('title', 'test')
        .where('id', 'd94173ec-1d91-421e-8fdc-20a3161b7802')
        .fetch()

// SQL:
// SELECT * FROM todos
// WHERE title = 'test'
// AND id = 'd94173ec-1d91-421e-8fdc-20a3161b7802'
You can also use the following syntaxes, which do exactly the same thing:
const todos = await query('todos')
        .where(
            and(
                eq('title', 'test'),
                eq('id', 'd94173ec-1d91-421e-8fdc-20a3161b7802')
            )
        )
        .fetch()

const todos = await query('todos')
        .where(
            and([
                eq('title', 'test'),
                eq('id', 'd94173ec-1d91-421e-8fdc-20a3161b7802'),
            ])
        )
        .fetch()

// NOTE: this form does NOT support columns with the name 'tag'!
const todos = await query('todos')
        .where({
            title: 'test',
            id: 'd94173ec-1d91-421e-8fdc-20a3161b7802'
        })
        .fetch()
Adding alternative conditions using or
You can also combine conditions using or with the .or function, which will take all previous conditions and allow any row to match that fulfills the alternative condition:
// add this import
import { where } from 'ihp-datasync/ihp-querybuilder'

const todos = await query('todos')
        .where('id', 'd94173ec-1d91-421e-8fdc-20a3161b7802')
        .or(where('id', '173ecd94-911d-1e42-dc8f-1b780320a316'))
        .fetch()

// SQL:
// SELECT * FROM todos
// WHERE id = 'd94173ec-1d91-421e-8fdc-20a3161b7802'
// OR id = '173ecd94-911d-1e42-dc8f-1b780320a316'
You can of course chain the conditions inside the .or call as well.
Alternatively, if you use the verbose syntax like .where(eq('title', 'test')), you can wrap multiple conditions using or():
// add this import
import { or } from 'ihp-datasync/ihp-querybuilder'

const todos = await query('todos')
        .where(
            or(
                eq('id', 'd94173ec-1d91-421e-8fdc-20a3161b7802'),
                eq('id', '173ecd94-911d-1e42-dc8f-1b780320a316')
            )
        )
        .fetch()

// SQL:
// SELECT * FROM todos
// WHERE id = 'd94173ec-1d91-421e-8fdc-20a3161b7802'
// OR id = '173ecd94-911d-1e42-dc8f-1b780320a316'
If it’s more convenient, you can also pass an array to the or function, which behaves the same way as multiple arguments.
Adding additional conditions using and
In some cases you might want to add a combination of conditions to a query using and and doing so by chaining would be unclear. In that case, you can use the .and function which functions identically to the .or function, except for of course combining the conditions using AND, not OR.
// add this import
import { where } from 'ihp-datasync/ihp-querybuilder'

const todos = await query('todos')
        .where('userId', '173ecd94-911d-1e42-dc8f-1b780320a316')
        .and(where('title', 'Test').or(where('title', 'test')))

// SQL:
// SELECT * FROM todos
// WHERE user_id = '173ecd94-911d-1e42-dc8f-1b780320a316'
// AND (title = 'Test' OR title = 'test')
Alternatively, if you use the verbose syntax like .where(eq('title', 'test')), you can wrap multiple conditions using and():
// add this import
import { or } from 'ihp-datasync/ihp-querybuilder'

const todos = await query('todos')
        .where(
            and(
                eq('id', 'd94173ec-1d91-421e-8fdc-20a3161b7802'),
                or(
                    eq('title', 'Test'),
                    eq('title', 'test')
                )
            )
        )
        .fetch()

// SQL:
// SELECT * FROM todos
// WHERE user_id = '173ecd94-911d-1e42-dc8f-1b780320a316'
// AND (title = 'Test' OR title = 'test')
If it’s more convenient, you can also pass an array to the and function, which behaves the same way as multiple arguments.
Fetching a single record
When you have the id of a record, you can also use fetchOne to get it from the database:
const todos = await query('todos')
        .where('id', 'd94173ec-1d91-421e-8fdc-20a3161b7802')
        .fetchOne();
This will run the SQL query SELECT * FROM todos WHERE id = 'd94173ec-1d91-421e-8fdc-20a3161b7802' LIMIT 1.
In case the record is not found, fetchOne will return null.
Order
Use orderBy, orderByAsc or orderByDesc to get a sorted result:
const latestTodos = await query('todos')
        .orderByDesc('createdAt')
        .fetchOne();

const oldestTodos = await query('todos')
        .orderBy('createdAt') // 'orderBy' is an alias for 'orderByAsc'
        .fetchOne();
Unique/Distinct
Use distinctOn, to get a unique result:
const userTodos = await query('todos')
        .distinctOn('userId')
        .fetch();
Create Record
To insert a record into the database, call createRecord with a plain javascript object:
createRecord(table, record)

// Example:
const newTodo = {
    title: 'Finish Guide',
    userId: '49946f4d-8a2e-4f18-a399-58e3296ecff5'
}
;
const insertedTodo = await createRecord('todos', newTodo);

console.log('id', insertedTodo.id);
Create Many Record
You can use createRecords to insert multiple records with a single INSERT statement:
createRecords(table, records)

// Example:
const todoA = { title: 'Finish Guide', userId: '49946f4d-8a2e-4f18-a399-58e3296ecff5' };
const todoB = { title: 'Learn Haskell', userId: '49946f4d-8a2e-4f18-a399-58e3296ecff5' };

const todos = await createRecord('todos', [ todoA, todoB ]);
Update Record By ID
The function updateRecord runs an UPDATE query for a specific record:
updateRecord(table, id, patch)

// Example:
const todo = await updateRecord('todos', '66cc037e-5729-435c-b507-a17492fe44f4', { isCompleted: false });
Delete Record By ID
Use deleteRecord to run a simple DELETE query:
deleteRecordById(table, id)

// Example:
await deleteRecord('todos', '66cc037e-5729-435c-b507-a17492fe44f4');
This will execute:
DELETE FROM todos WHERE id = "66cc037e-5729-435c-b507-a17492fe44f4"
Using DataSync library without a bundler
In your Web/View/Layout.hs file, we add an importmap with the rest of the scripts:
<!-- DataSync -->
<script async src="https://cdn.jsdelivr.net/npm/es-module-shims@1.4.1/dist/es-module-shims.min.js"></script>
<script type="importmap">
    {
        "imports": {
            "ihp-datasync/ihp-datasync": "https://cdn.jsdelivr.net/gh/digitallyinduced/ihp@0.17.0/lib/IHP/DataSync/ihp-datasync.min.js",
            "ihp-datasync/ihp-querybuilder": "https://cdn.jsdelivr.net/gh/digitallyinduced/ihp@0.17.0/lib/IHP/DataSync/ihp-querybuilder.min.js"
        }
    }
</script>
The first script is a shim for importmap functionality, and the next script <script type="importmap"> we define a map of how to resolve the ihp-datasync/* imports.
No, add type="module" to your app.js script,
<script type="module" src={assetPath "/app.js"}></script>
Inside the, app.js script, you can now import, ihp-datasync/*:
import {
  DataSyncController,
  DataSubscription,
  createRecord,
  updateRecord,
  deleteRecord,
  createRecords,
} from "ihp-datasync/ihp-datasync";
import {
  QueryBuilder,
  query,
  ihpBackendUrl,
  fetchAuthenticated,
} from "ihp-datasync/ihp-querybuilder";
You are all set!
const articles = await query("articles").fetch();
console.log(articles);
Advanced IHP DataSync
Advanced Policies
SECURITY DEFINER Functions
When you use Row Level Security with IHP DataSync, queries run as the ihp_authenticated role. This role only has limited permissions, so if your RLS policy calls a function that accesses other tables, the policy check may fail with a permission error.
To fix this, mark the function as SECURITY DEFINER. A SECURITY DEFINER function runs with the permissions of the user who created it (typically the table owner) rather than the calling user. This allows the function to access tables that ihp_authenticated cannot.
A common example is a policy that checks whether a user is an admin:
CREATE FUNCTION is_admin() RETURNS BOOLEAN SECURITY DEFINER AS $$
    SELECT EXISTS (SELECT 1 FROM admins WHERE user_id = ihp_user_id())
$$ language sql;

CREATE POLICY "Admins can manage all projects" ON projects USING (is_admin());
Without SECURITY DEFINER, the is_admin() function would fail because ihp_authenticated doesn’t have direct access to the admins table.
You can add SECURITY DEFINER to a function in the Schema Designer by editing the function’s SQL directly, or by writing it in a migration:
CREATE OR REPLACE FUNCTION is_admin() RETURNS BOOLEAN SECURITY DEFINER AS $$
    SELECT EXISTS (SELECT 1 FROM admins WHERE user_id = ihp_user_id())
$$ language sql;
Note: Use SECURITY DEFINER only when needed, as it elevates privileges. Keep the function body minimal and ensure it cannot be exploited to bypass intended access controls.
