Database
- Introduction
- Haskell Bindings
- Retrieving Records
- Raw SQL Queries
- Create
- Update
- Delete
- Enums
- Database Updates
- Making Changes to the Database
- Supported Database Types
- Transactions
- Unique Constraints
- Troubleshooting
Introduction
IHP provides a few basic functions to access the database. On top of Postgres SQL, we try to provide a thin layer to make it easy to do all the common tasks your web application usually does. Haskell data structures and types are generated automatically based on your database schema.
The only supported database platform is Postgres. Focusing on Postgres allows us to better integrate advanced Postgres-specific solutions into your application.
In development, you do not need to set up anything to use Postgres. The built-in development server automatically starts a Postgres instance to work with your application. The built-in development Postgres server is only listening on a Unix socket and is not available via TCP.
Connecting to DB via Terminal
When the development server is running, you can connect to it via postgresql:///app?host=YOUR_PROJECT_DIRECTORY/build/db with your favorite database tool. When inside the project directory you can also use make psql to open a Postgres REPL connected to the development database (named app), or start psql by pointing at the local sockets file psql --host=/PATH/TO/PROJECT/DIRECTORY/build/db app. The web interface of the development server also has a GUI-based database editor (like phpmyadmin) at http://localhost:8001/ShowDatabase.
Connecting to DB via UI
When the development server is running, you can use your favorite UI tool (e.g. TablePlus) that allows connecting to Postgres. To do that you would need the following credentials:
Database Host: This is the application root + “/build/db”. Use this command on terminal from the root of your app and copy the output:
echo `pwd`/build/db
Database username: This is the current user you run the terminal with. Run whoami command to get that name.
Database name: app.
Schema.sql
Once you have created your project, the first step is to define a database schema. The database schema is a SQL file with a lot of CREATE TABLE ... statements. You can find it at Application/Schema.sql.
In a new project, this file will be empty.
If you are using PostgreSQL 18 or newer, you can set the environment variable IHP_POSTGRES_VERSION=18 to use the native uuidv7() function as the default for new tables and jobs instead of uuid_generate_v4(). UUIDv7 provides time-ordered UUIDs that are better for database indexing.
To define your database schema add your CREATE TABLE ... statements to the Schema.sql. For a users table this can look like this:
CREATE TABLE users (
    id UUID DEFAULT uuid_generate_v4() PRIMARY KEY NOT NULL,
    firstname TEXT NOT NULL,
    lastname TEXT NOT NULL
);
Haskell data structures and types are automatically generated from the Schema.sql file. They are re-generated on every file change of the Schema.sql. We use the well-known postgresql-simple Haskell library to connect to the database.
Schema Designer
Because the SQL syntax is sometimes hard to remember, the framework provides a GUI-based database editor called IHP Schema Designer. You can find the Schema Designer at http://localhost:8001/Tables.
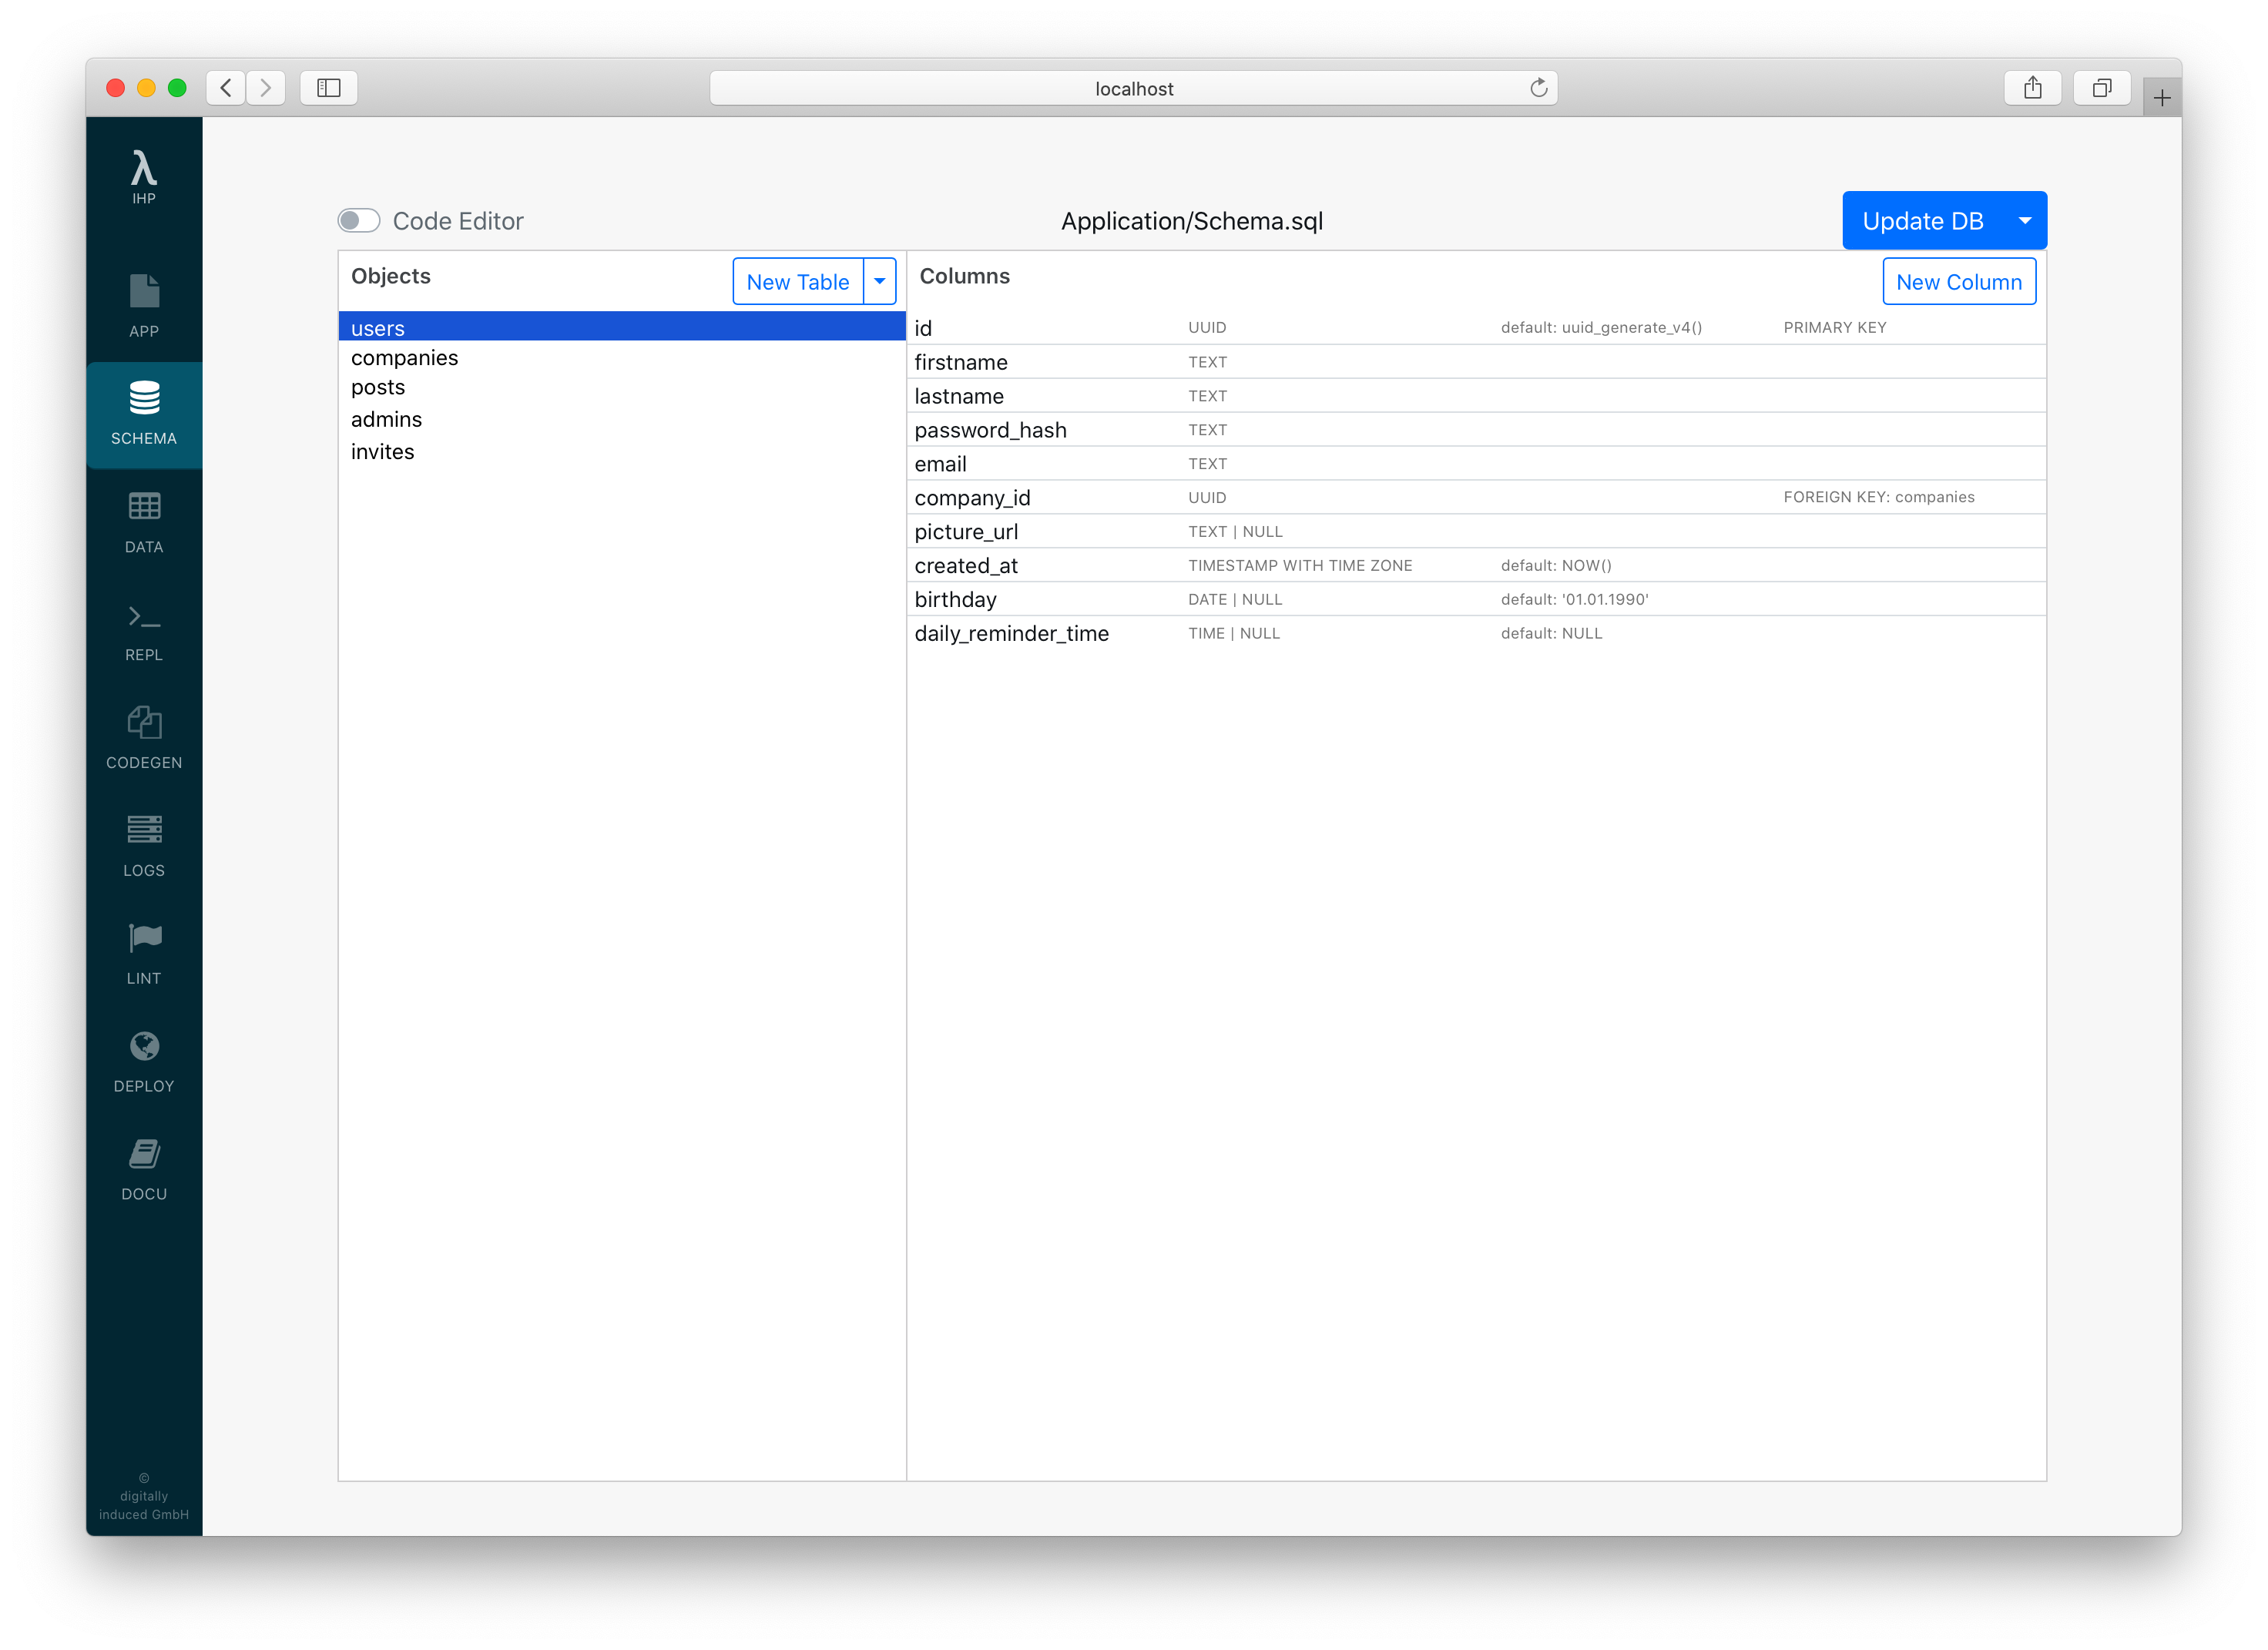
Keep in mind that the Schema Editor also only modifies the Schema.sql. This works by parsing the SQL DDL-statements and applying transformations on the AST, compiling and writing it back to Schema.sql. When there is a syntax error in the Schema.sql file the visual mode will be unavailable and you have to work with the code editor to fix the problem.
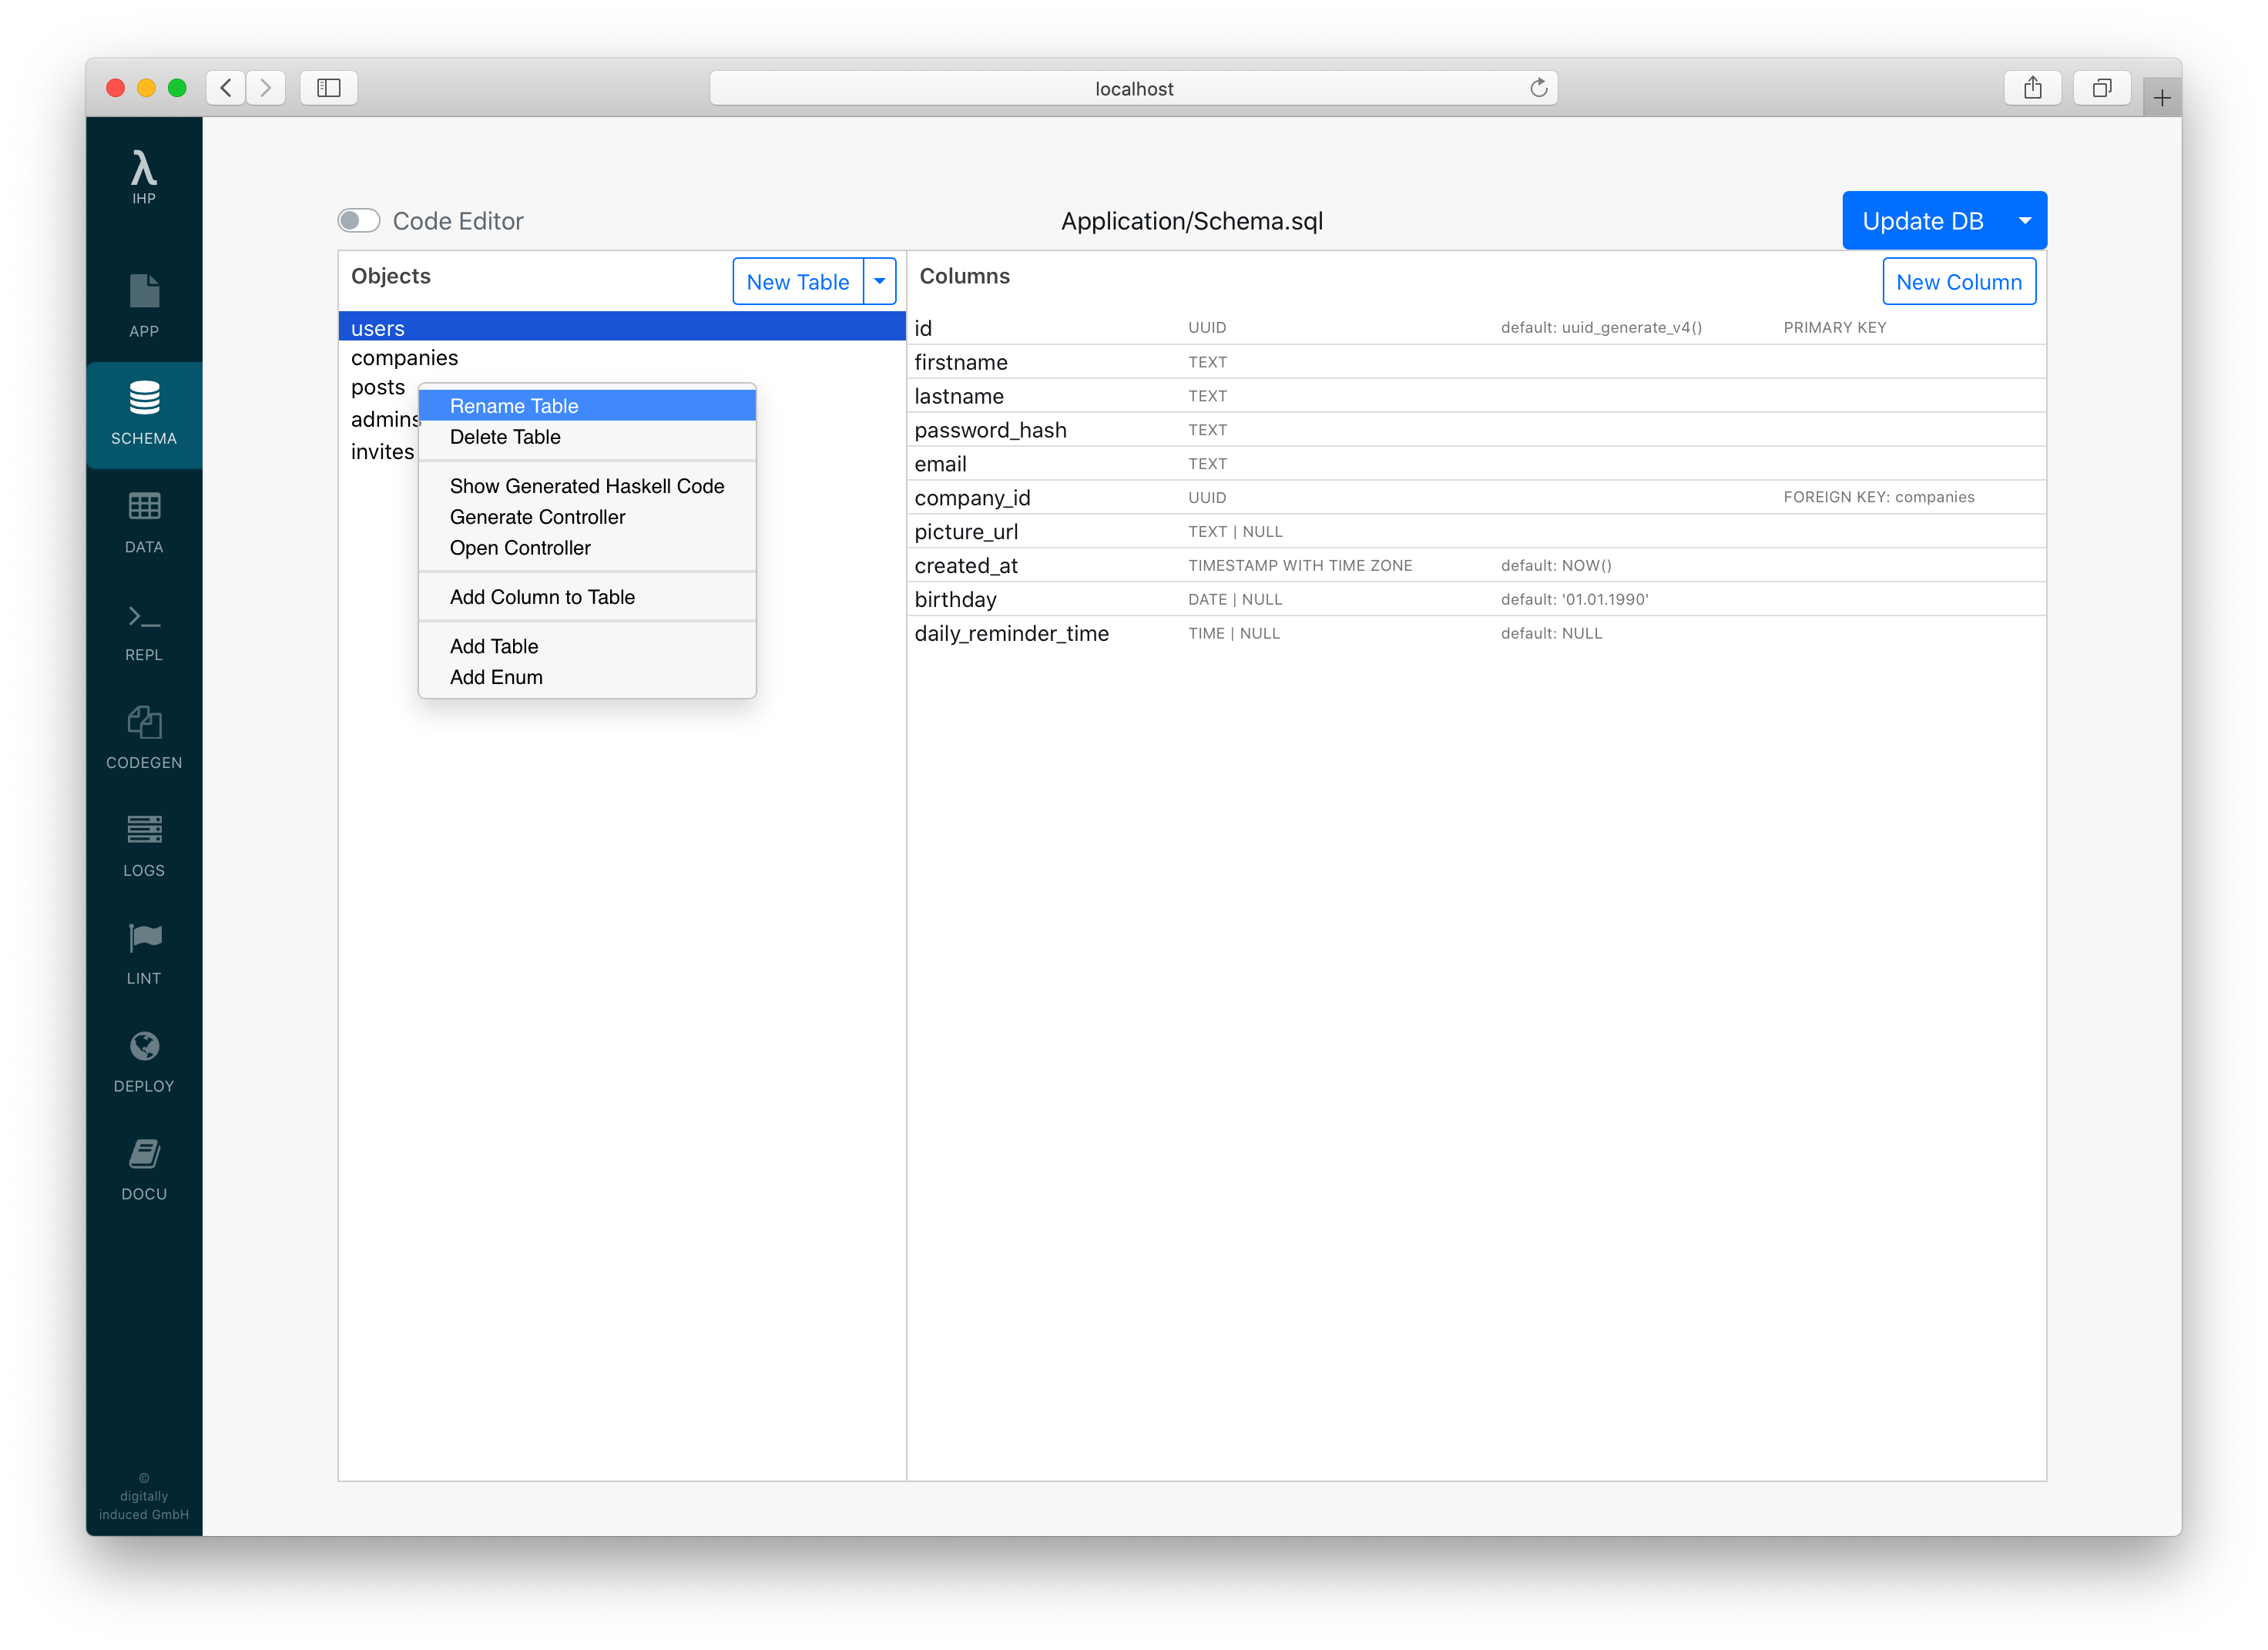
You can add tables, columns, foreign key constraints, and enums. You can also edit these objects by right-clicking them. New tables have an id column by default. Lots of opinionated short-cuts for rapid application development like automatically offering to add foreign key constraints are built-in.
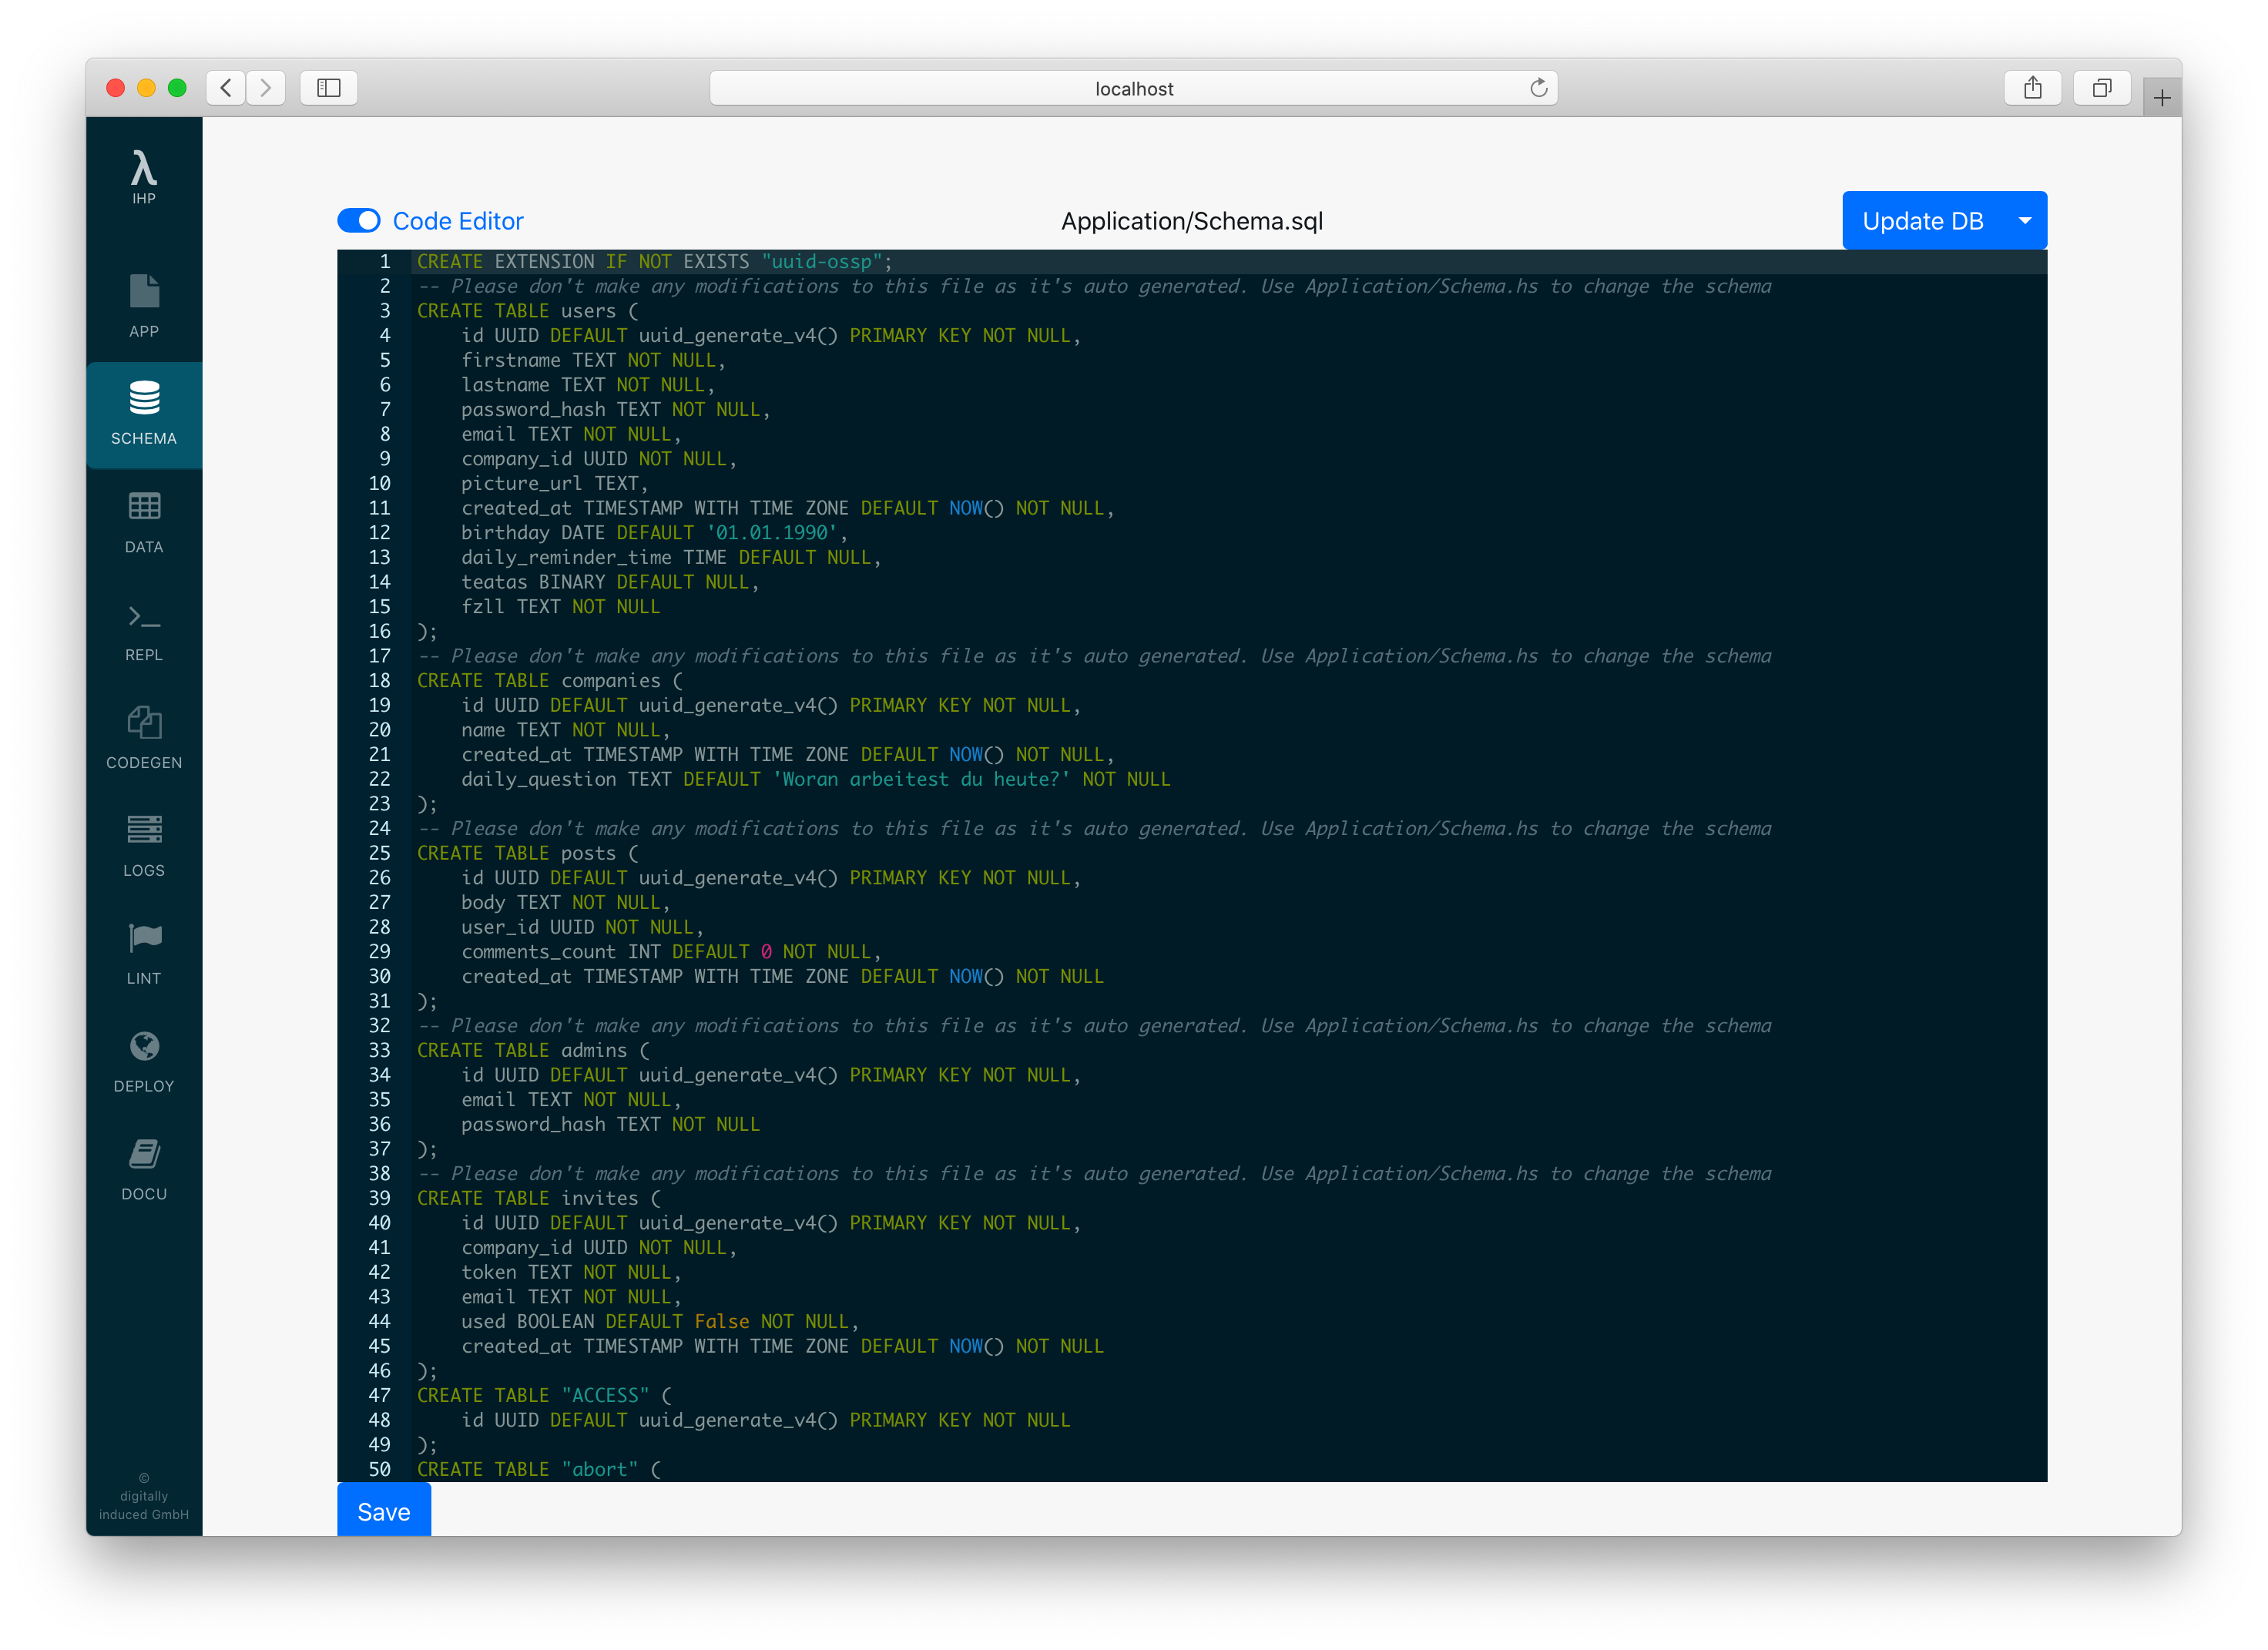
When the Visual Editor is not powerful enough, just switch back to the code editor. For convenience, the Schema Designer also allows you to toggle to the Code Editor inside the web browser:
Push to DB
After we have added a few data structures to our Schema.sql, our running Postgres database is still empty. This is because we still need to import our database schema into the database.
Run make db while the server is running.
This will delete and re-create the current database and import the Schema.sql. After importing the Schema, it will also import the Application/Fixtures.sql which is used for pre-populating the empty database with some data. It’s equivalent to running psql < Schema.sql; psql < Fixtures.sql inside an empty database.
When the development server is started the first time, the Schema.sql and Fixtures.sql are automatically imported.
Fixtures.sql
The Fixtures.sql includes a lot of INSERT INTO statements to pre-fill your database once the schema has been created.
You can manually add INSERT INTO statements to this file. You can also migrate your fixtures by just making the required changes to this SQL file.
You can dump your current database state into the Fixtures.sql by running make dumpdb. This way you can regularly commit the database state to git, so other developers have the same data inside their local development database as you have.
Update DB
You can also update the database while keeping its contents.
In the Schema Designer: Click on Migrate DB:

In the command line: Run make dumpdb and after that make db.
When dumping the database into the Fixtures.sql first and then rebuilding the database with the dump, the contents will be kept when changing the schema.
Transferring/Backing Up DB
To have the full database dumped in a portable manner, you can do make sql_dump > /tmp/my_app.sql, which will generate a full SQL database dump, without owner or ACL information.
Haskell Bindings
Model Context
In a pure functional programming language like Haskell, we need to pass the database connection to all functions which need to access the database. We use an implicit parameter ?modelContext :: ModelContext to pass around the database connection without always specifying it. The ModelContext data structure is basically just a wrapper around the actual database connection.
An implicit parameter is a parameter which is automatically passed to certain functions, it just needs to be available in the current scope.
This means that all functions which are running database queries will need to be called from a function which has this implicit parameter in scope. A function doing something with the database, will always have a type signature specifying that it requires the ?modelContext to be available, like this:
myFunc :: (?modelContext :: ModelContext) => IO SomeResult
All controller actions already have ?modelContext in scope and thus can run database queries. Other application entry-points, like e.g. Scripts, also have this in scope.
This also means, that when a function does not specify that it depends on the database connection in its type signature (like ?modelContext :: ModelContext => ..), you can be sure that it’s not doing any database operations.
Haskell Data Structures
For every table in the Schema.sql a corresponding data structure will be generated on the Haskell side. For example, given a table:
CREATE TABLE users (
    id UUID DEFAULT uuid_generate_v4() PRIMARY KEY NOT NULL,
    firstname TEXT NOT NULL,
    lastname TEXT NOT NULL
);
The generated Haskell data structure for this table will look like this:
data User = User
    { id :: Id User
    , firstname :: Text
    , lastname :: Text
    }
The id field type Id User is basically just a wrapper around UUID for type-safety reasons. All database field names are mapped from under_score to camelCase on the Haskell side.
When a SQL field can be NULL, the Haskell field type will be contained in Maybe.
In the Schema Designer, you can take a look at the generated Haskell code by right-clicking the table and clicking Show Generated Haskell Code.
Retrieving Records
Querying Records
You can retrieve all records of a table using query:
do
    users <- query @User |> fetch
    forEach users \user -> do
        putStrLn user.name
This will run a SELECT * FROM users query and put a list of User structures.
Fetching a single record
When you have the id of a record, you can also use fetch to get it from the database:
do
    let userId :: Id User = ...
    user <- fetch userId
    putStrLn user.name
This will run the SQL query SELECT * FROM users WHERE id = ... LIMIT 1.
fetch knows a single entity will be returned for the id, so instead of a list of users, a single user will be returned. In case the entity is not found, an exception is thrown. Use fetchOrNothing to get Nothing instead of an exception when no result is found
Fetching a list of ids
When have you a list of ids of a single record type, you can also just fetch them:
do
    let userIds :: [Id User] = ...
    users <- fetch userIds
This will run the SQL query SELECT * FROM users WHERE id IN (...). The results in users have type [User].
Fetching a Maybe (Id record)
Sometimes you have an optional id field, like e.g. when having a database schema like this:
CREATE TABLE tasks (
    id UUID DEFAULT uuid_generate_v4() PRIMARY KEY NOT NULL,
    description TEXT,
    assigned_user_id UUID
);
In this case the field assigned_user_id can be null. In our action we want to fetch user when it’s not null, and return Nothing otherwise:
action ShowTask { taskId } = do
    task <- fetch taskId
    assignedUser <- case task.assignedUserId of
            Just userId -> do
                user <- fetch userId
                pure (Just user)
            Nothing -> pure Nothing
This contains a lot of boilerplate for wrapping and unwrapping the Maybe value. Therefore you can just call fetchOneOrNothing directly on the Maybe (Id User) value:
action ShowTask { taskId } = do
    task <- fetch taskId
    assignedUser <- fetchOneOrNothing task.assignedUserId
Fetching n records (LIMIT)
Use limit to query only up to n records from a table:
do
    users <- query @User
        |> orderBy #firstname
        |> limit 10
        |> fetch
This will run a SELECT * FROM users ORDER BY firstname LIMIT 10 query and will return the first 10 users ordered by their firstname.
When you are only interested in the first result you can also use fetchOne as a shortcut for |> limit 1:
do
    firstUser <- query @User
        |> orderBy #firstname
        |> fetchOne
Skipping n records (OFFSET)
Use offset to skip n records from a table:
do
    users <- query @User
        |> orderBy #firstname
        |> offset 10
        |> fetch
This is most often used together with limit to implement paging.
Counting records (COUNT queries)
You can use fetchCount instead of fetch to get the count of records matching the query:
do
    activeUsersCount :: Int <- query @User
        |> filterWhere (#isActive, True)
        |> fetchCount

    -- SELECT COUNT(*) FROM users WHERE is_active = 1
Fetching records as a Vector
Use fetchVector instead of fetch to get results as a Vector instead of a list. This avoids the overhead of building a linked list, which can be beneficial for large result sets:
do
    users <- query @User |> fetchVector

    -- SELECT * FROM users
The returned Vector works with forEach in HSX views just like a list does.
Fetching distinct records
Use distinct to fetch distinct records:
do
    posts <- query @Post
        |> distinct
        |> fetch
Or distinctOn #tableField to fetch distinct records based on the #tableField value:
do
    users <- query @User
        |> distinctOn #fullName
        |> fetch
Raw SQL Queries
The IHP query builder is designed to be able to easily express many basic sql queries. When your application is growing you will typically hit a point where a complex SQL query cannot be easily expressed with the IHP query builder. In that case it’s recommended to use handwritten SQL to access your data.
Recommended: Use the
[typedSql| ... |]quasi quoter fromIHP.TypedSql. It connects to your development database at compile time and infers Haskell types for parameters and results — so mistakes surface as compile errors instead of runtime crashes.sqlQuery,sqlQuerySingleRow,sqlQueryScalar,sqlQueryScalarOrNothing,sqlExec, andsqlExecDiscardResultare deprecated; usetypedSqlwithsqlQueryTyped/sqlExecTyped, or fall back to theunsafeSql*variants when a truly raw query is required.
Typed queries (preferred)
Use typedSql with sqlQueryTyped for any query you can write as a literal. Parameters are interpolated via ${expr} and the result type is inferred from the SELECT list:
import IHP.TypedSql (typedSql, sqlQueryTyped, sqlExecTyped)

do
    result <- sqlQueryTyped [typedSql|
        SELECT id, title, body FROM projects WHERE id = ${id}
    |]

    -- WHERE id IN (...) via an array parameter
    let ids :: [Id Project] = [id]
    inList <- sqlQueryTyped [typedSql|
        SELECT id, title, body FROM projects WHERE id = ANY(${ids})
    |]

    -- Post ids with their comment counts
    commentsCount <- sqlQueryTyped [typedSql|
        SELECT post_id, COUNT(*) FROM comments WHERE post_id = ANY(${postIds}) GROUP BY post_id
    |]
    -- commentsCount :: [(Id Post, Int64)]
For a single value use the same quoter and pick the first row:
do
    [count] <- sqlQueryTyped [typedSql| SELECT COUNT(*) FROM projects |]
    -- count :: Int64
For INSERT/UPDATE/DELETE use sqlExecTyped to get the affected row count:
do
    rowsAffected <- sqlExecTyped [typedSql|
        UPDATE projects SET archived = true WHERE id = ${projectId}
    |]
See the Typed SQL Guide for full details including RETURNING clauses, JOINs with nullable columns, and schema-change safety.
Unsafe raw SQL (escape hatch)
Some queries cannot be expressed with typedSql — for example, queries whose table or column names are computed at runtime, or DDL statements that cannot be described without a dev database. For those, use unsafeSqlQuery and friends:
import qualified Database.PostgreSQL.Simple as PG
import qualified Database.PostgreSQL.Simple.Types as PG

do
    -- Dynamically-chosen table name — typedSql can't describe this
    let table :: Text = "projects"
    result :: [Project] <- unsafeSqlQuery "SELECT * FROM ?" [PG.Identifier table]
If you need to fetch only a single column, type-hint the result with Only:
do
    allProjectUuids :: [Only UUID] <- unsafeSqlQuery "SELECT projects.id FROM projects" ()

    let projectIds =
            allProjectUuids
                |> map (\(Only uuid) -> Id uuid :: Id Project)
The unsafe* family skips compile-time checking; getting a column order or type wrong will fail only at runtime. Prefer typedSql whenever the query shape is known statically.
Scalar Results
Use unsafeSqlQueryScalar when you have a raw query that returns a single value. When possible, prefer sqlQueryTyped with [typedSql| ... |] — it infers the type from the SELECT list automatically.
do
    count :: Int <- unsafeSqlQueryScalar "SELECT COUNT(*) FROM projects" ()

    randomString :: Text <- unsafeSqlQueryScalar "SELECT md5(random()::text)" ()
Dealing With Complex Query Results
With typedSql, complex result shapes are handled automatically — you do not need to define a FromRow instance. Selecting multiple columns returns a tuple or a labeled SqlRow:
import IHP.TypedSql (typedSql, sqlQueryTyped)

fetchPostsWithCommentsCount :: (?modelContext :: ModelContext) => IO [(Id Post, Text, Int64)]
fetchPostsWithCommentsCount = sqlQueryTyped [typedSql|
    SELECT posts.id, posts.title,
        (SELECT COUNT(*) FROM comments WHERE comments.post_id = posts.id) AS comments_count
    FROM posts
|]
If you need a named record type for readability, map over the result:
data PostWithCommentsCount = PostWithCommentsCount
    { id :: Id Post
    , title :: Text
    , commentsCount :: Int64
    }
    deriving (Eq, Show)

fetchPostsWithCommentsCount :: (?modelContext :: ModelContext) => IO [PostWithCommentsCount]
fetchPostsWithCommentsCount = do
    rows <- sqlQueryTyped [typedSql|
        SELECT posts.id, posts.title,
            (SELECT COUNT(*) FROM comments WHERE comments.post_id = posts.id) AS comments_count
        FROM posts
    |]
    pure (map (\(id, title, commentsCount) -> PostWithCommentsCount { id, title, commentsCount }) rows)
If you must use unsafeSqlQuery for a complex result, define a record type and a manual FromRow instance:
module Application.PostsQuery where

import IHP.Prelude
import IHP.ModelSupport
import Database.PostgreSQL.Simple
import Database.PostgreSQL.Simple.FromRow

data PostWithCommentsCount = PostWithCommentsCount
    { id :: Id Post
    , title :: Text
    , commentsCount :: Int
    }
    deriving (Eq, Show)

instance FromRow PostWithCommentsCount where
    fromRow =
        PostWithCommentsCount
            <$> field
            <*> field
            <*> field

fetchPostsWithCommentsCount :: (?modelContext :: ModelContext) => IO [PostWithCommentsCount]
fetchPostsWithCommentsCount = do
    trackTableRead "posts" -- This is needed when using auto refresh, so auto refresh knows that your action is accessing the posts table
    unsafeSqlQuery "SELECT posts.id, posts.title, (SELECT COUNT(*) FROM comments WHERE comments.post_id = posts.id) AS comments_count FROM posts" ()
You can now fetch posts with their comments count like this:
import Application.PostsQuery as PostsQuery

action MyAction = do
    postsWithCommentsCount <- PostsQuery.fetchPostsWithCommentsCount

    render MyView { ..}
Complex Query Results: Real-world Example
Here’s a real world example of dealing with complex query results:
module Application.People.Query (
    fetchActiveWorkers,
    Row (..),
) where

import Application.People.Person (botGoesBy)
import "string-interpolate" Data.String.Interpolate (i)
import Database.PostgreSQL.Simple (Query)
import Database.PostgreSQL.Simple.FromRow (field, fromRow)
import qualified Generated.Types as Types
import IHP.ModelSupport
import IHP.Prelude

data Row = Row
    { id :: !(Id Types.Person)
    , firstName :: !Text
    , lastName :: !Text
    , goesBy :: !Text
    , sendMessageActionState :: !(Maybe Text)
    }
    deriving (Eq, Show)

instance FromRow Row where
    fromRow =
        Row
            <$> field
            <*> field
            <*> field
            <*> field
            <*> field

fetchActiveWorkers :: (?modelContext :: ModelContext) => IO [Row]
fetchActiveWorkers = do
    trackTableRead "people"
    trackTableRead "worker_settings"
    trackTableRead "action_run_states"
    trackTableRead "send_message_actions"
    unsafeSqlQuery query ()

query :: Query
query =
    [i|
        select
            people.id,
            people.first_name,
            people.last_name,
            people.goes_by,
            max(action_run_states.state) send_message_action_state
        from
            people
            inner join
                worker_settings on (worker_settings.person_id = people.id)
            inner join
                phone_contacts on (phone_contacts.person_id = people.id)
            left join
                send_message_actions on (send_message_actions.to_id = phone_contacts.phone_number_id)
            left join
                action_run_states on (
                    action_run_states.id = send_message_actions.action_run_state_id
                    and (action_run_states.state = 'not_started' or action_run_states.state = 'suspended')
                )
        where
            people.goes_by <> '#{botGoesBy}'
            and worker_settings.is_active
        group by
            people.id
        order by
            people.last_name,
            people.first_name;
    |]
Row is the data type used to hold the result of the query. The use of trackTableRead enables the query to play nicely with Auto Refresh.
Create
Creating a single record
To insert a record into the database, call newRecord to get an empty record value:
do
    let user = newRecord @User
    -- user = User { id = 0000-0000-0000-0000, firstname = "", lastname = "" }
The newRecord function does not insert the record, it just returns a new empty data structure we can fill with values and then insert into the database.
We can use set to fill in attributes:
do
    let user = newRecord @User
            |> set #firstname "Max"
            |> set #lastname "Mustermann"

    -- user = User { id = 0000-0000-0000-0000, firstname = "Max", lastname = "Mustermann" }
We use createRecord to insert the above record into the users table:
do
    let user = newRecord @User
            |> set #firstname "Max"
            |> set #lastname "Mustermann"

    -- user = User { id = 0000-0000-0000-0000, firstname = "Max", lastname = "Mustermann" }

    insertedUser <- user |> createRecord
    -- This will run INSERT INTO users (id, firstname, lastname) VALUES (DEFAULT, "Max", "Mustermann");
    -- insertedUser = User { id = cf633b17-c409-4df5-a2fc-8c3b3d6c2ea7, firstname = "Max", lastname = "Mustermann" }
This can also be rewritten in a more compact form:
do
    user <- newRecord @User
            |> set #firstname "Max"
            |> set #lastname "Mustermann"
            |> createRecord
    -- user = User { id = "cf633b17-c409-4df5-a2fc-8c3b3d6c2ea7", firstname = "Max", lastname = "Mustermann" }
Creating many records
You can use createMany to insert multiple records with a single INSERT statement:
do
    let usersToBeInserted [ newRecord @User, newRecord @User, ... ]
    users <- createMany usersToBeInserted
This will run:
INSERT INTO users (id, firstname, lastname)
    VALUES (DEFAULT, "", ""), (DEFAULT, "", "") , (DEFAULT, "", "") ... ;
Update
The function updateRecord runs an UPDATE query for a specific record:
do
    user <- fetch ("cf633b17-c409-4df5-a2fc-8c3b3d6c2ea7" :: Id User)
    user
        |> set #lastname "Tester"
        |> updateRecord
This will set the lastname of user cf633b17-c409-4df5-a2fc-8c3b3d6c2ea7 to Tester and run an UPDATE query to persist that:
UPDATE users SET firstname = firstname, lastname = "Tester" WHERE id = "cf633b17-c409-4df5-a2fc-8c3b3d6c2ea7"
The UPDATE query will only update columns that have been changed using |> set #someField someValue on the record.
Delete
Deleting a single record
Use deleteRecord to run a simple DELETE query:
do
    user <- fetch ("cf633b17-c409-4df5-a2fc-8c3b3d6c2ea7" :: Id User)
    deleteRecord user
This will execute:
DELETE FROM users WHERE id = "cf633b17-c409-4df5-a2fc-8c3b3d6c2ea7"
Deleting a single record by id
If you only know a record’s id, use deleteRecordById to run a simple DELETE query:
do
    let userId = ("cf633b17-c409-4df5-a2fc-8c3b3d6c2ea7" :: Id User)
    deleteRecordBy userId
This will execute:
DELETE FROM users WHERE id = "cf633b17-c409-4df5-a2fc-8c3b3d6c2ea7"
Deleting many records
Use deleteRecords to run a DELETE query for multiple records:
do
    users :: [User] <- ...
    deleteRecords users
This will execute:
DELETE FROM users WHERE id IN (...)
Deleting many records by their ids
If you only know the record ids, use deleteRecordByIds to run a DELETE query for multiple records:
do
    userIds :: [Id User] <- ...
    deleteRecordByIds userIds
This will execute:
DELETE FROM users WHERE id IN (...)
Deleting all records
Use deleteAll to run a DELETE query for all rows in a table:
do
    deleteAll @User
This will execute:
DELETE FROM users
Enums
It’s possible to define and use custom enum types with IHP. An enum can be created using the Schema Designer. The process is pretty much the same as when creating a table.
Adding enums via the Schema Designer
Open the Schema Designer, right-click into the Objects Pane, and then select Add Enum:
You have to give a name to your enum type. The name should be in plural form, like with table names. E.g. we could name our enum colors.
Next, add the enum values by right-clicking into the Values pane and click on Add Value. Here we could add values such as red, blue and yellow.
Adding enums via SQL
Instead of using the Schema Designer, you can also just add the required SQL statement manually into Application/Schema.sql:
CREATE TYPE colors AS ENUM ('blue', 'red', 'yellow');
Using enums in the Haskell Code
The above colors example will allow us to access the enum like this:
let blue :: Colors = Blue
let red :: Colors = Red
let yellow :: Colors = Yellow
You can use the enum as a field type for another record. E.g. we can have posts table and there give each post a color:
CREATE TABLE posts (
    id UUID DEFAULT uuid_generate_v4() PRIMARY KEY NOT NULL,
    body TEXT NOT NULL,
    color colors
);
You can use fill even with custom enums:
    action CreatePostAction = do
        let post = newRecord @Post
        post
            |> fill @["body", "color"]
            |> ifValid \case
                Left post -> render NewView { .. }
                Right post -> do
                    post <- post |> createRecord
                    setSuccessMessage "Post created"
                    redirectTo PostsAction
In your views, use inputValue to get a textual representation for your enum which works with fill:
[hsx|
<input type="text" value="{inputValue" Blue} />
|]
Database Updates
The Update DB operation is three steps:
-
Data is read from the database and stored in
Fixtures.sql -
The database is deleted and the schema in
Schema.sqlcreated -
The data in
Fixtures.sqlis (re-)inserted.
The small arrow on the Update DB button shows a menu where it is possible to just run Save DB to Fixtures (step 1) or Push to DB (steps 2 + 3).
Making Changes to the Database
The main purpose of the below steps are for keeping the data rows from Application/Fixtures.sql between updates. If you are not concerned with keeping these rows when refactoring, feel free to skip this section.
The main reason for the steps outlined below is that changes to the database schema are written to Application/Schema.sql only. The actual database is not altered. This means the actual schema and Schema.sql will be out of sync.
When the schemas are out of sync, the INSERT statements in Fixtures.sql will fail. If this happens, and you attempt to update, the target table will be empty after the update. Try again, and the empty table is read from the database and the data in Fixtures.sql is gone.
If you feel this is all a bit less streamlined compared to the rest of the development experience, you are correct. We will work on improving handling changes to the database.
Adding a Column
Nullable or with Default
This is always OK. The existing rows can be re-inserted from your Fixtures.sql without errors. After another update cycle, Fixtures.sql will also contain the new column.
Non-Nullable or Without Default
It’s best to do this in two steps. First, follow the above. After updating the DB, fill the column with data and remove the nullable or default properties.
Data can be updated by manually editing the table in the data view or by running UPDATE statements in the custom query field below the data view.
Renaming a Column
When you are renaming a column, the development process of using Update DB will not work. This is because Update DB will save the old database state into the Fixtures.sql. There it still references the old column names. It will then fail on the next update.
-
Rename your column
col_atocol_bin the Schema Designer -
Rename the column in the database by executing
ALTER TABLE tablename RENAME COLUMN col_a TO col_bin the custom query field below the data view.
Deleting a Column
Similarly as for renaming, deleting a column currently won’t work automatically either.
- Delete your column in the Schema Designer
-
Delete the column from the database by executing
ALTER TABLE tablename DROP COLUMN colname
Migrations In Production
See the Migrations guide.
Supported Database Types
IHP currently has support for the following Postgres column types:
- UUID
- Text
- VARCHAR(..), CHARACTER VARYING(..)
- TIMESTAMP WITHOUT TIMEZONE, TIMESTAMP
- TIMESTAMP WITH TIMEZONE, TIMESTAMPZ
- BIGINT, INT8
- SMALLINT, INT2
- INTEGER, INT4, INT
- BOOLEAN, BOOL
- REAL, FLOAT4
- DOUBLE PRECISION, FLOAT8
- POINT
- DATE
- BYTEA
- TIME
- NUMERIC, NUMERIC(..)
- CHAR(..), CHARACTER(..)
- SERIAL
- BIGSERIAL
- JSONB
- INET (Only IP addresses, CIDR not supported yet)
- TSVECTOR
- Arrays of all the above types
- Custom types, usually enums
Transactions
You can use the withTransaction function to wrap your database operations in a Postgres database transaction:
withTransaction do
   company <- newRecord @Company |> createRecord

   user <- newRecord @User
       |> set #companyId company.id
       |> createRecord

   company <- company
       |> setJust #ownerId user.id
       |> updateRecord
In this example, when the creation of the User fails, the creation of the company will be rolled back. So that no incomplete data is left in the database when there’s an error.
The withTransaction function will automatically commit after it successfully executed the passed do-block. When any exception is thrown, it will automatically rollback.
It’s good practice to keep your transaction blocks focused on database operations only:
action CreateUserAction = do
    user <- withTransaction do
        newRecord @User |> createRecord

    redirectTo NewSessionAction
Unique Constraints
It’s possible to use the UI to set the unique constraint on a column. However, sometimes you might want to add a unique constraint on multiple columns. This can be done by adding a unique constraint to the Schema.sql file. For example, to add a unique constraint on the email and username columns of the users table, you would add the following to the Schema.sql file:
CREATE TABLE users (
    id UUID DEFAULT uuid_generate_v4() PRIMARY KEY NOT NULL,
    email TEXT NOT NULL,
    username TEXT NOT NULL,
    UNIQUE (email, username)
);
PostgreSQL constraint names have a 63-byte limit.
For a multi-column unique constraint, Postgres auto-generates a name from table + column names.
For strategy_factor_regime_online + (symbol_id, timeframe, ts, version), this becomes a long name (truncated form: strategy_factor_regime_online_symbol_id_timeframe_ts_version_ke) and can trigger noisy migrations like:
ALTER TABLE strategy_factor_regime_online DROP CONSTRAINT strategy_factor_regime_online_symbol_id_timeframe_ts_version_ke;
Solution: use a short explicit constraint name after CREATE TABLE strategy_factor_regime_online:
ALTER TABLE strategy_factor_regime_online
    ADD CONSTRAINT uq_sfr_on_main UNIQUE (symbol_id, timeframe, ts, version);
Alternative: use CREATE UNIQUE INDEX ....
Troubleshooting
“relation does not exist”
QueryError "SELECT ... FROM posts" ... (PGRES_FATAL_ERROR,"ERROR: relation \"posts\" does not exist")
The table has not been created in your database. This usually means you added a table to Application/Schema.sql but have not pushed the schema to the database yet. Run make db while the development server is running to re-create the database from your schema. Also check for typos in the table name.
“column does not exist”
QueryError "SELECT ... " ... (PGRES_FATAL_ERROR,"ERROR: column \"my_column\" does not exist")
Your database schema is out of sync with the generated Haskell types. This happens when you add or rename a column in Schema.sql but the actual database has not been updated. Run make db to re-import the schema into the database, or use Migrate DB from the Schema Designer. If you renamed a column, also run the appropriate ALTER TABLE statement as described in the “Renaming a Column” section above.
Connection Refused
libpq: failed (connection to server on socket ... failed: No such file or directory)
The PostgreSQL database is not running. Make sure the IHP development server is started with devenv up. The built-in development server automatically manages a PostgreSQL instance – it is not available until the dev server is running.
“Couldn’t match type ‘Maybe’” on a Column
Couldn't match type 'Maybe Text' with 'Text'
This happens when a column in your schema is nullable (no NOT NULL constraint) but your code treats it as a non-nullable value, or vice versa. Nullable columns generate Maybe types in Haskell. Either add NOT NULL to the column in Schema.sql if it should never be null, or handle the Maybe in your code:
-- For a nullable column:
case user.bio of
    Just bio -> [hsx|{bio}|]
    Nothing  -> [hsx|No bio provided|]
N+1 Query Issues
If you see many repeated queries in your server log like this:
Query (SELECT * FROM comments WHERE post_id = ?) ...
Query (SELECT * FROM comments WHERE post_id = ?) ...
Query (SELECT * FROM comments WHERE post_id = ?) ...
You have an N+1 query problem. This happens when you fetch a list of records and then individually fetch related records for each one inside a loop. Fix this by using fetch with include to eagerly load the related records in a single query. See the Relationships guide for details on how to use include.
Type Mismatch on Query Results
Couldn't match type 'Post' with '[Post]'
Check whether you are using the right fetch function. fetch on an Id returns a single record, while query @Post |> fetch returns a list [Post]. Use fetchOne if you want a single result from a query, or fetchOrNothing if you want Maybe Post when fetching by id.
